OpenAI Prompt Filtering Integration
As AI interfaces let users interact with systems through chat instead of fixed APIs, requiring dynamic, real-time access control.
Using tools like GPT-4, users can request actions using open-ended language like:
- “What’s the IATA rate for this hotel?”
- “Help me diversify my investment portfolio”
- “Show me my financial data for Q1”
These requests look harmless on the surface, but some should be restricted while others are fine for public users.
The challenge is:
How do you decide which is which and enforce it?
This tutorial demonstrates how to combine OpenAI’s GPT models for intent classification with Permit.io’s ABAC policies for real-time access decisions
You’ll learn how to classify free-form user prompts into structured access control requests and validate them using Permit’s Policy Decision Point (PDP).
What You’ll Build
This Node.js based implementation:
- Classifies user prompts using OpenAI
- Builds structured permission requests with attributes
- Evaluates access in real-time
You’ll apply these techniques to two example domains:
-
Hotel Rate Access Determine if a user can access IATA, premium, or public hotel pricing based on their attributes.
-
Financial Advice Access Control access to AI-generated financial advice by validating user opt-in or advisor role.
This guide uses two of Four Perimeter Model for AI Access Control.
These ensure:
- Only eligible users can interact with your AI agent
- Outputs are policy-compliant before reaching the user
By the end of this guide, you’ll have a fully functioning access control system that dynamically adapts to the user’s intent—no hardcoded rules, or brittle endpoint matching.
Tools & Prerequisites
| Tool / Service | Usage |
|---|---|
| Node.js | JavaScript runtime for executing the app |
| Permit.io | Fine-grained access control and policy management |
| OpenAI API | LLM-powered prompt understanding and classification |
| Docker | For running the Permit PDP locally |
Required Credentials
You’ll need the following secrets set in your environment:
OPENAI_API_KEY=<your_openai_key>
PERMIT_API_KEY=<your_permit_api_key>
PDP_URL=http://localhost:7766  # or your Cloud PDP URL
For a PDP setup guide, see Permit PDP Overview
Your PERMIT_API_KEY is available in the Permit.io dashboard
We recommend creating a .env file in the root of your project for local development:
touch .env
Then populate it:
OPENAI_API_KEY=sk-...
PERMIT_API_KEY=your_permit_key_here
PDP_URL=http://localhost:7766
These values will be automatically loaded using dotenv.
Dependencies
From your project root, install the required packages:
npm install openai permitio dotenv
These libraries power:
- OpenAI prompt classification (
openai) - Permit.io policy evaluation (
permitio) - Environment variable management (
dotenv)
With your project initialized and dependencies installed, you're ready to define your roles, resources, and policies in Permit.io.
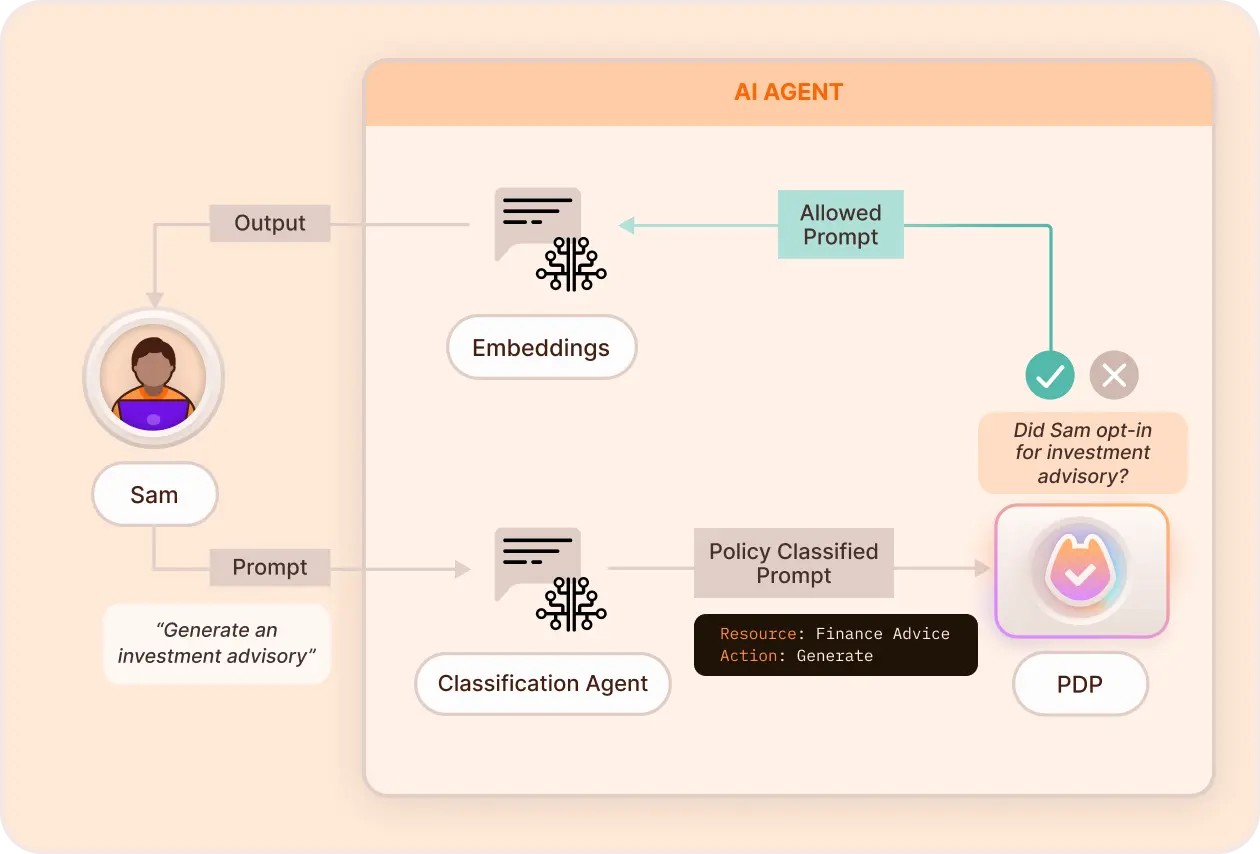
How Prompt Filtering Works
Traditional access control models fall short when building AI-driven applications, especially when users interact via natural language. Prompt filtering bridges the gap between unstructured user input and structured policy enforcement by classifying requests before they’re processed.
Why is AI Classification Important
- Natural Understanding – OpenAI recognizes nuanced requests, even without structured syntax.
- Flexible Format – Users can express their intent naturally, improving UX.
- Zero Hardcoding – Avoids brittle regex or keyword maps.
- Multi-Use – One classifier can handle different domains (e.g. travel, finance).
With that understanding in place, let’s model our resources, roles, and policies in Permit.io.
Defining Policies with Permit.io
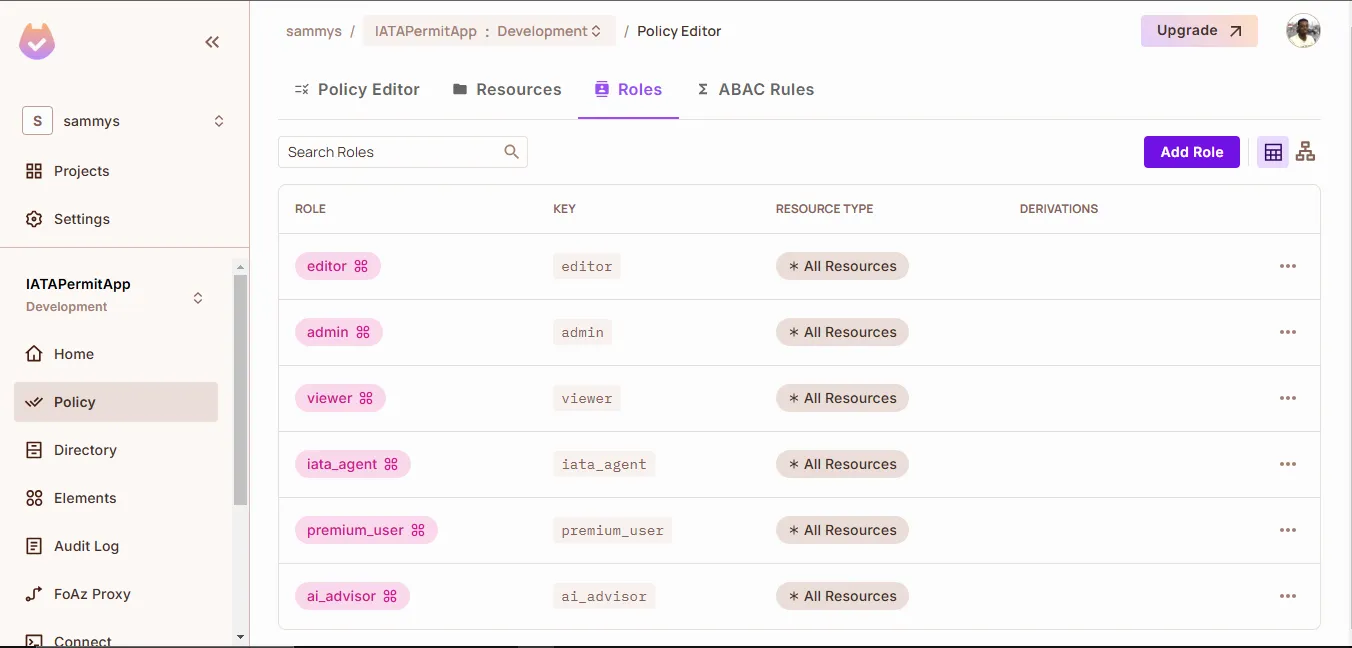
Define User Roles
- Assign your users to roles that reflect what they’re allowed to access:
iata_agent: Can access IATA-specific hotel ratespremium_user: Can access premium hotel ratesai_advisor: Can receive AI-generated financial adviceviewer: Can access public data (default role)
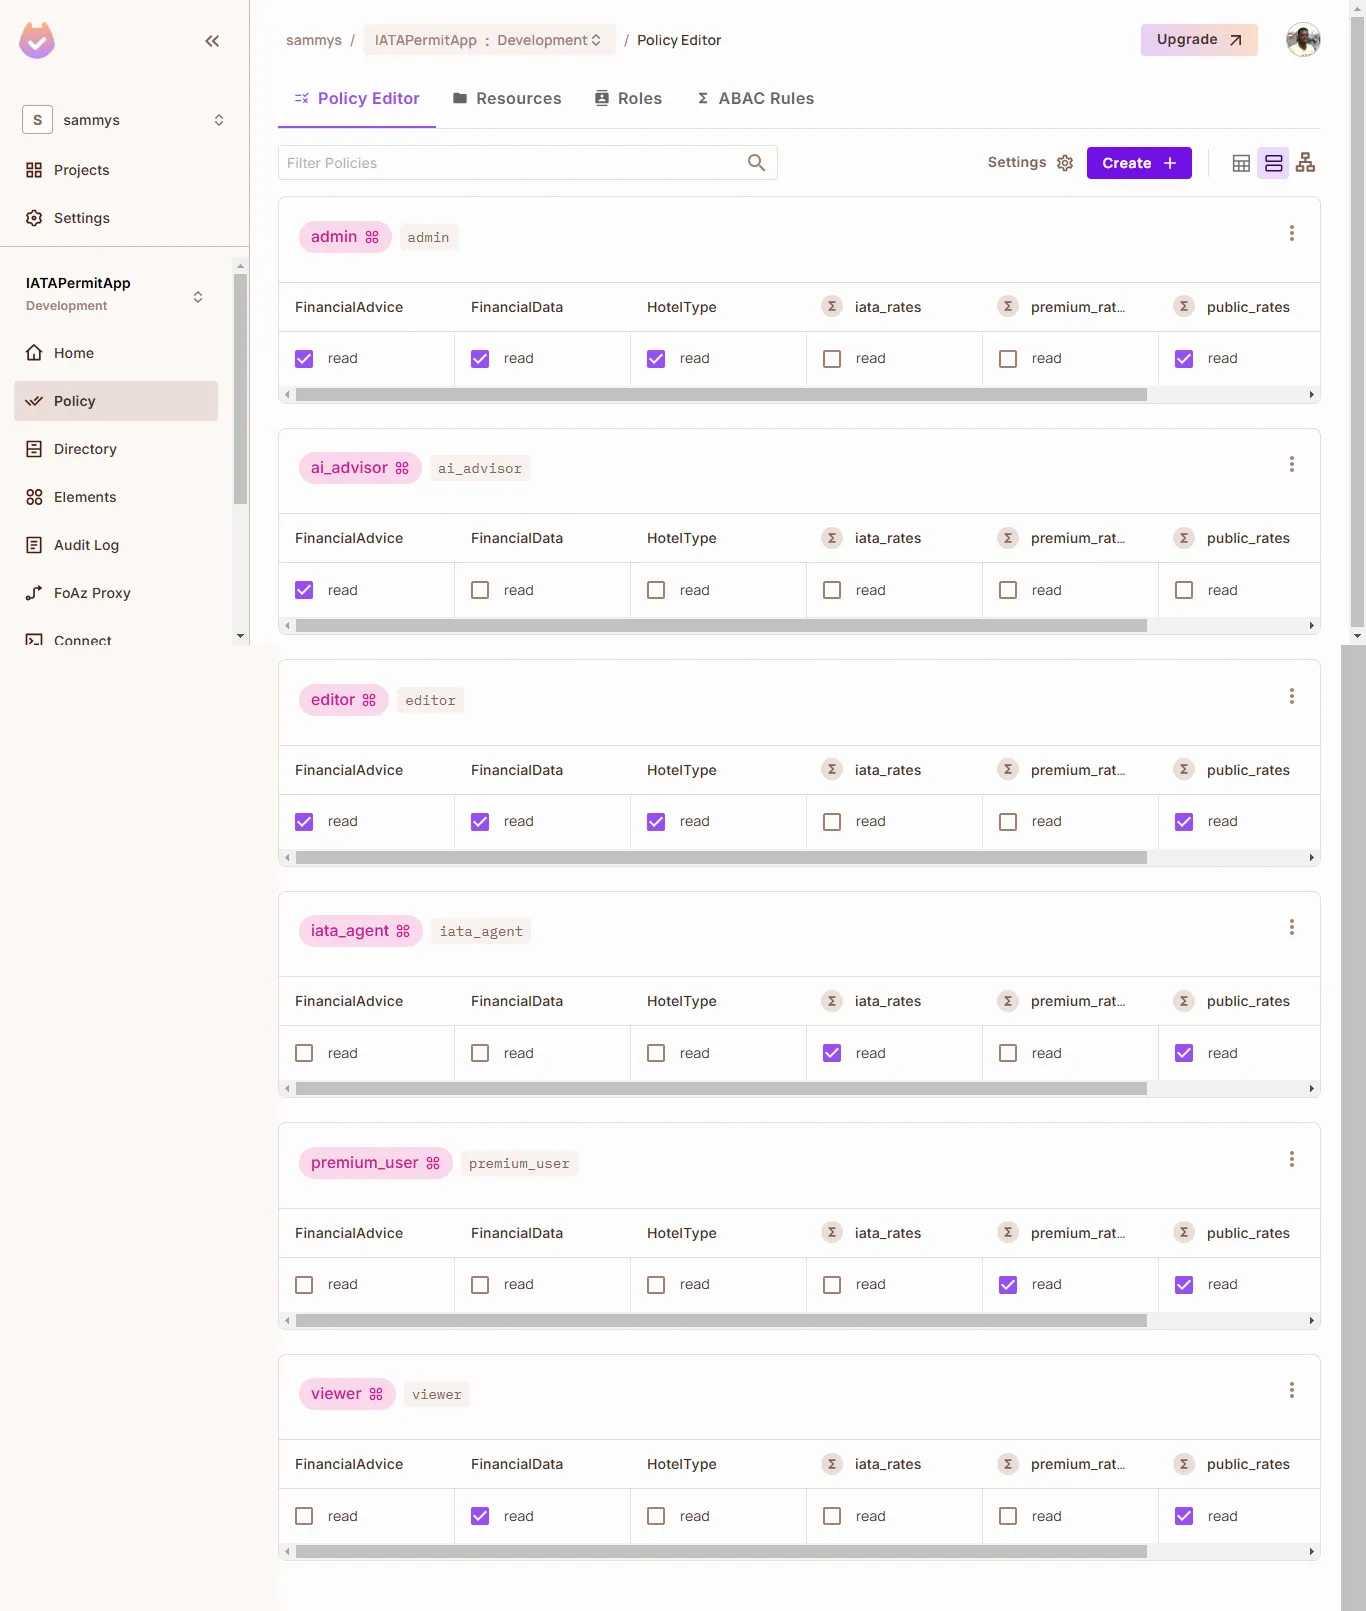
- Go to Directory → Roles and create the above roles as follows:
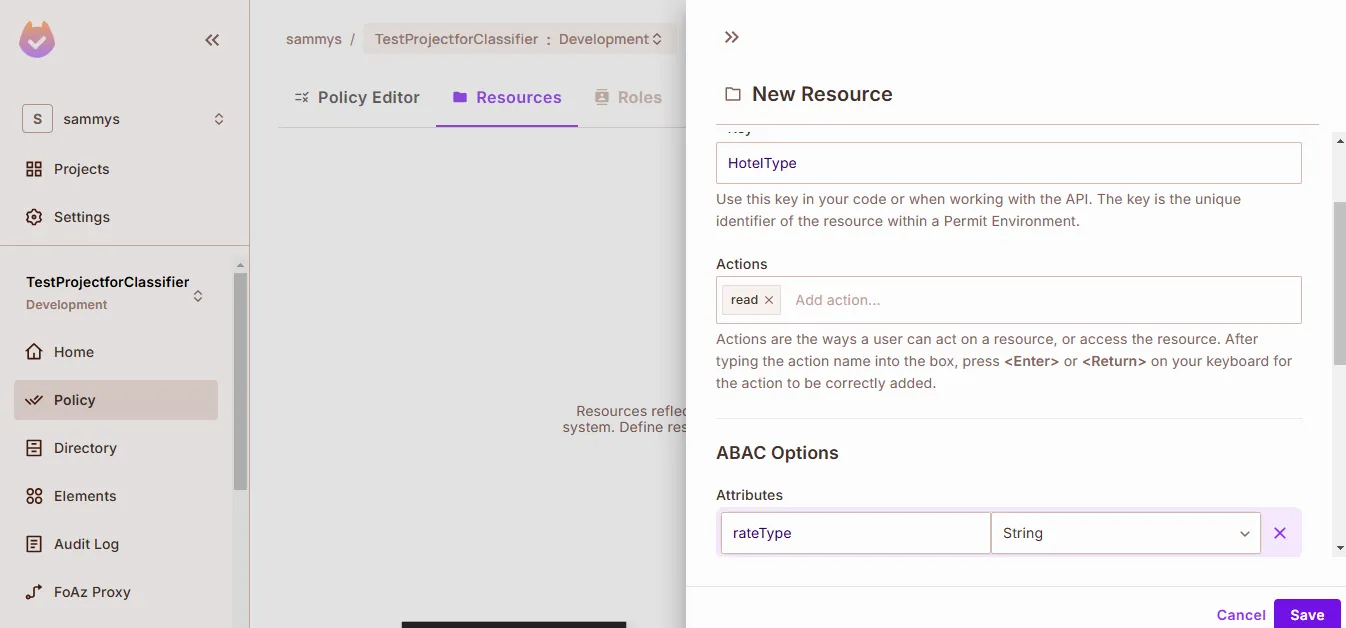
Define Resources
- These resources represent the types of information or functionality you're protecting:
HotelType(attribute:rateType:IATA,premium,public)FinancialData(no attributes required)FinancialAdvice(no attributes required)
- Go to Policy → Resources and define each resource type along with any relevant attributes.

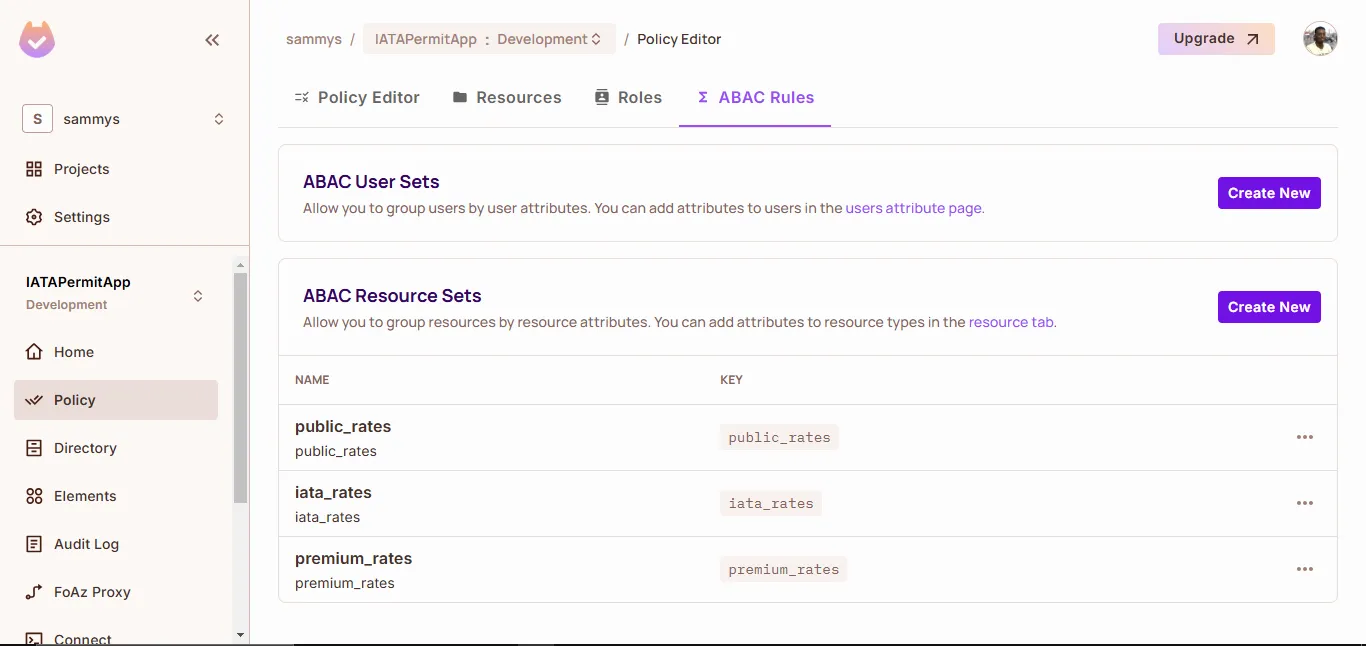
Group Resources into Sets
- Use resource sets to group resources by attributes:
iata_rates:HotelTypewhererateType == "IATA"premium_rates:HotelTypewhererateType == "premium"public_rates:HotelTypewhererateType == "public"
- No condition is needed for
FinancialAdviceorFinancialData— these are directly referenced in policy rules. - You can set these up via Policy → ABAC → Resource Sets.
Define Permission Rules
- Link user roles to the resource sets and actions:
viewer:public_rates,FinancialDatapremium_user:premium_rates,public_ratesiata_agent:iata_rates,public_ratesai_advisor:FinancialAdvice
- Set these up using the Policy Matrix or Rules Editor.
Running the PDP
Pull the Permit.io PDP Docker Image
Make sure Docker is installed, and pull the Permit.io PDP image:
docker pull permitio/pdp-v2:latest
Run the PDP Container
docker run -it -p 7766:7000 \
  --env PDP_DEBUG=True \
  --env PDP_API_KEY=<YOUR_API_KEY> \
  permitio/pdp-v2:latest
Connect Your Application to the PDP
In your Node.js app, connect to the local PDP:
const permit = new Permit({
  token: process.env.PERMIT_API_KEY,
  pdp: process.env.PDP_URL
});
Verify the Connection
Check if the container is running:
docker ps
Look for PDP logs:
docker logs <container_id>
While Permit.io offers a Cloud PDP, we're using the Container PDP because:
- It supports our role-based permissions
- It provides faster response times for local development
- It allows offline development and testing
With the PDP running, your application can now make real-time permission checks against the policies we configured earlier.
Implementing the OpenAI-Powered Classifier
Now that we've set up roles and policies in Permit.io, we can focus on how user prompts are dynamically classified and translated into structured access requests using OpenAI.
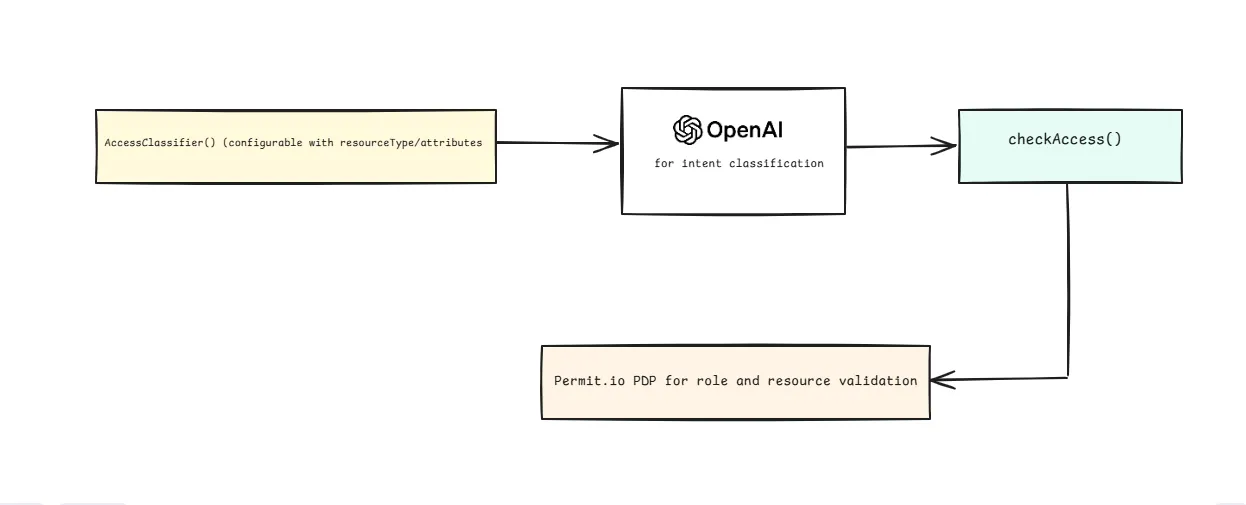
This section walks through the logic behind the AccessClassifier, how it connects with Permit.io, and how it handles real-world access requests.
Classifier Core Responsibilities:
- Understand natural language requests (e.g., “What’s the price of Hilton Budapest?”)
- Infer the intent and attributes (e.g.,
resourceType: HotelType,rateType: public) - Return a structured request object for Permit to evaluate access
Classifier Setup
The AccessClassifier class is built around OpenAI’s GPT-4 API.
The classifier, designed for high adaptability, allows for the configuration of specific resource types or attributes, ensuring the system interprets a wide range of requests.
const classifier = new AccessClassifier(resourceType, attributes);

// The system adapts based on what you pass:
classifier('HotelType', ['rateType']) // For hotel rate requests
classifier('FinancialAdvice') // For financial requests
classifier(null, ['sensitivity']) // For generic attribute checking
The key to this flexibility is the system's prompt engineering. The prompts guide the classifier in interpreting user queries accurately and mapping them to the correct resource types and attributes.
Here’s a simplified outline of its structure:
class AccessClassifier {
    constructor(resourceType = null, attributes = []) {
        this.openai = new OpenAI({
            apiKey: process.env.OPENAI_API_KEY
        });

        this.resourceType = resourceType;
        this.attributes = attributes;
        this.systemPrompt = this.buildSystemPrompt();
    }

    buildSystemPrompt() {
        // Base prompt explaining the classifier's job
        let prompt = `You are a request classifier that understands user intent.
Your job is to analyze requests and determine:
1. The type of resource being requested
2. Any relevant attributes of that resource
3. The intent behind the request (data access vs advisory)

Output format:
{
    "resourceType": "determined from context",
    "resourceKey": "specific identifier",
    "attributes": "relevant attributes if any",
    "action": "usually read"
}`;

        // Add configuration-specific instructions
        if (this.resourceType) {
            prompt += `\n\nClassify requests specifically for: ${this.resourceType}`;
        }

        if (this.attributes.length) {
            prompt += `\n\nLook for these attributes: ${this.attributes.join(', ')}`;
        }

        // Examples showing the classifier's flexibility
        prompt += `\n\nExample classifications:
[Request]: "Show me the data"
[Output]: {
    "resourceType": "determined by context",
    "resourceKey": "data",
    "attributes": {},
    "action": "read"
}

[Request]: "I need access to X with Y permission"
[Output]: {
    "resourceType": "X",
    "resourceKey": "identifier",
    "attributes": {"permission": "Y"},
    "action": "read"
}`;

        return prompt;
    }
}
Here is an example of the classifier's configurability and output:
// The classifier adapts based on configuration
const classifier = new AccessClassifier(resourceType, attributes);

// Example usage with output
const result = await classifier.classify("What's the price for Hilton?");
// Returns structured data for permission check:
{
    resourceType: "HotelType",
    resourceKey: "hilton",
    attributes: {
        rateType: "public"  // Inferred from context
    },
    action: "read"
}
Permission Check Implementation
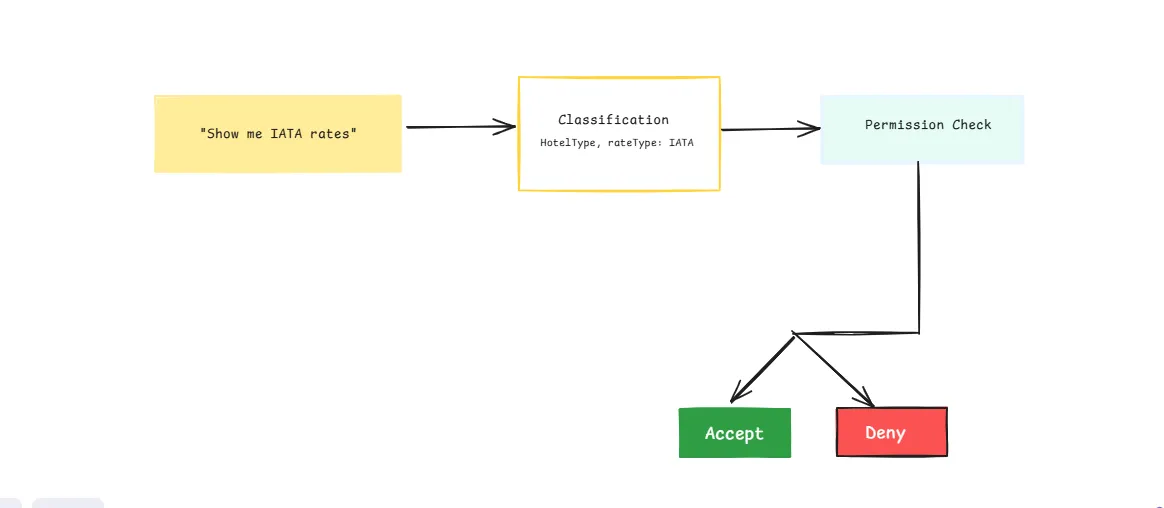
Once a request has been classified into structured attributes and resource types (as shown in the diagram), the next step is to determine whether the user is authorized to perform the requested action.
This section explains how the checkAccess function ties everything together—taking a user’s intent and enforcing policies based on roles and attributes.
Let's see how our system processes requests:
// First, create our domain-specific classifiers
const hotelClassifier = new AccessClassifier('HotelType', ['rateType']);
const financeClassifier = new AccessClassifier('FinancialAdvice');

// Example requests
const request = "Show me my current portfolio value";
const classification = await financeClassifier.classify(request);
const allowed = await checkAccess('regular_user_1', classification);
The checkAccess Function
The checkAccess function takes a user ID and the classified request, constructs a resource object that Permit.io can understand, and evaluates permissions based on both roles and resource attributes.
When access is denied, it provides context-specific feedback about why the request failed.
Here's the implementation:
async function checkAccess(userId, parsedRequest) {
  try {
    console.log('\n🔒 Checking Permission:');
    console.log(`👤 User: ${userId}`);
    console.log(`📑 Resource Type: ${parsedRequest.resourceType}`);
    console.log(`🎯 Action: ${parsedRequest.action}`);

    let resource = {
      type: parsedRequest.resourceType,
      key: parsedRequest.resourceKey
    };

    // Add attributes only if they exist
    if (Object.keys(parsedRequest.attributes || {}).length > 0) {
      resource.attributes = parsedRequest.attributes;
      console.log('📋 Attributes:', parsedRequest.attributes);
    }

    try {
      const permitted = await permit.check(
        userId,
        parsedRequest.action,
        resource
      );

      if (permitted) {
        console.log('✅ Access Granted');
      } else {
        // Log specific denial reason
        if (parsedRequest.resourceType === 'HotelType') {
          console.log('❌ Access Denied - Insufficient rate type permissions');
        } else if (parsedRequest.resourceType === 'FinancialAdvice') {
          console.log('❌ Access Denied - User not authorized for financial advice');
        } else {
          console.log('❌ Access Denied - Insufficient permissions');
        }
      }

      return permitted;
    } catch (checkError) {
      if (checkError.message.includes('role')) {
        console.error('❌ Role-based permission check failed:', checkError.message);
      } else if (checkError.message.includes('attribute')) {
        console.error('❌ Attribute-based permission check failed:', checkError.message);
      } else {
        console.error('❌ Permission check failed:', checkError.message);
      }
      throw checkError;
    }
  } catch (err) {
    console.error("❌ Permission check failed:", err);
    throw err;
  }
}
Testing the System
Now that we have the classifier and permission system set up, let's see it in action. We'll test different types of requests to demonstrate how the system:
Example: Classifying and Enforcing Access
const hotelClassifier = new AccessClassifier("HotelType", ["rateType"]);
const request = "Show me the premium rate for Hilton";

const classification = await hotelClassifier.classify(request);
const allowed = await checkAccess("premium_user_001", classification);
If the user is not in the premium_user role, the access will be denied with a specific reason.
Example: Financial Advice Check
const financeClassifier = new AccessClassifier("FinancialAdvice");
const adviceRequest = "How should I diversify my investments?";

const classification = await financeClassifier.classify(adviceRequest);
const allowed = await checkAccess("regular_user_2", classification);
If the user lacks the ai_advisor or opted_in flag, the system returns an access denial message tailored to the resource type.
Logs & Observability
During testing and production, Permit.io’s audit logs show each access request in real time, including:
- Allow or Deny outcomes
- Evaluated roles and attributes
- Matched conditions and resource sets
These logs are accessible from the Permit.io dashboard and are especially useful for debugging policy issues and compliance reviews.
Final Thoughts & Resources
This guide demonstrated how to combine OpenAI’s natural language understanding with Permit.io’s attribute-based access control to create a dynamic and flexible access control system. Instead of hardcoding permission paths, we used AI to interpret user intent and evaluated permissions based on structured policies.
- Classifies user prompts intelligently using OpenAI’s GPT models
- Enforces real-time access control using Permit.io’s PDP and ABAC policies
- Handles ambiguous or implicit requests gracefully
- Supports multiple access types (e.g. hotel rates, financial advice)
Further Resources
- Blog: AI Prompt Classification for Access Control
- GitHub: Full Example Repo
- Got Questions? Join the Permit.io Slack Community