Sync Users
This section aims to explain how new users are created within Permit. In short, Users can be added and managed via the User Management screen, by using the supported SDKs, or via the API.
Before we dive in, let's first understand the difference between Users and Members
Users vs. Members
When using Permit, it is crucial to distinguish between two important categories: Users and Members. Understanding this difference will help you map and properly implement your authorization layer.
Users
The term Users refers to the end users of your application. These are the entities (Humans or automated entities) whose access you want to control.
Each user has an identity that can be authenticated and authorized to access certain resources. Users are assigned to tenants (each user can belong to more than one tenant) and can then be assigned roles and permissions.
The User Management Element allows you to create an embeddable UI for user management. Through this UI, users can manage their own access (With pre-defined limitations) as well as invite other users and assign various roles.
We do plan to release a Policy Editor Element, which will allow users to define their own policies within safe limits. That being said, you can still produce such interfaces on your own for end-users via using the Permit API - and even govern access to these interfaces with Permit itself (for example, in a separate environment).
Members
The term Members refers to your team members - the people who work alongside you within the Permit app. Members are governed by Permit's own access control (Authorization for Authorization).
By default, only members get access to Permit and can author/edit policies.
When to sync your users?
The recommended point for syncing users into Permit is as part of the sign-in/sign-up process or, in other words, as soon as the authentication solution verifies their identity. This is also the point at which you should translate a user's organizational role (i.e., Head of Marketing / customer / Consultant / Patient) and any other JWT claims about the identity into application level roles, attributes, and relationships.
Syncing users into Permit
Now that we have a clear understanding of the difference between Users and Members, let's talk about adding new users to Permit. There are three primary ways of doing so:
The User Management screen, the syncUser function in our SDKs, and the API.
Via the User Management screen
-
In Permit, navigate to the User Management screen via the navigation bar.
-
In the top right corner, click on
 note
noteThe new user will be created in the currently selected tenant. Each tenant is a separate, isolated unit with its own set of users, data, configurations, and permissions. If you are using multiple tenants, make sure to select the relevant one.
-
Fill out the "Create a new user" form
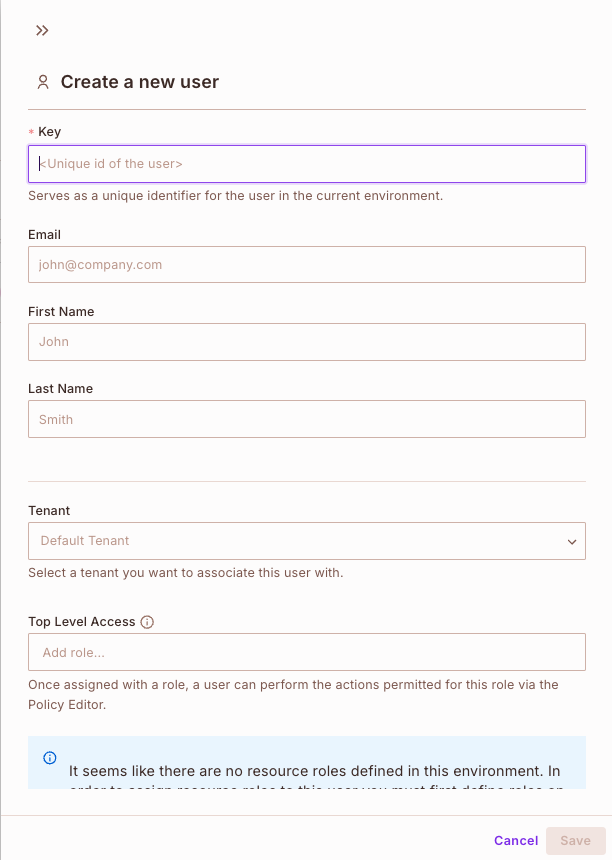
This form consists of:
-
Key: A unique identifier that will distinguish your user from others. When using authentication solutions, this will usually be the user's UUID.
-
Personal Info: The email, first and last name are used to easily identify the user within Permit's UI. You can also leave these fields blank.
-
Role Based Permissions: If you have already defined Roles that your user can be assigned, you can assign the new user with the relevant roles here.
-
Permissions on Related Resources (ReBAC): This section allows you to assign the newly created user with an instance role for creating ReBAC policies. Read more about creating ReBAC policies here.
- Once you're done, click "Save". That's it! The newly created user will now appear in the User Management screen.
Via the SDKs
Generally, creating users via the SDK requires using a single function - syncUser.
(Note that the function syntax varies based on the SDK language)
The syncUser function should be used for initial user creation. If you are creating a user from scratch or importing one from your authentication solution, this is the function you need to use.
Once the user has been synced with Permit, you should not use this SDK call to update the user's role. Instead, you should use the assign.role function.
It is important to note the difference between the syncUser vs. createUser functions. While createUser allows us to create a new user, this newly created user will have no role assigned to them.
Once assigned a role, a user can perform actions that are permitted for that role.
By default, we will want to associate any newly created user with a specific role (Otherwise, they won't be able to perform any actions).
The createUser function is intended for specific use cases where we want to create a new user without role assignment.
Usually, your existing users, as well as new ones, will originate in your authentication solution.
We integrate with any authentication solution and provide the syncUser function for all of our SDKs.
A detailed explanation of how to use the syncUser function with each of our SDKs is available here. The syncUser function will consist of:
Parameters
user - An object that contains the information about the user.
A Payload
key - A unique ID by which Permit will identify the user for permission checks.
You will later pass this ID to the permit.check() API. You can use anything for this ID - the user email,
a UUID, or anything else as long as it's unique on your end. The user key must be url-friendly (slugified).
email (Optional) - The email of the user. If synced, it will be unique inside the environment.
first_name (Optional) - First name of the user.
last_name (Optional) - Last name of the user.
attributes (Optional) - User attributes are used to enforce attribute-based access control policies. You can read more about
how to define these attributes here.
Here's an example of the syncUser as defined for the NodeJS SDK:
{
    key: "key",

    email: "email@example.com",

    first_name: "John",

    last_name: "Smith",

    attributes: {}
}
The final implementation depends on the language of the SDK.
Via the API
Creating users via the API requires us to perform a Create User call. To make this call, we must first define two Path Parameters:
-
proj_id- string (Proj Id) Either the unique ID of the project or the URL-friendly key of the project (i.e: the "slug"). -
env_id- string (Env Id) Either the unique ID of the environment or the URL-friendly key of the environment (i.e: the "slug").
The rest of the schema for the call consists of the following parameters:
-
keystring (Key) ^[A-Za-z0-9|@+-._]+$ A unique ID by which Permit will identify the user for permission checks. -
email(Optional) string (Email) The email of the user. If synced, it will be unique inside the environment. -
first_name(Optional) string (First Name) First name of the user. -
last_name(Optional) string (Last Name) Last name of the user. -
attributes(Optional) object (Attributes) Default: User attributes are used to enforce attribute-based access control policies. You can read more about how to define these attributes here.
Here's a sample request for using the Create User API call:
{
  "key": "user|892179821739812389327",
  "email": "jane@coolcompany.com",
  "first_name": "Jane",
  "last_name": "Doe",
  "attributes": {
    "department": "marketing",
    "age": 30,
    "subscription": {
      "tier": "pro",
      "expired": false
    }
  }
}
The API Create User function will not assign the user with a role. This needs to be done
separately via the Assign Role To User function.
A full list of all API functions, their uses, and purpose is available here.