Golang Quickstart
This guide assumes you have created at least one policy in Permit. If you haven't, complete the Quickstart first.
1. Get your Permit Environment API Key
- In the Permit Dashboard, navigate to the Projects screen.
- Find the Project and Environment you want to connect to.
- Click the
 icon on the top right of the environment card.
 - Click Copy API Key.
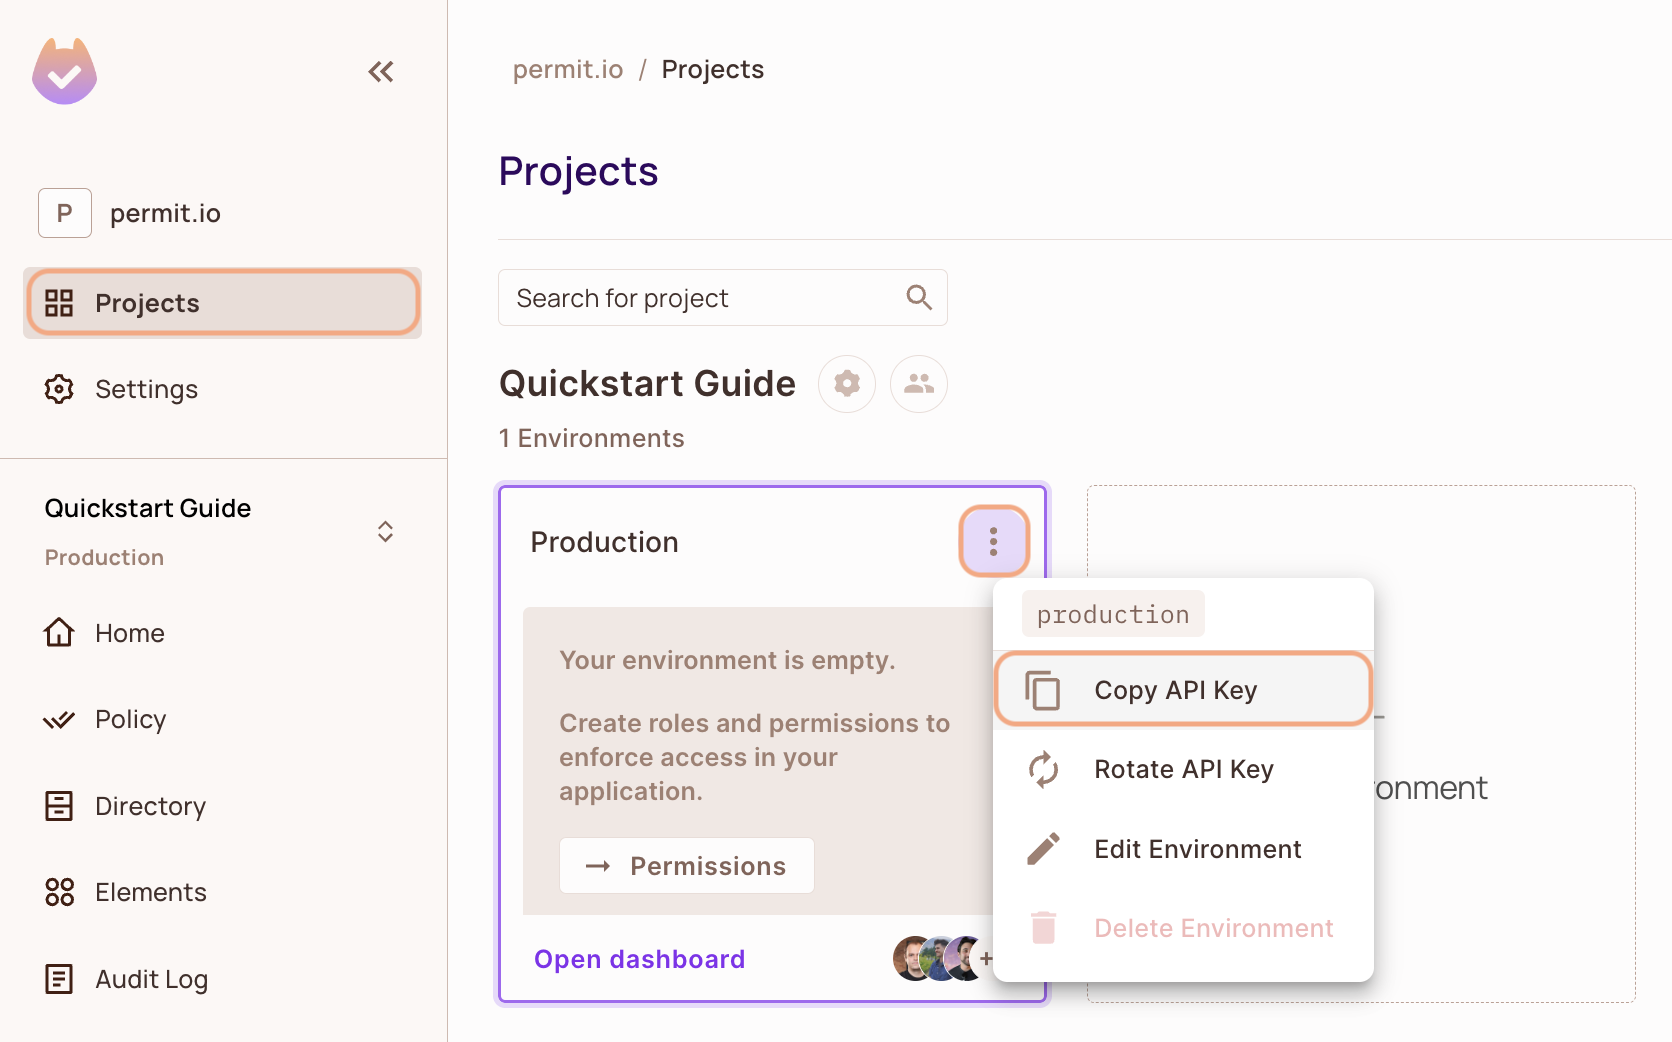
You can also copy the API key of the active environment from User Menu > Copy Environment Key.
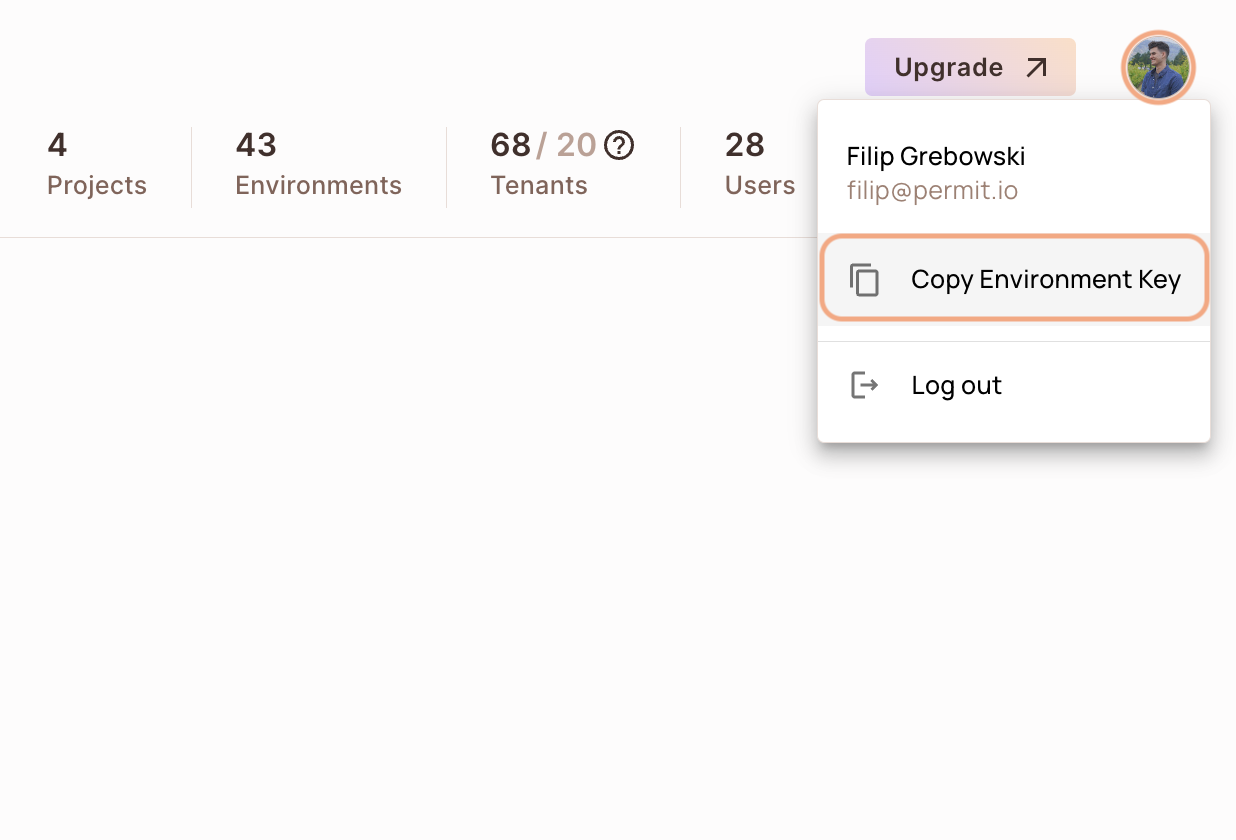
The API key you copy from the user menu belongs to the active environment in the sidebar. If you switch the active environment and click Copy Environment Key again, you copy a different API key: the key of the newly active environment.
2. Setup your PDP (Policy Decision Point) Container
Your application sends permission checks to a policy decision point (PDP), the microservice that evaluates your policy. Run the PDP as a Docker container, or use the managed Cloud PDP that Permit.io runs for you.
- Cloud PDP
- Container PDP
To use the Cloud PDP, pass the Cloud PDP URL when you initialize the Permit SDK.
Cloud PDP is a managed, production-ready service that Permit.io runs for you. It supports RBAC and ReBAC authorization models, but does not support ABAC.
For more details on capabilities, limits, and when to use Cloud PDP vs. a container PDP, see Cloud PDP Capabilities.
// This line initializes the SDK and connects your app
// to the Permit.io Cloud PDP.

const permit = new Permit({
  pdp: "https://cloudpdp.api.permit.io",
  // your API Key
  token: "[YOUR_API_KEY]",
});
Follow these steps to install and run the PDP container on your machine.
1. Pull our PDP container from Docker Hub
If you don't have Docker yet, install Docker first.
docker pull permitio/pdp-v2:latest
2. Run the container
Replace <YOUR_API_KEY> with the API key you copied in the previous step.
docker run -it -p 7766:7000 --env PDP_DEBUG=True --env PDP_API_KEY=<YOUR_API_KEY> permitio/pdp-v2:latest
Your PDP container is running. To check its status, run docker ps in your terminal.
Next, add the Permit SDK to your app or use the demo example below.
Add the SDK to your Golang code
Initialise the Golang SDK and check for permissions.
- Install the Permit.io SDK for Golang
go get github.com/permitio/permit-golang
- Import the SDK into your code
import "github.com/permitio/permit-golang/pkg/permit"
- Create a new instance of the SDK.
You can find instructions on getting a secret API key in the previous section.
package main

import "github.com/permitio/permit-golang/pkg/permit"
import "github.com/permitio/permit-golang/pkg/config"

func main() {
	PermitConfig := config.NewConfigBuilder("<YOUR_API_TOKEN>").Build()
	Permit := permit.New(PermitConfig)
}
Check for permissions using the SDK
You can run a permission check with permit.check(). You need to pass 3 arguments to the function:
User: a unique user that identifies the user doing the action - this can be created usingmodels.NewUserCreate("user_key")action: the action performed, as string.resource: the resource the action is performed on - this can be created usingmodels.NewResourceCreate("resource_key")
In the following example we are checking that a user with the unique id john@permit.io can create a document resource.
package main

import "github.com/permitio/permit-golang/pkg/permit"
import "github.com/permitio/permit-golang/pkg/config"
import "github.com/permitio/permit-golang/pkg/enforcement"

func main() {
	PermitConfig := config.NewConfigBuilder("<YOUR_API_TOKEN>").Build()
	Permit := permit.New(PermitConfig)

	user := enforcement.UserBuilder("john@doe.com").Build()
	resource := enforcement.ResourceBuilder("document").Build()
	permitted, err := Permit.Check(user, "create", resource)
	if err != nil {
		return
	}
	if permitted {
		// Let the user read the resource
	} else {
		// Deny access
	}
}
Usually instead of an email you'd use the unique identifier provided by your chosen authentication solution. You can also pass the entire decoded JWT, to include attributes about the user.
In cases where you are dealing with more than one tenant in your application, Permit.Check() can pass the tenant as part of the resource.
The tenant passed in needs to be either the tenant id or the tenant key.
You can use the list_tenants API to get the ids and keys set for your tenants.
tenant: a unique tenant id or tenant key that you have defined within Permit.
	resource := enforcement.ResourceBuilder("document").WithTenant("tenant").Build()
    const permitted = await permit.check(user, "create", resource);
Check permissions against ABAC policies
Above we have checked for permissions against an RBAC policy - but what if we have an ABAC policy we want to run a permission check for? An ABAC policy is made up of User Sets and Resource Sets, which you can read more about here.
With ABAC we define conditions based on pre-configured attributes.
If we are running a permit.check() for an ABAC policy, we replace the userId and the resource with objects, containing attributes.
userCheck := enforcement.UserBuilder("userKey").Build()
attributes := map[string]string{
	"hasApproval": "true",
}
resourceCheck := enforcement.ResourceBuilder("resourceKey").WithTenant("default").WithAttributes(attributes).Build()
allowed, _ := permitClient.Check(userCheck, "create", resourceCheck)
Permission checks are being run against the PDP container that's running locally on your machine - offering minimal latency and without leaving your network.
This means that your user data never goes outside your system, keeping security high.
Full app example
Assuming a Node.js app made up of a single file, with the permitio and express modules installed.
package main

import (
	"fmt"
	"go.uber.org/zap"
	"net/http"

	"github.com/permitio/permit-golang/pkg/config"
	"github.com/permitio/permit-golang/pkg/enforcement"
	"github.com/permitio/permit-golang/pkg/permit"
)

const (
	port = 4000
)

func main() {
	// This line initializes the SDK and connects your Go app
	// to the Permit.io PDP container (you've set in the previous step), with the API key provided.
	permitClient := permit.NewPermit(
		// Building new config for Permit client
		config.NewConfigBuilder(
			// your api key
			"<YOUR_API_KEY>").
			// Set the PDP URL
			WithLogger(zap.NewExample()).
			WithPdpUrl("http://localhost:7766").
			Build(),
	)

	// You can open http://localhost:4000 to invoke this http
	// endpoint, and see the outcome of the permission check.
	http.HandleFunc("/", func(w http.ResponseWriter, r *http.Request) {
		// This user was defined by you in the previous step and
		// is already assigned with a role in the permission system.
		user := enforcement.UserBuilder("user_id").
			WithFirstName("john").
			WithLastName("doe").
			WithEmail("jown@doe.com").
			Build()

		// This resource was defined by you in the previous step
		// and is already has actions assigned in the permission system.
		resource := enforcement.ResourceBuilder("document").Build()

		// After we created this user in the previous step, we also synced the user's identifier
		// to permit.io servers with permitClient.syncUser(user)).
		// The user identifier can be anything (email, db id, etc) but must be unique for each user.
		// Now that the user is synced, we can use its identifier to check permissions with `permit.check()`.
		permitted, err := permitClient.Check(user, "read", resource)
		if err != nil {
			fmt.Println(err)
			return
		}
		if permitted {
			w.WriteHeader(http.StatusOK)
			_, err = w.Write([]byte(user.FirstName + " " + user.LastName + " is PERMITTED to read document!"))
		} else {
			w.WriteHeader(http.StatusForbidden)
			_, err = w.Write([]byte(fmt.Sprintf(user.FirstName + " " + user.LastName + " is NOT PERMITTED to read document!")))
		}
	})
	fmt.Printf("Listening on http://localhost:%d", port)
	http.ListenAndServe(fmt.Sprintf(":%d", port), nil)
}