Stytch & Permit Integration
Stytch is one of the leading authentication platforms for developers, offering robust and scalable authentication solutions. Permit.io is a leading authorization platform, providing easily manageable and secure authorization capabilities. By integrating Stytch with Permit.io, you can enhance your application with both strong authentication and dynamic authorization.
There are many different ways to implement Stytch, and the specific strategy you choose will depend on your use case and preferences. This guide demonstrates one way of implementing Stytch to get you up and running as quickly as possible.
We will base our examples on working with a Next.js application. However, Stytch provides example applications in various programming languages to suit different development needs.
What you will build
In this tutorial, you’ll learn how to integrate Stytch for secure authentication and Permit.io for easily manageable authorization, allowing us to change our application's permissions on the fly.
This guide provides a basic introduction to integrating Stytch with Permit.io for authentication and authorization. The authorization functionality demonstrated will be quite simple.
Prerequisites
- Stytch account with a Stytch Consumer project via the Stytch Dashboard. You can read more about setting it up here.
- Permit account
- A Next.js project (you can easily create one by running
npx create-next-app@latest) - A Basic understanding of how to work with Next.js
Stytch Step-by-Step Guide
Step 1: Install Stytch SDKs and Configure Your API Keys
First, add the Stytch frontend JavaScript SDK and backend Node SDK packages to your Next.js application:
npm install @stytch/nextjs @stytch/vanilla-js stytch --save
Next, add your Stytch project's API keys to your application as environment variables:
STYTCH_PROJECT_ENV=test
STYTCH_PROJECT_ID="YOUR_STYTCH_PROJECT_ID"
STYTCH_PUBLIC_TOKEN="YOUR_STYTCH_PUBLIC_TOKEN"
STYTCH_SECRET="YOUR_STYTCH_SECRET"
Step 2: Wrap Your Application in a StytchProvider
Initialize the Stytch client and add a StytchProvider component to the root of your application so that the frontend JavaScript SDK is available to child components:
import { StytchProvider, createStytchUIClient } from "@stytch/nextjs";
import Head from "next/head";

const stytch = createStytchUIClient(process.env.STYTCH_PUBLIC_TOKEN);

export default function App({ Component, pageProps }) {
  return (
    <>
      <Head>{/* Truncated */}</Head>
      <StytchProvider stytch={stytch}>
        <Component {...pageProps} />
      </StytchProvider>
    </>
  );
}
Step 3: Add a StytchLogin Component
Create a StytchLogin component. You can configure which authentication methods you'd like to offer by modifying the products array in your config object. Here's an example that includes Email Magic Links and OAuth products:
import { StytchLogin, Products } from "@stytch/vanilla-js";

const Login = () => {
  const REDIRECT_URL = "SEE_STEP_5";

  const config = {
    products: [Products.emailMagicLinks, Products.oauth],
    emailMagicLinksOptions: {
      loginRedirectURL: REDIRECT_URL,
      loginExpirationMinutes: 60,
      signupRedirectURL: REDIRECT_URL,
      signupExpirationMinutes: 60,
    },
    oauthOptions: {
      providers: [{ type: "google" }],
      loginRedirectURL: REDIRECT_URL,
      signupRedirectURL: REDIRECT_URL,
    },
  };

  return <StytchLogin config={config} styles={{}} />;
};
Next, add the StytchLogin component to your application's login page. You'll notice that we check for a logged-in user before displaying the StytchLogin component:
import { useStytchUser } from "@stytch/nextjs";
import { useRouter } from "next/router";
import { useEffect } from "react";

export default function LoginPage() {
  const { user, isInitialized } = useStytchUser();
  const router = useRouter();

  useEffect(() => {
    if (isInitialized && user) {
      router.replace("/profile");
    }
  }, [user, isInitialized, router]);

  return <Login />;
}
Step 4: Handle Redirects and Complete the Authentication Flow
In this step, we want to make sure that as a user is successfully logged in, we redirect him to the initial page of the app, in this case
the /profile.
Specifying the Redirect URL
- Define the Redirect URL: Set the
REDIRECT_URLparameter in your StytchLogin component configuration. - Update Stytch Dashboard: Add the redirect URL to the Redirect URLs tab in the Stytch Dashboard.
Create the Redirect Page Component
Start by importing the necessary modules and then creating the redirect component:
import { useRouter } from "next/router";
import { useEffect } from "react";
import stytch from "stytch";

export default function RedirectPage() {
  const router = useRouter();

 ...

}
Use useEffect to handle authentication
We only want to redirect id we made sure that we have a successful user session.
useEffect(() => {
  const stytch_token_type = router?.query?.stytch_token_type?.toString();
  const token = router?.query?.token?.toString();

  if (token && stytch_token_type === "oauth") {
    stytch.oauth.authenticate(token, {
      session_duration_minutes: 60,
    });
  } else if (token && stytch_token_type === "magic_links") {
    stytch.magicLinks.authenticate(token, {
      session_duration_minutes: 60,
    });
  }
}, [router]);

return <div>Loading...</div>;
The whole code for this step is showcased below:
import { useRouter } from "next/router";
import { useEffect } from "react";
import stytch from "stytch";

export default function RedirectPage() {
  const router = useRouter();

  useEffect(() => {
    const stytch_token_type = router?.query?.stytch_token_type?.toString();
    const token = router?.query?.token?.toString();

    if (token && stytch_token_type === "oauth") {
      stytch.oauth.authenticate(token, {
        session_duration_minutes: 60,
      });
    } else if (token && stytch_token_type === "magic_links") {
      stytch.magicLinks.authenticate(token, {
        session_duration_minutes: 60,
      });
    }
  }, [router]);

  return <div>Loading...</div>;
}
Step 5: Grant Access to Protected Frontend Content
As you successfully implement the above steps into your custom application, you should be able to use Stytch to perform a user login.
Stytch's frontend JavaScript SDK will automatically populate the session and user objects. Use the useStytchSession and
useStytchUser hooks to listen for changes:
import { useStytchUser, useStytchSession } from "@stytch/nextjs";
import { useEffect } from "react";
import { useRouter } from "next/router";

export default function ProfilePage() {
  const { user, isInitialized } = useStytchUser();
  const router = useRouter();

  useEffect(() => {
    if (isInitialized && !user) {
      router.replace("/");
    }
  }, [user, isInitialized, router]);

  return <div>Profile Page Content</div>;
}
Step 6: Grant Access to Protected Server-side Routes
The below code will allow you to work with Stytch's backend Node SDK, which will retrieve the Stytch session_token or session_jwt
from the request cookies, and then call the sessions.authenticate or sessions.authenticateJwt methods:
import stytch from "stytch";

let client;

const loadStytch = () => {
  if (!client) {
    client = new stytch.Client({
      project_id: process.env.STYTCH_PROJECT_ID || "",
      secret: process.env.STYTCH_SECRET || "",
      env: process.env.STYTCH_PROJECT_ENV === "live" ? stytch.envs.live : stytch.envs.test,
    });
  }
  return client;
};

export async function getServerSideProps({ req }) {
  const redirectRes = {
    redirect: {
      destination: "/",
      permanent: false,
    },
  };

  const sessionJWT = req.cookies["stytch_session_jwt"];

  if (!sessionJWT) {
    return redirectRes;
  }

  const stytchClient = loadStytch();

  try {
    await stytchClient.sessions.authenticateJwt(sessionJWT);
    return { props: {} };
  } catch (e) {
    return redirectRes;
  }
}
As you saw in the above step, we are fetching a sessionJWT directly from the cookies. As we are also able to authenticate the session
with the .authenticateJwt() function, we therefore know the user id will also be available to us, so we can proceed to sync the user
into Permit. This is part of the handoff point implementation.
We need to sync user identities into Permit to understand each user's assigned role. This allows us to immediately identify their role upon successful authentication, enabling us to apply the appropriate policies and rules. As a result, we can clearly define what each user is permitted or restricted from doing.
Before we utilize the syncUser function, we need to set up a basic Permit in the UI.
Permit Pre-sync setup guide
For the initial setup guide with Permit, please follow the Quickstart guide. It will give you an outline of how to
create a basic workspace with Permit, create roles and resources, and assign permissions to the roles.
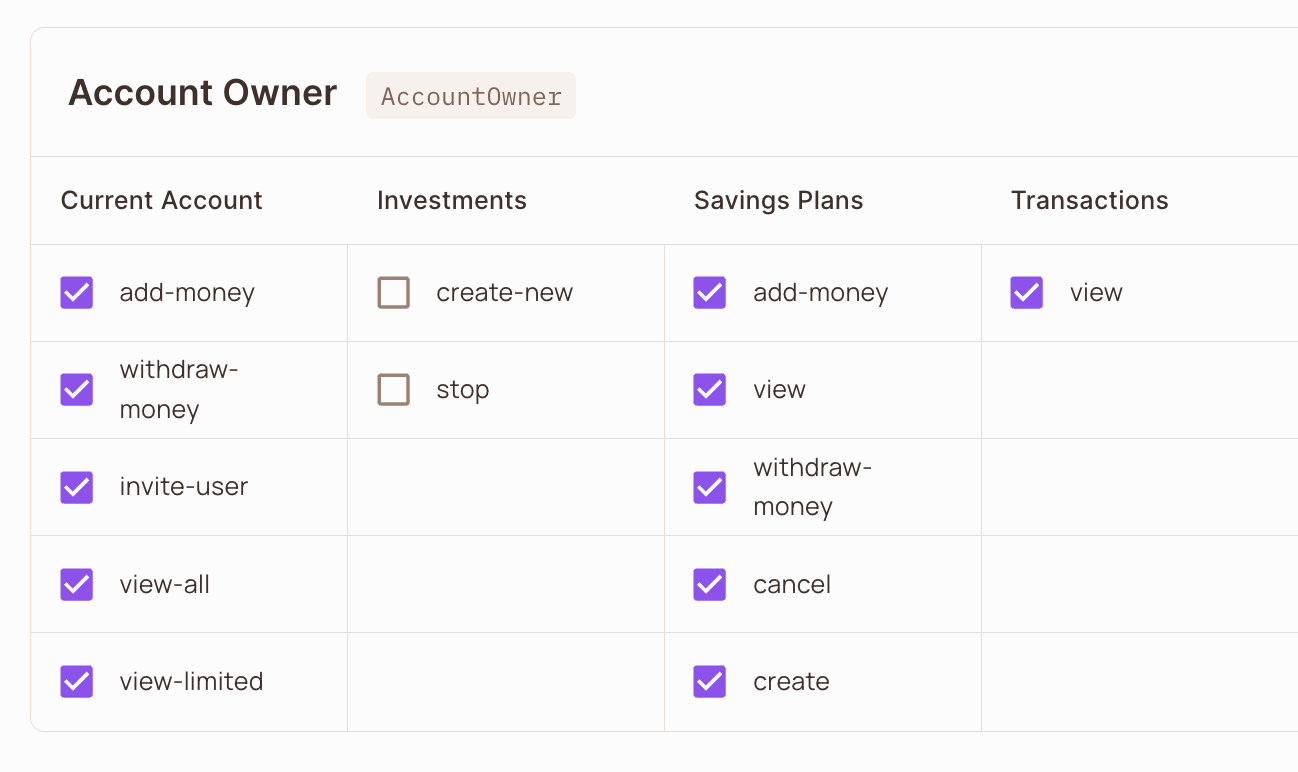
Below is an example of the policy we will be working with. The only thing we are missing is syncing a user into Permit and assigning them the appropriate role.
Importing and initializing the Permit object
As you work with your app's implementation, any critical, data-sensitive actions are performed in the backend, which typically includes server-side logic, database interactions, and API integrations. Inside your backend file, you need to import the Permit package and initialize the Permit instance object.
import { Permit } from "permitio";

const permit = new Permit({
  // The Environment API Key
  token: process.env.PERMIT_API_KEY,
  // The URL for the deployed PDP. Usually runs on port 7766.
  pdp: process.env.PERMIT_PDP_HOSTNAME,
});
Creating a handoff-point check
Once the session is created, we need to immediately fetch the userId and add the user to Permit before we show the end-user any of our UI.
Fetching the stytch userId
const { user } = useStytchUser();

const userId = user.user_id;
Performing the authentication check
const isAutenticated = await stytchClient.sessions.authenticateJwt(sessionJWT);
if (isAutenticated) {
  // perform all SDK function calls here, passing in the userId.
}
As part of user synchronization, we use 3 functions from the SDK:
- Creating a new Tenant
- Adding a user to the new Tenant
- Assigning the user with a new Role
Let's break it down to each individual function:
Creating a new Tenant
await permit.api.tenants.create({
  key: userEmailId,
  name: userEmail,
});
Adding a user to the Tenant
await permit.api.syncUser({
  key: userId,
  email: userEmail,
});
Assigning a role to the user
Here, we are assigning the role of Account Owner, using the role key AccountOwner.
await permit.api.assignRole({
  role: "AccountOwner",
  tenant: tenantId,
  user: userId,
});
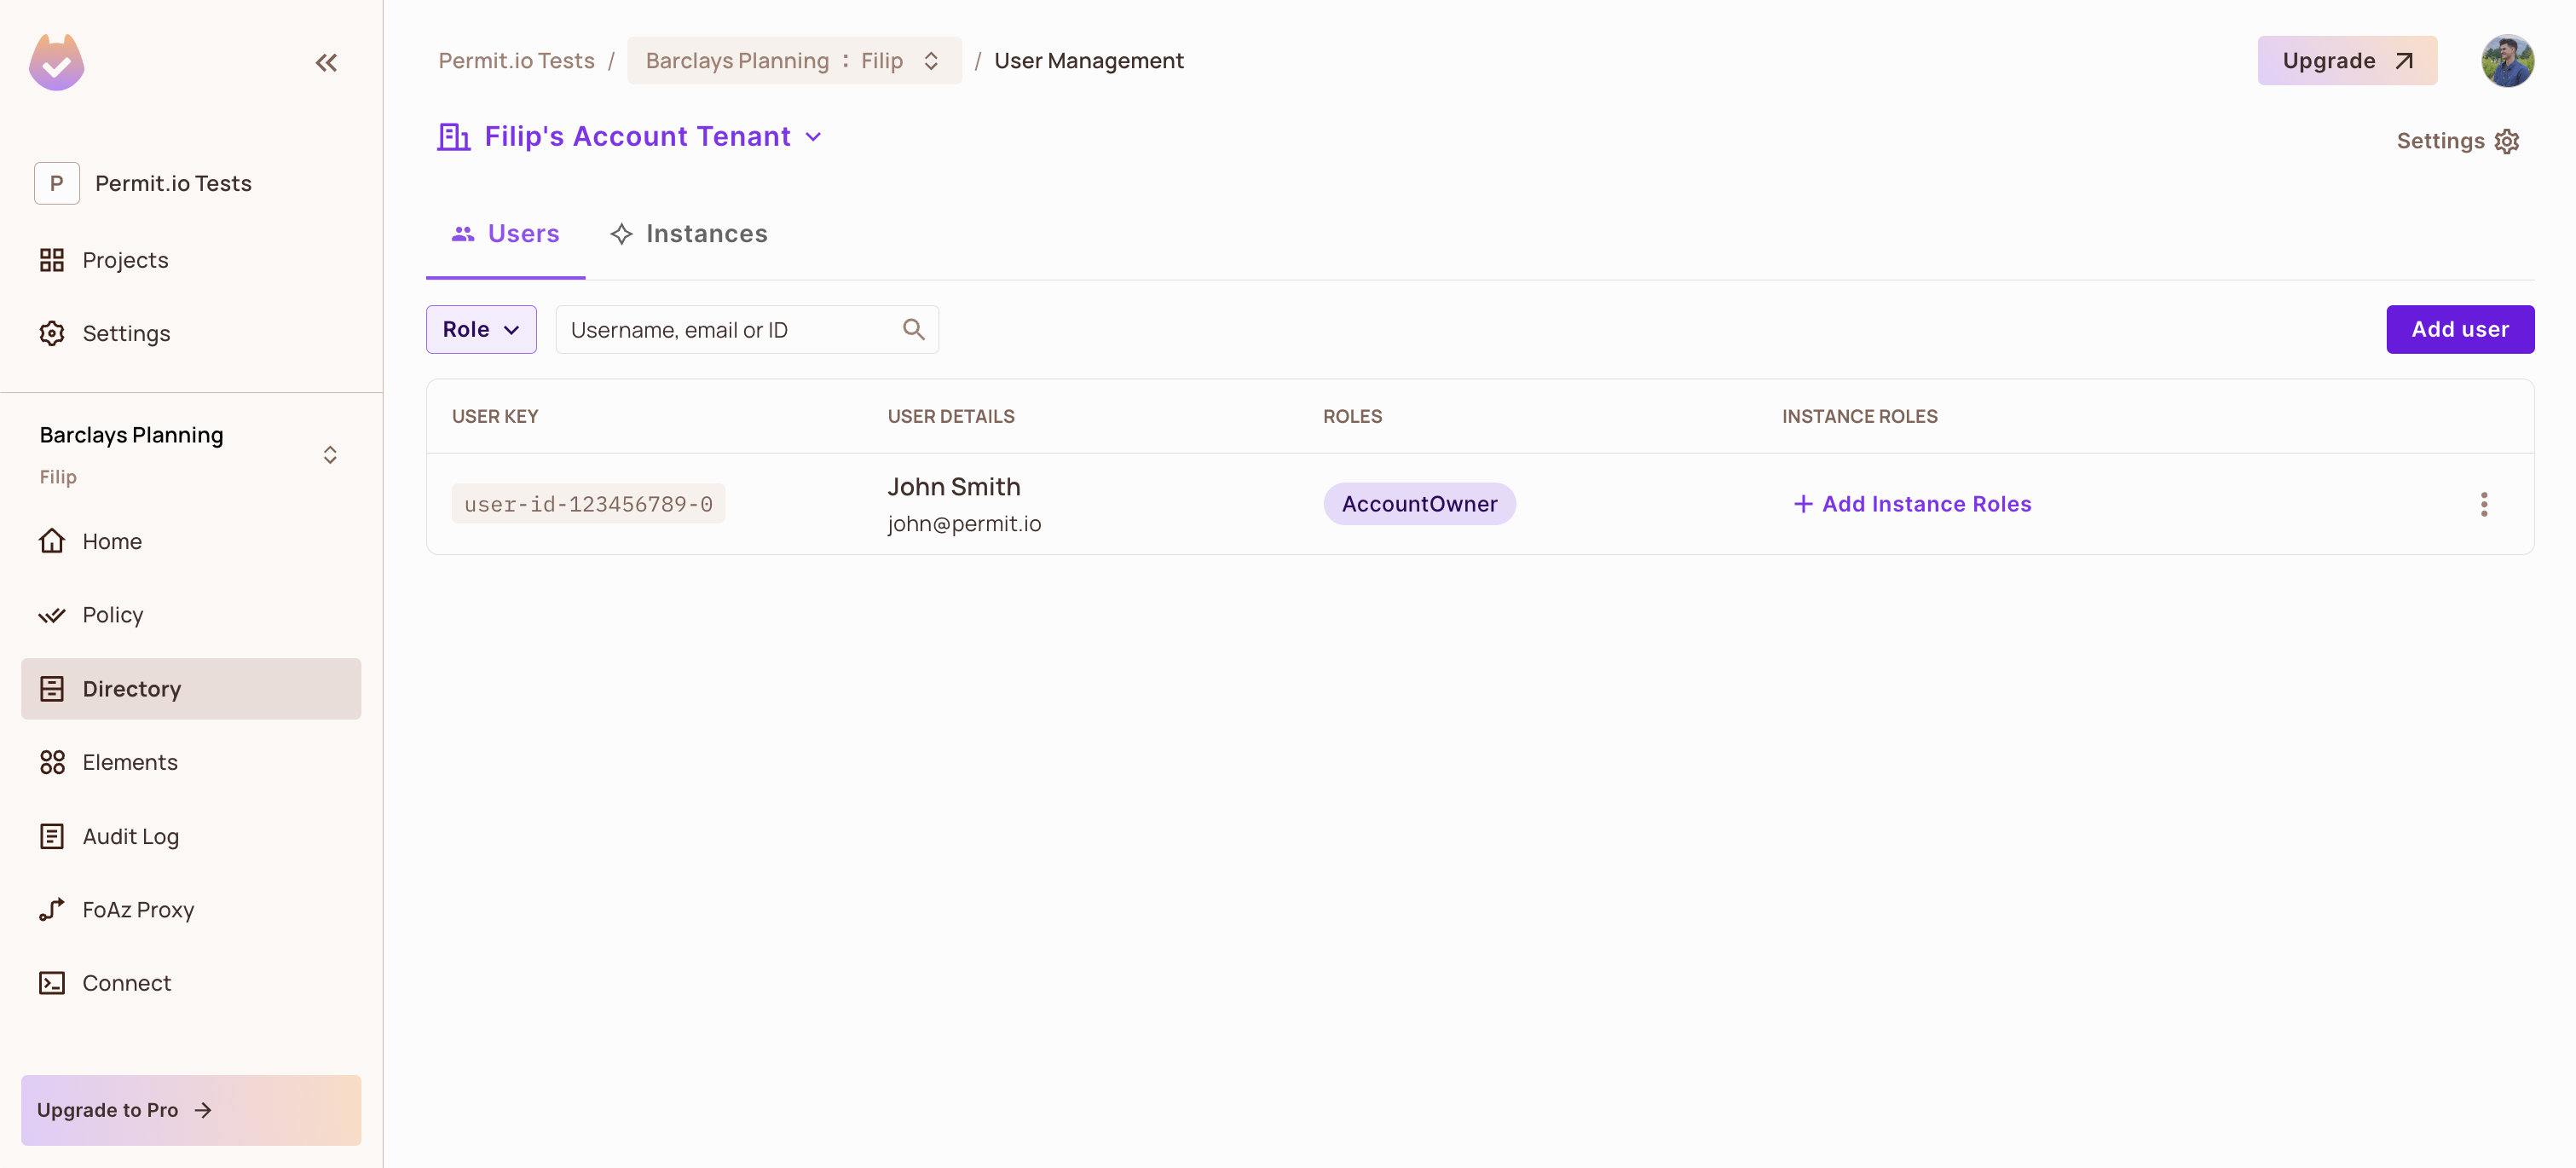
Once these SDK calls are complete, we will see a user created inside of a new tenant and assigned a new role.
Wrapping-up
You are all done! You have successfully set up Stytch as your authentication solution and combined it with Permit, thus enforcing your authorization by syncing users into Permit and assigning them a role.
Now you are ready to enforce different parts of your application level code. As an example, we have created a simple enforcement below
that checks if the AccountOwner has the ability to view all the information for his account.
const isPermitted = await permit.check(id, "view-all", {
  type: "Account",
  tenant: currentTenant,
});
If we look back into the Policy Editor, and the Account Owner role, we can see that for the Current Account we have the ability to
view-all as it has been checked.
If you need further help with this tutorial or have any questions, please feel free to reach out to us on Slack.