Permit and Cognito Demo
1. Introduction
1.1. The application
The demo application is a simple app that display the user information. Based on this GitHub repository and this article The full code is available on GitHub.
1.2. Create the right resources and roles in Permit
In our example, we will set up a simple Hello World application, so we will create a hello resource with the following actions:
- say
- wave
We will also create two roles:
adminandviewer
Setting up roles and resources can be done through the Permit dashboard, by using the Permit API, or with one of our SDKs: Python, NodeJS and more. Additional SDKs are available in the SDK Reference section inside the docs.
1.3. Set up the right permissions in Permit.io:
adminshould have all the permissions for thehelloresource.viewerwill only have thewavepermission.
As noted earlier, these permissions can be set up through either the Permit dashboard or by using the Permit API.
2. Run the demo application
2.1. Clone the demo application:
git clone https://github.com/permitio/cognito-integration
2.2. Put your Cognito credentials in the /standalone_be/.env file (you can see the .env.example file for reference)
2.3. Put your Permit credentials in the .env file
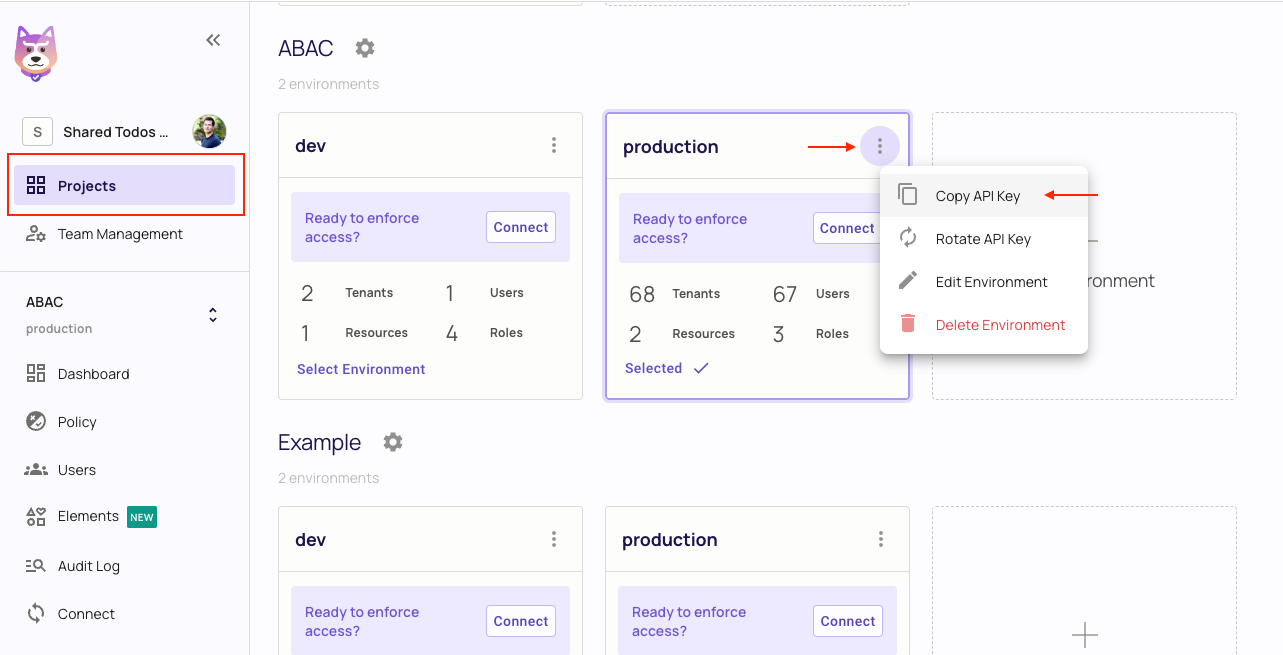
You can get your Permit API Key from the projects page by clicking on the three dots on the top right of your environment and selecting Copy API Key.
PERMIT_API_KEY=<permit_api_key>
3. How it works
3.1. Cognito
As we want to use Cognito for authentication, we will use the Cognito SDK to get each user's information and access token.
On the frontend side, we have the redirectToLogin function to redirect the user to the Cognito login page if they are not logged in.
// app.mjs
const redirectToLogin = async () => {
  const state = await generateNonce();
  const codeVerifier = await generateNonce();
  sessionStorage.setItem(`codeVerifier-${state}`, codeVerifier);
  const codeChallenge = base64URLEncode(await sha256(codeVerifier));
  window.location = `${cognitoLoginUrl}/login?response_type=code&client_id=${clientId}&state=${state}&code_challenge_method=S256&code_challenge=${codeChallenge}&redirect_uri=${window.location.origin}`;
};

//...
On the backend side, we have the GET api/id and GET api/access routes that validate the token and returns the user information.
// standalone_be/index.mjs
// init CognitoJwtVerifier
const verifierIdToken = CognitoJwtVerifier.create({
  userPoolId: userPoolId,
  tokenUse: "id",
  clientId: clientId,
});

app.get("/api/id", async (req, res) => {
  try {
    const payload = await verifierIdToken.verify(
      req.headers.authorization?.split(" ")[1] // the JWT as string
    );
    res.status(200).send(payload);
  } catch {
    res.status(403).send("Token not valid!");
  }
});
//...
3.2. Permit sync users
As we want to use Permit for authorization, we will use the Permit SDK to get users' permissions and check if they have the right ones.
So we need to sync the users from Cognito to Permit.
We will use the syncUsers function to sync the users from Cognito to Permit.
This code will be called after each successful Cognito login by the frontend.
// /frontend/app.mjs
//...
if (searchParams.get("code") !== null) {
  //... get the tokens from Cognito
  // After we got the tokens, we need to sync the user info with Permit
  const syncUser = await fetch("http://localhost:8000/api/sync", {
    method: "POST",
    headers: new Headers({ Authorization: `Bearer ${tokens.access_token}` }),
  });
  //...
}
On the backend side, we have the POST api/sync route that syncs the user from Cognito to Permit.
If you want to add roles to the user, use the permit.api.assignRoles(userKey, roleKey, tenantKey) function.
// /standalone_be/index.mjs

// init Permit

const permit = new Permit({
  token: permitToken,
  pdp: "https://cloudpdp.api.permit.io",
});

app.post("/api/sync", async (req, res) => {
  try {
    const payload = await verifier.verify(
      req.headers.authorization?.split(" ")[1] // the JWT as string
    );
  } catch (error) {
    res.status(403).send("Token not valid!");
  }
  const syncUser = await permit.api.syncUser({
    first_name: payload.name,
    key: payload.sub,
    email: payload.email,
  });
  // you can also assign role to a user here if you have mapping between Cognito groups and Permit roles
  // with the assign role SDK method
  // await permit.api.assignRole({
  //     "key": cognitoUser.sub,
  //     "role": caseSensitiveRoleKey,
  //     "tenant": caseSensitiveTenantKey, // if you don't use tenants, use 'default'
  // });
  res.status(200).send(syncUser);
});
3.3. Permit authorization
Authorization is only done on the backend side, so we will use the permit SDK to check if the user has the right permissions for each request.
In this example we have two action routes POST /say_hello and POST /wave_hello that will be protected by Permit.
Only after successful cognito authentication and Permit authorization will the user be able to access these routes and get 200(successful) response.
app.post("/say_hello", async (req, res) => {
  try {
    const payload = await verifierIdToken.verify(
      req.headers.authorization?.split(" ")[1] // the JWT as string
    );
    // check the request body for the "message" property
    const permitted = await permit.check(
      payload.sub, // the user id
      "say", // the action
      "hello" // the resource
    );
    if (permitted) {
      res.status(200).send("Permitted! to say hello");
    } else {
      res.status(403).send("Not permitted to say hello");
    }
  } catch (error) {
    res.status(403).send("Token not valid!");
  }
});
//... handle the request