LangChain Integration
LangChain has changed how developers build AI applications, offering powerful abstractions for chaining LLMs, tools, and memory. However, as soon as an app touches sensitive data, like patient records, private business documents, or support workflows, it needs access control.
In this guide, we’ll show how to wrap LangChain workflows with Permit.io to enforce policy-based controls at every level using Permit’s Four Perimeter Model.
This guide uses Permit’s Four Perimeter Model for AI Access Control. These perimeters help ensure:
- Only eligible users can interact with your AI agent
- Sensitive data is protected based on user roles
- External actions are never triggered without authorization
- Outputs are policy-compliant before reaching the user
By the end of this tutorial, you’ll have a fully functional, policy-aware LangChain app ready for production.
Prerequisites and Tech Stack
Tools & Services
| Tool | Purpose |
|---|---|
| LangChain | LLM chaining framework |
| Permit.io | Policy-as-code access control |
| OpenAI | LLM + embeddings for RAG |
| FAISS | Vector store for document retrieval |
| Langchain-Permit | Permit-LangChain integration SDK |
| Poetry | Python dependency management |
Python Dependencies
Install these via pyproject.toml using Poetry:
[tool.poetry.dependencies]
python = "^3.9"
langchain = "^0.1.0"
langchain-openai = "^0.0.2"
langchain-permit = "^0.1.2"
permit = "^2.7.2"
pydantic-settings = "^2.7.1"
Required Environment Variables
Add the following to your .env file:
PERMIT_API_KEY=your_api_key
PERMIT_PDP_URL=http://localhost:7766  # Or your cloud PDP
JWKS_URL=http://localhost:3458/.well-known/jwks.json  # For JWT validation
OPENAI_API_KEY=sk-...  # From OpenAI
For a PDP setup guide, see Permit PDP Overview
Your PERMIT_API_KEY is available in the Permit.io dashboard
Planning our Policies
Before jumping into implementation, it's essential to define what we're protecting, who needs access, and under what conditions.
We'll use a healthcare AI assistant as our example. It allows patients to ask health-related questions, doctors to retrieve medical documents, and eligible users to schedule appointments.
Here’s what our access model looks like from a real-world perspective:
Prompting the AI
Only users who are at least 18 years old, have opted into AI use, and have remaining daily quota may interact with the assistant.
Viewing Documents
All users can view public medical documents. Only authorized users can view restricted documents.
Scheduling Appointments
Users must be at least 18 and have the
can_scheduleattribute set to true.
AI Output Redaction
Responses containing sensitive terms (e.g., “high blood pressure”) must be redacted unless the user has elevated privileges.
Policy Model: Resources, Roles & Rules:
Resources:
healthcare_prompt: The AI entry pointhealthcare_document: Individual medical documentshealthcare_appointment: External appointment resource
User Attributes:
age: Integer, used in ABAC rulesai_opt_in: Boolean flagdaily_quota_remaining: Integer countcan_schedule: Boolean flag
Document Attributes:
public: Boolean flag to denote visibility
User Sets:
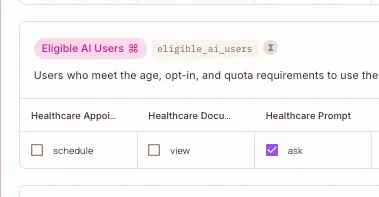
- Eligible AI Users: Must meet age, opt-in, and quota conditions
- Scheduling Eligible Users: Must meet age and
can_scheduleconditions - Everyone: Used for public document access
Document Sets:
- Public Docs:
public == truedocuments only
Actions:
ask: Used onhealthcare_promptview: Used onhealthcare_documentschedule: Used onhealthcare_appointment
Permit Schema Setup
With our perimeters and policies mapped out, it’s time to configure our authorization schema in the Permit.io dashboard. This includes defining resources, actions, user and resource sets, and ABAC rules.
We’ll use the Policy tab for everything in this section.
Define Resources
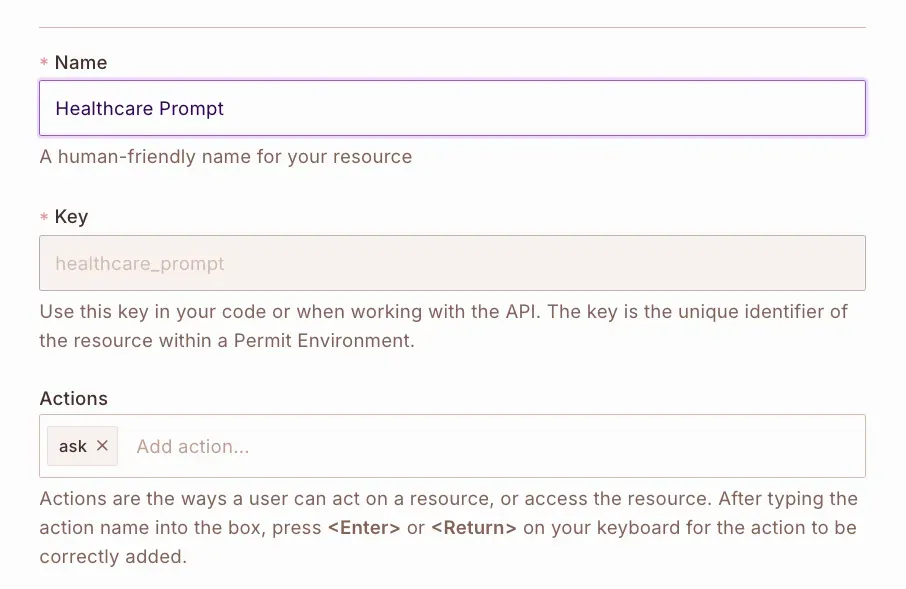
Create healthcare_prompt Resource
This represents the AI entry point (i.e., submitting a prompt).
- Name:
healthcare_prompt - Action:
ask
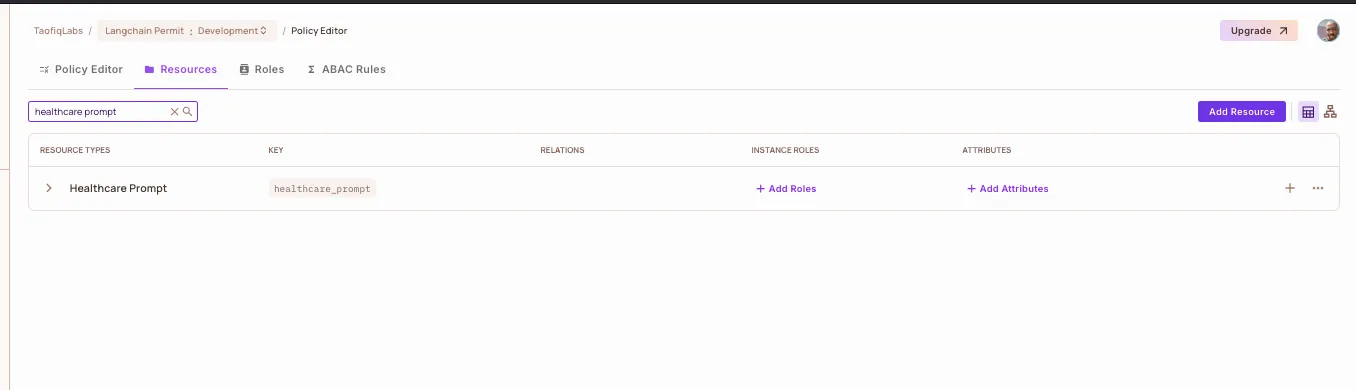
You'll see the resource type of healthcare_prompt created for you in the Resource section:
Create healthcare_document Resource
This represents documents in the knowledge base (e.g., test results, diagnoses).
- Name:
healthcare_document - Action:
view
Create healthcare_appointment Resource
Represents the scheduling system or appointment entity.
- Name:
healthcare_appointment - Action:
schedule
Define ABAC User and Resource Sets
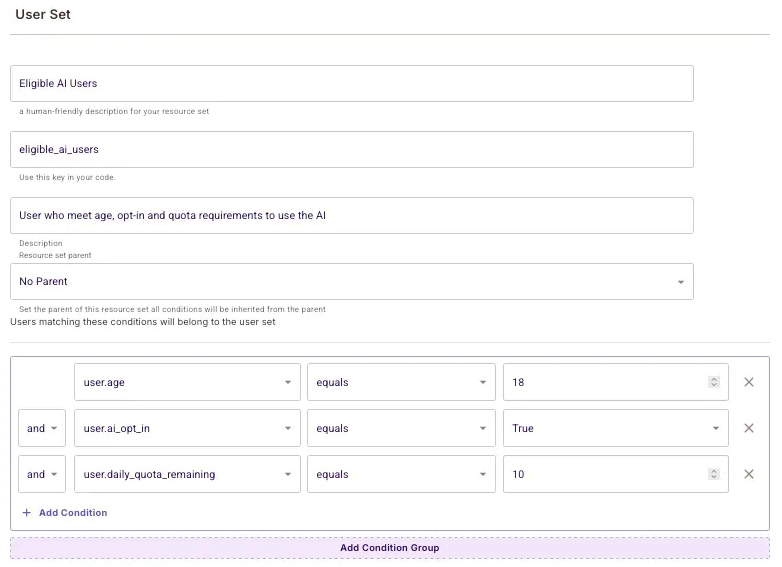
Define Eligible AI Users ABAC Set
Navigate to the ABAC Rules section and define an ABAC User Set for controlling access to the AI itself (ask action on healthcare_prompt).
- Conditions:
user.age >= 18user.ai_opt_in == trueuser.daily_quota_remaining > 0
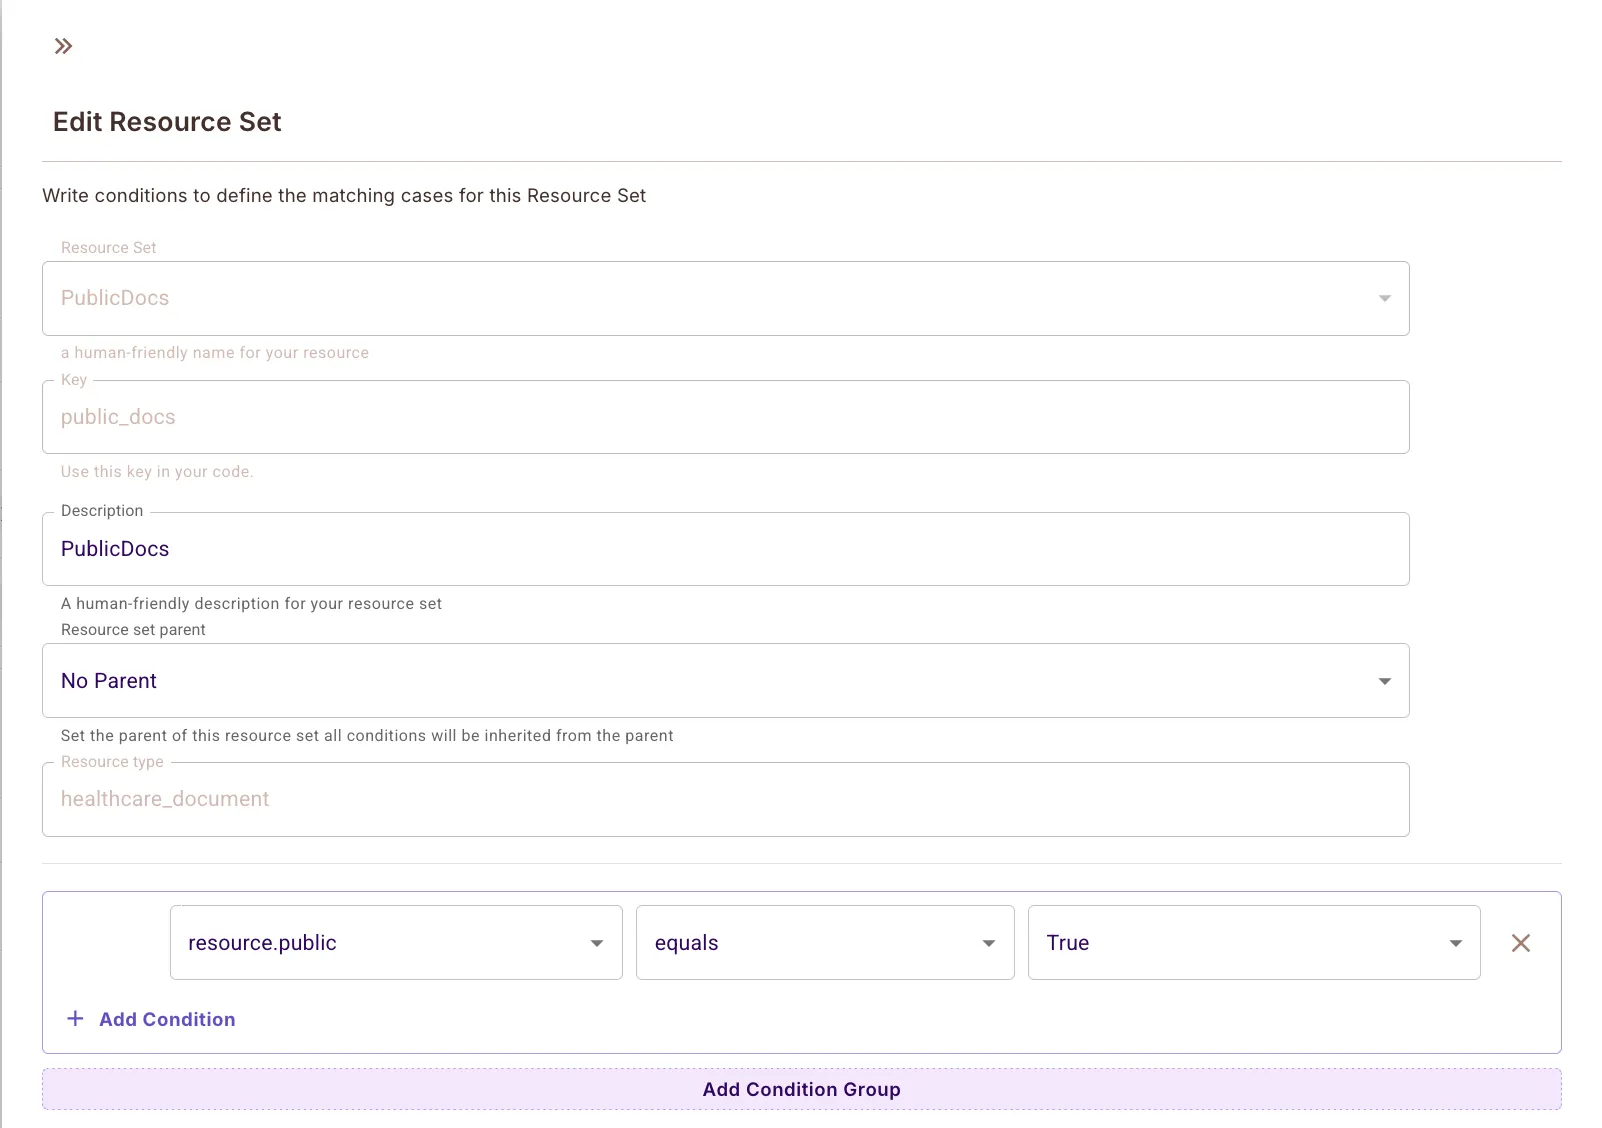
Define PublicDocs Resource Set
Used to group documents with public: true metadata.
- Set name:
PublicDocs - Conditions:
resource.public == true
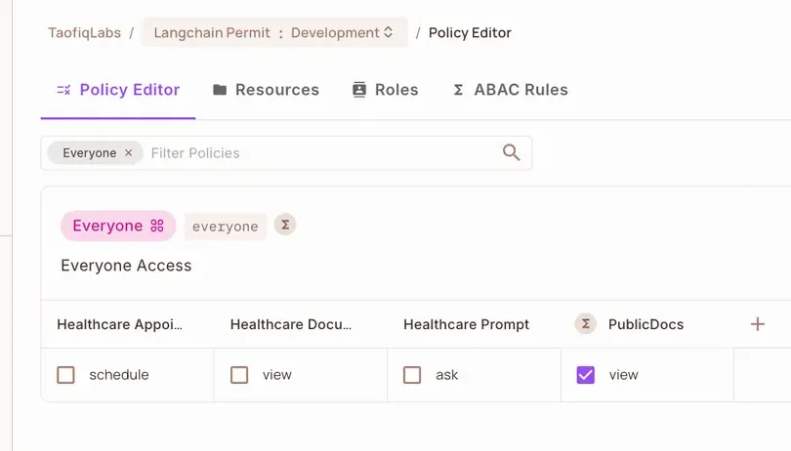
Grant Access with Policy Rules
In the Policy Editor, define who can do what:
Eligible AI Users→askonhealthcare_promptEveryone→viewonPublicDocsScheduling Eligible Users→scheduleonhealthcare_appointment
Permit Data Setup
With your schema modeled, the next step is to assign actual data to your users and resources. This happens in the Directory tab of the Permit dashboard, where you’ll define:
- Users and their attributes
- Resources (documents) and their metadata
This real-world data is what your policies will evaluate against at runtime.
Create Example Users
Go to the Users section and add test users that match or fail the policies. Here are two examples based on the JWTs shown in the blog:
Valid User: user-123
{
  "key": "user-123",
  "attributes": {
    "age": 25,
    "ai_opt_in": true,
    "daily_quota_remaining": 10,
    "can_schedule": true}
}
This user:
- Is 25 years old
- Has opted into AI
- Has quota left
- Can schedule appointments
→ Thus, they should be allowed through all perimeters.
Invalid User: user-456
{
  "key": "user-456",
  "attributes": {
    "age": 16,
    "ai_opt_in": false,
    "daily_quota_remaining": 0,
    "can_schedule": false}
}
This user:
- Is underage
- Hasn’t opted in
- Quota is 0
→ Thus, prompt access will be denied at perimeter #1.
Prompt Protection (JWT + Permission Checks)
The first layer of defense in our healthcare AI assistant is Prompt Protection. This ensures that only eligible users (those who are old enough, opted in, and within their usage quota) can interact with the LLM.
This perimeter uses:
LangchainJWTValidationToolfor JWT validationLangchainPermissionsCheckToolfor runtime policy evaluation
Together, they block unauthorized users before the AI ever sees a prompt.
Setup Components
Your project should include the following modules to enforce prompt protection.
File Structure
src/
├── config/
│   └── settings.py          # Load API keys and config
├── core/
│   ├── security.py          # JWT validation
│   └── permissions.py       # Permit policy checks
└── perimeters/
    └── prompt_guard.py      # Combines all checks before LLM access
Configuration Settings
Create a file src/config/settings.py to manage your API keys and environment variables using pydantic-settings.
# src/config/settings.py
from pydantic_settings import BaseSettings
from functools import lru_cache

class Settings(BaseSettings):
    openai_api_key: str
    permit_api_key: str
    permit_pdp_url: str
    jwks_url: str
    jwt_issuer: str
    jwt_audience: str
    test_jwt_token: str
    vector_store_path: str
    log_level: str = "INFO"

    class Config:
        env_file = ".env"

@lru_cache()
def get_settings():
    return Settings()
JWT Validation
Use LangchainJWTValidationTool to validate and extract user claims.
# src/core/security.py
from langchain_permit.tools import LangchainJWTValidationTool
from src.config.settings import get_settings

settings = get_settings()

class SecurityManager:
    def __init__(self):
        self.jwt_validator = LangchainJWTValidationTool(jwks_url=settings.jwks_url)

    async def validate_token(self, token: str):
        claims = await self.jwt_validator._arun(token)
        return self._process_user_claims(claims)

    def _process_user_claims(self, claims):
        required = {'age', 'ai_opt_in', 'daily_quota_remaining'}
        attrs = claims.get('attributes', {})
        missing = required - set(attrs.keys())
        if missing:
            raise ValueError(f"Missing required attributes: {missing}")
        return claims

security_manager = SecurityManager()
Prompt Permission Check
Use LangchainPermissionsCheckTool to check whether the user is allowed to use the AI.
# src/core/permissions.py
from permit import Permit
from langchain_permit.tools import LangchainPermissionsCheckTool
from src.config.settings import get_settings

settings = get_settings()

class PermissionsManager:
    def __init__(self):
        self.permit_client = Permit(token=settings.permit_api_key, pdp=settings.permit_pdp_url)
        self.permissions_checker = LangchainPermissionsCheckTool(permit=self.permit_client)

    async def check_prompt_permissions(self, user, prompt_type="general"):
        result = await self.permissions_checker._arun(
            user=user,
            action="ask",
            resource={"type": "healthcare_prompt"}
        )
        return result.get("allowed", False)

permissions_manager = PermissionsManager()
Wrap LLM Access with Prompt Guard
Tie everything together in prompt_guard.py and only allow the AI to run if both checks pass.
# src/perimeters/prompt_guard.py
from langchain_openai import ChatOpenAI
from langchain.prompts import ChatPromptTemplate
from src.core.security import security_manager
from src.core.permissions import permissions_manager

class PromptGuard:
    def __init__(self):
        self.llm = ChatOpenAI()
        self.prompt = ChatPromptTemplate.from_messages([
            ("system", "You are a helpful medical assistant. Provide general health information only."),
            ("human", "{question}")
        ])

    async def process_medical_query(self, token: str, question: str, prompt_type="general"):
        user = await security_manager.validate_token(token)
        allowed = await permissions_manager.check_prompt_permissions(user=user, prompt_type=prompt_type)
        if not allowed:
            raise ValueError("User does not have permission to use the AI")

        chain = self.prompt | self.llm
        response = await chain.ainvoke({"question": question})
        return response.content

prompt_guard = PromptGuard()
Example Entry Point
# src/main.py
import asyncio
from src.perimeters.prompt_guard import prompt_guard
from src.config.settings import get_settings

async def main():
    settings = get_settings()
    response = await prompt_guard.process_medical_query(
        token=settings.test_jwt_token,
        question="What are common symptoms of a fever?"
    )
    print("Response:", response)

if __name__ == "__main__":
    asyncio.run(main())
Expected Results
| User Type | Result |
|---|---|
| Valid JWT with all attributes | ✅ Allowed to prompt |
JWT missing attributes (e.g., age) | ❌ Blocked before prompt |
| Underage / not opted in / no quota | ❌ Rejected via permission check |
Secure Document Retrieval (RAG Filtering)
Once a user passes Prompt Protection, the next step is ensuring they only receive documents they’re allowed to see. In LangChain-based RAG, this means enforcing policies before documents are selected and passed into the LLM.
We’ll use:
FAISSas our vector store for storing medical documentsPermitEnsembleRetrieverfromlangchain-permitto filter documents based on Permit’s ABAC policies
Use Case: Public vs. Restricted Documents
Some documents (like general health info) should be available to all users. Others (like patient diagnoses) should only be seen by specific users or roles.
We enforce this with:
- A
publicattribute on each document - A
PublicDocsresource set in Permit - A
viewaction on thehealthcare_documentresource
Add Sample Documents
Create src/perimeters/rag_security.py and populate it with sample documents. Each document is annotated with metadata and stored in a FAISS index.
# src/perimeters/rag_security.py
from typing import List, Dict, Any
from langchain.schema import Document
from langchain_openai import OpenAIEmbeddings
from langchain_community.vectorstores import FAISS
from langchain_permit.retrievers import PermitEnsembleRetriever
from src.config.settings import get_settings

settings = get_settings()

class RAGSecurityManager:
    def __init__(self):
        self.embeddings = OpenAIEmbeddings()
        self.sample_docs = [
            Document(
                page_content="Common cold symptoms include runny nose, cough, and sore throat.",
                metadata={"id": "doc1", "type": "healthcare_document", "attributes": {"public": True}}
            ),
            Document(
                page_content="High blood pressure treatment guidelines and medications.",
                metadata={"id": "doc2", "type": "healthcare_document", "attributes": {"public": False}}
            ),
            Document(
                page_content="Patient diagnosis reports and treatment plans for serious conditions.",
                metadata={"id": "doc3", "type": "healthcare_document", "attributes": {"public": False}}
            )
        ]
        self.vectorstore = FAISS.from_documents(self.sample_docs, self.embeddings)

    async def get_relevant_documents(self, query: str, user: Dict[str, Any]) -> List[Document]:
        vector_retriever = self.vectorstore.as_retriever(search_kwargs={"k": 2})
        secure_retriever = PermitEnsembleRetriever(
            retrievers=[vector_retriever],
            permit_api_key=settings.permit_api_key,
            permit_pdp_url=settings.permit_pdp_url,
            user=user['key'],
            action="view",
            resource_type="healthcare_document"
        )
        return await secure_retriever.ainvoke(query)

rag_security_manager = RAGSecurityManager()
Integrate into prompt_guard.py
Update prompt_guard.py to retrieve filtered documents before generating the final LLM prompt.
# src/perimeters/prompt_guard.py (continued)
from src.perimeters.rag_security import rag_security_manager

class PromptGuard:
    def __init__(self):
        self.llm = ChatOpenAI()
        self.system_prompt = """You are a helpful medical assistant.
        Provide information based on the given context and general health knowledge.
        Do not provide medical advice or diagnosis."""

    async def process_medical_query(self, token: str, question: str, prompt_type="general"):
        user = await security_manager.validate_token(token)
        allowed = await permissions_manager.check_prompt_permissions(user=user, prompt_type=prompt_type)
        if not allowed:
            raise ValueError("User does not have permission to use the AI.")

        # 🔒 Secure RAG filtering
        context_docs = await rag_security_manager.get_relevant_documents(query=question, user=user)
        context_text = "\n".join(doc.page_content for doc in context_docs)

        prompt = ChatPromptTemplate.from_messages([
            ("system", self.system_prompt),
            ("system", f"Context:\n{context_text}"),
            ("human", "{question}")
        ])

        chain = prompt | self.llm
        response = await chain.ainvoke({"question": question})
        return response.content
Expected Behavior
| User Type | Visible Docs |
|---|---|
| Valid user | All documents (public + private) |
| Public-only user | Only doc1 (public: true) |
| Unauthorized user | Blocked at prompt level |
Run Example Query
poetry run python -m src.main
Set a test query like:
query = "What treatments are available for high blood pressure?"
If the user can’t access private docs, only doc1 will be shown to the LLM, resulting in a more limited response.
Secure External Access (Action Controls)
AI systems aren’t just answering questions—they’re often performing actions on behalf of users. For example: booking an appointment, modifying data, or triggering workflows. This perimeter ensures that:
Only users who are allowed by policy can trigger external operations.
In our case, the external action is Scheduling a healthcare appointment
Only users who are 18+ and have can_schedule: true should be allowed.
Implement External Access Manager
Create a new file src/perimeters/external_access.py to encapsulate secure access logic:
# src/perimeters/external_access.py
from src.core.security import security_manager
from src.core.permissions import permissions_manager

class ExternalAccessManager:
    async def schedule_appointment(self, token: str, appointment_details: dict) -> str:
        try:
            # Step 1: Validate JWT
            user_claims = await security_manager.validate_token(token)

            # Step 2: Check Permit permissions
            check_result = await permissions_manager.permissions_checker._arun(
                user=user_claims,
                action="schedule",
                resource={"type": "healthcare_appointment"}
            )

            if not check_result.get("allowed", False):
                raise ValueError("User does not have permission to schedule an appointment.")

            # Step 3: (Mocked) external call
            date = appointment_details.get("date", "N/A")
            time = appointment_details.get("time", "N/A")
            return f"✅ Appointment successfully booked for {date} at {time}."

        except Exception as e:
            raise ValueError(f"Scheduling failed: {str(e)}")

external_access_manager = ExternalAccessManager()
Update Your Main Script
Simulate a user accepting an AI recommendation to schedule an appointment.
# src/main.py (continued)
from src.perimeters.external_access import external_access_manager

# Run PromptGuard as before...
response = await prompt_guard.process_medical_query(
    token=settings.test_jwt_token,
    question="Should I follow up with a doctor?"
)
print("AI Response:", response)

# Simulated user follow-up
user_input = "Yes"  # Imagine this comes from a UI click
if user_input.strip().lower() == "yes":
    schedule_response = await external_access_manager.schedule_appointment(
        token=settings.test_jwt_token,
        appointment_details={"date": "2025-12-10", "time": "10:00 AM"}
    )
    print("Scheduling Response:", schedule_response)
Test Scenarios
| User Attributes | Result |
|---|---|
age=25, can_schedule=true | ✅ Appointment booked |
age=25, can_schedule=false | ❌ Rejected |
age=16, can_schedule=true | ❌ Rejected (underage) |
You can also view full decision logs in the Audit Logs tab of the Permit dashboard.
Response Enforcement (Output Sanitization)
Even with secure prompts, document access, and external action controls, there’s still a risk:
What if the LLM "hallucinates" sensitive information or oversteps access boundaries in its final output?
To mitigate this, we add a custom output parser that:
- Scans AI output for sensitive terms
- Redacts or transforms the output before it's returned to the user
- Optionally varies redaction based on user role or permissions
Use Case
In our healthcare assistant:
Any instance of the term "high blood pressure" will be redacted unless the user has elevated permissions.
This is a basic example, but you can expand this to scan for:
- Patient names or medical IDs
- HIPAA-regulated phrases
- Regex-detected PII
Create a Custom Output Parser
Create src/perimeters/output_parser.py and define a SensitiveDataParser.
# src/perimeters/output_parser.py
from langchain.schema import BaseOutputParser

class SensitiveDataParser(BaseOutputParser):
    """
    Redacts specific sensitive phrases from LLM output.
    """

    def parse(self, text: str) -> str:
        # Example: redact "high blood pressure"
        return text.replace("high blood pressure", "[REDACTED]")

    def get_format_instructions(self) -> str:
        return "Return the text with any sensitive data redacted."
Attach the Parser to Your LLM Chain
Update prompt_guard.py to run the AI output through your parser:
# src/perimeters/prompt_guard.py (continued)
from src.perimeters.output_parser import SensitiveDataParser

class PromptGuard:
    def __init__(self):
        self.llm = ChatOpenAI()
        self.sensitive_parser = SensitiveDataParser()
        self.system_prompt = """You are a helpful medical assistant.
        Provide information based on the given context and general health knowledge.
        Do not provide medical advice or diagnosis."""

    async def process_medical_query(self, token: str, question: str, prompt_type="general"):
        user = await security_manager.validate_token(token)
        allowed = await permissions_manager.check_prompt_permissions(user=user, prompt_type=prompt_type)
        if not allowed:
            raise ValueError("User does not have permission to use the AI.")

        context_docs = await rag_security_manager.get_relevant_documents(query=question, user=user)
        context_text = "\n".join(doc.page_content for doc in context_docs)

        prompt = ChatPromptTemplate.from_messages([
            ("system", self.system_prompt),
            ("system", f"Context:\n{context_text}"),
            ("human", "{question}")
        ])

        chain = prompt | self.llm
        raw_response = await chain.ainvoke({"question": question})

        # 🔐 Parse the final response
        safe_response = self.sensitive_parser.parse(raw_response.content)
        return safe_response
Optional: Permission-Aware Redaction
Want to only redact for certain users (e.g., patients)? You could:
- Pass the
userobject intoSensitiveDataParser - Skip redaction if user has a role like
doctoror a clearance flag
This enables dynamic response filtering based on Permit policies.
Final Result & How to Run the Demo
With all four security perimeters implemented, you now have a fully secure, policy-driven LangChain application. Let’s run the final demo, observe the interactions, and verify policy enforcement in action.
Running the App
Make sure your .env is set, and dependencies are installed. Then run the app via:
poetry install
poetry run python -m src.main
Your main.py script will:
- Validate a JWT token
- Check prompt permissions
- Retrieve permitted documents using secure RAG
- Generate an LLM response based on that context
- Redact any sensitive terms from the output
- Simulate an appointment scheduling request (if applicable)
Example JWT Payloads
Ineligible User
{
  "key": "user-123",
  "attributes": {
    "age": 16,
    "ai_opt_in": false,
    "daily_quota_remaining": 0,
    "can_schedule": false}
}
Result: Rejected during prompt validation (fails ABAC rules)
Fully Eligible User
{
  "key": "user-123",
  "attributes": {
    "age": 25,
    "ai_opt_in": true,
    "daily_quota_remaining": 10,
    "can_schedule": true}
}
Result: Prompt allowed, Private docs retrieved, Appointment scheduled, Sensitive response redacted (if applicable)
What You Should See
If everything is working correctly, you’ll observe:
- Unauthorized users are stopped early via prompt protection
- Only documents the user can view are included in the context
- The AI answers based on filtered knowledge
- Responses with restricted terms are sanitized
- Scheduling is blocked or allowed based on user attributes
Where to View Permissions & Logs
Audit Logs in the Permit dashboard let you trace each check and see why a user was allowed or denied. You can use the Policy Editor to tweak conditions and immediately affect runtime behavior.