MongoDB RAG Integration
MongoDB RAG Integration lets you build a secure Retrieval-Augmented Generation (RAG) system using MongoDB, Permit.io, and LangChain. This guide walks you through setting up a policy-enforced AI agent that retrieves and generates responses based on user identity and permissions—ensuring agents only access data they're authorized to see.
This guide uses Permit.io's Four Perimeter Model for AI Access Control to ensure:
- Only eligible users can interact with your AI agent
- Sensitive data is protected based on user roles
- External actions are never triggered without authorization
- Outputs are policy-compliant before reaching the user
By the end, you'll have a fully operational, policy-governed RAG pipeline with attribute-based authorization.
Prerequisites & Tools
| Tool / Service | Purpose |
|---|---|
| MongoDB Atlas | Vector database for document storage & search |
| Permit.io | Authorization-as-a-service with policy-based access control |
| OpenAI | LLM API for embeddings & generation |
| Docker & Docker Compose | To run all services locally |
| Python 3.11+ | For running setup scripts |
The full source code is available here: permitio/permit-mongodb-secure-rag
Quickstart
Set Up Vector Search in MongoDB Atlas
- Create a new project and cluster (Free M0 tier is fine).
- Create a secure_rag database and documents collection.
- Go to Search Indexes → Create Search Index → Vector Search.
- Paste the following JSON in the configuration:
{
  "fields": [
    {"numDimensions": 1536, "path": "vector_embedding", "similarity": "cosine", "type": "vector"},
    {"path": "metadata.department", "type": "filter"},
    {"path": "document_id", "type": "filter"}
  ]
}
- Click Save and wait for the index to build.
Clone the Project & Add Your .env File
- Clone the repo:
git clone https://github.com/permitio/permit-mongodb-secure-rag.git
cd permit-mongodb-secure-rag
- Create a
.envfile in the root and add your credentials:
MONGODB_URI=<your-mongodb-uri>
OPENAI_API_KEY=<your-openai-api-key>
PERMIT_API_KEY=<your-permit-api-key>
PERMIT_PDP_URL=http://permit-pdp:7000
Run Everything
- Start all services with Docker Compose:
docker-compose up --build
- Start the Permit PDP locally
- Sync markdown docs to MongoDB
- Generate embeddings for each document
- Sync metadata, users, departments & ReBAC policies to Permit.io
- Start the LangChain FastAPI server
Test the RAG Query API
Query endpoint:
curl -X POST http://localhost:8000/query \
 -H "Content-Type: application/json" \
 -d '{"query": "Tell me about 2026 budget", "user_id": "user_marketing_1"}'
Try querying as:
carol→user_marketing_1(viewer in marketing)alice→user_engineering_1(viewer in engineering)
Project Structure
| Folder/File | Purpose |
|---|---|
docs/ | Markdown documents grouped by department |
watcher/ | Syncs docs to MongoDB & triggers embedding generation |
scripts/ | Permit ReBAC setup (policies, departments, users) |
app/ | LangChain API logic (FastAPI powered) |
Dockerfile* | Docker setup for each service |
How Permissions Work
- Each markdown file contains frontmatter metadata (e.g., department, confidential)
- This metadata is synced to Permit.io as resource instances
- When a user makes a query, LangChain asks Permit.io which documents they can access
- MongoDB vector search filters based on permitted IDs only
- The final response is generated using OpenAI from only allowed docs
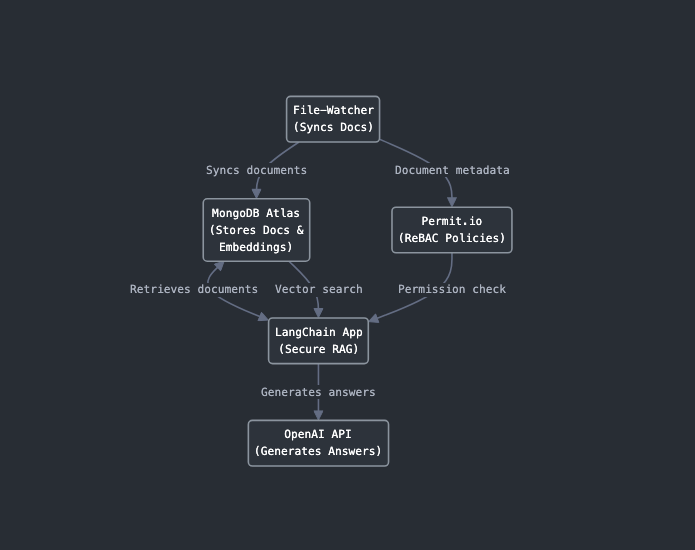
Architecture Diagram
In-Depth Project Overview
Secure RAG combines Retrieval-Augmented Generation with Role-Based Access Control (ReBAC) to ensure that an AI agent only retrieves and generates responses from data a user is authorized to access. This project integrates:
- MongoDB Atlas: Stores documents and their embeddings for RAG, with vector search and database indexing for efficient retrieval.
- Permit.io: Manages access control using a ReBAC model to enforce permissions based on user identity and department.
- LangChain: Provides the framework for building the RAG pipeline, connecting MongoDB for retrieval and OpenAI for generation.
- Docker Compose: Orchestrates the services (MongoDB, Permit PDP, LangChain app, and file-watcher).
Key Features
- Secure Retrieval: Retrieves only documents a user is permitted to access, based on their identity and department.
- File Syncing: A file-watcher service monitors the docs directory for changes and syncs Markdown files to MongoDB.
- Policy Tagging: Syncs document metadata to Permit.io as resource instances with attributes like department and confidential.
- Immediate RAG Availability: Newly added files are synced to MongoDB and immediately available for RAG queries.
MongoDB Atlas Setup
Create a MongoDB Atlas Cluster
- Sign up/login to MongoDB Atlas.
- Create a new cluster (e.g., Cluster0) in your preferred region (e.g., AWS Singapore).
- Use the free tier (M0 Sandbox) for this demo.
Create the Database and Collection
- In your cluster, go to the Collections tab.
- Create a database named
secure_rag. - Add a collection named
documents.
Set Up Vector Search Index
- Go to the Atlas Search tab in your cluster.
- Click Create Search Index and select Vector Search.
- Use the JSON editor to create an index named
vector_indexwith the following configuration:
{
  "fields": [
    {
      "type": "vector",
      "path": "vector_embedding",
      "numDimensions": 1536,
      "similarity": "cosine"
    },
    {
      "type": "filter",
      "path": "metadata.department"
    },
    {
      "type": "filter",
      "path": "document_id"
    }
  ]
}
vector_embedding: Field storing document embeddings (1536 dimensions for OpenAI embeddings).cosine: Similarity metric for vector search.metadata.department: Enables pre-filtering by department.
Set Up Database Index on document_id
- Click Next and Create Index. Wait for the index status to show as "READY".
- Go to the Indexes tab in the
secure_rag.documentscollection. - Click Create Index (not "Create Search Index").
Use the following configuration:
Field: document_id
Type: 1 (asc)
Options:
- Check "Create unique index".
- Index name: document_id_index.
- Leave "Create TTL" unchecked.
- Click Create Index.
This index improves performance for lookups and updates on document_id, which is used as a unique identifier.
Get the MongoDB Connection URL
- In the Atlas UI, click Connect on your cluster.
- Choose Connect your application.
- Copy the connection string - e.g:
mongodb+srv://<username>:<password>@cluster0.mongodb.net/secure_rag?retryWrites=true&w=majority
- Replace
<username>and<password>with your Atlas credentials.
Permit.io Policy Setup
To enable authorization in our RAG, we have to configure policy rules in Permit.io. For the sake of this tutorial, we will set up a Relationship-based Access Control (ReBAC) model that includes implicit permissions granted using role derivations.
Sign Up/Login to Permit.io
- Go to Permit.io and sign up or log in.
- Create a new project (e.g., SecureRAGDemo).
Define Resources and Roles
- Go to the Policy Editor in the Permit.io UI.
- Define the following resources and roles:
- Resource:
department(no actions needed) - Resource:
document(action:read) - Role:
viewer(permission:document:read)
- Resource:
Create Department Instances
- Go to Resources > department.
- Click Create Resource Instance.
- Set the key to
engineering, the tenant todefault, and add the attribute name: "Engineering Department". - Repeat for:
department:marketing(Attributes: name: "Marketing Department")department:finance(Attributes: name: "Finance Department")
Create Users
- Go to the Users tab.
- Click Create User.
- Set the key to
alice, and the email toalice@example.com. - Repeat for
bob(bob@example.com).
Assign Roles to Users
- Go to Role Assignments.
- Click Assign Role.
- Select user
alice, roleviewer, and resourcedepartment:engineering. - Repeat for
bobwithdepartment:marketing.
Define Role Derivations
- Go to the Policy Editor.
- Add a role derivation to inherit permissions:
- If a user has the
viewerrole indepartment:X, they inheritdocument:readfor documents where the department is the parent of the document. - Example: User with
viewerindepartment:engineeringcan read all documents wheredepartment:engineeringis the parent.
- If a user has the
Get Permit API Key and PDP URL
- Go to Settings > API Keys in Permit.io.
- Generate an API key and copy it.
- The PDP URL is typically
http://permit-pdp:7000(as defined indocker-compose.yml).
Automating Your Permit.io Setup with Scripts
If you prefer to automate the setup of resources, roles, departments, users, and relationships in Permit.io, you can use the provided scripts instead of configuring everything manually via the UI. After running these scripts, you’ll only need to define the role derivation manually in the Permit.io UI.
Install Script Dependencies
The scripts require the permit package. Install it using:
pip install permit
Set Environment Variables for Scripts
Ensure PERMIT_API_KEY and PERMIT_PDP_URL are set in your .env file:
PERMIT_API_KEY=<your-permit-api-key>
PERMIT_PDP_URL=http://permit-pdp:7000
You can get the PERMIT_API_KEY from the Permit.io UI under Settings > API Keys.
Run the Setup Scripts
-
Set Up ReBAC Model:
Runsetup_rebac.pyto define resources (department,document), roles (viewer), and relationships:python setup_rebac.py -
Create Departments:
Runsetup_departments.pyto create department instances (department:engineering,department:marketing,department:finance):python setup_departments.py -
Create Users and Assign Roles:
Runsetup_users.pyto create users (alice,bob) and assign roles (e.g.,aliceasviewerindepartment:engineering):python setup_users.py
Manually Define Role Derivation in Permit.io UI
- The scripts set up resources, roles, and relationships, but you need to define the role derivation manually.
- Go to the Policy Editor in the Permit.io UI.
- Add a role derivation:
- Resource:
document - Role:
viewer - Condition: User has role
viewerindepartmentANDdepartmentisparentofdocument.
- Resource:
This ensures that a user with the viewer role in a department (e.g., department:engineering) can read documents where that department is the parent.
Verify Setup
In the Permit.io UI, check:
- Resources > department for department instances.
- Resources > document for document instances (after syncing documents).
- Users for
aliceandbobwith their role assignments. - Policy Editor for role derivation.
Environment Variables
Create a .env File:
In the project root, create a .env file with the following variables:
MONGODB_URI=<your-mongodb-atlas-uri>
OPENAI_API_KEY=<your-openai-api-key>
PERMIT_API_KEY=<your-permit-api-key>
PERMIT_PDP_URL=http://permit-pdp:7000
Running the Project
Clone the Repository Clone the repo and navigate to the project directory:
git clone https://github.com/permitio/permit-mongodb-secure-rag.git
cd permit-mongodb-secure-rag
Install Dependencies
-
For Dockerized services, dependencies are installed automatically when you build the containers.
-
For manual scripts, install dependencies with:
pip install -r requirements.embeddings.txtpip install -r requirements.txt
Spin Up Services with Docker Compose
Start all services:
docker-compose up --build
This will start:
permit-pdp: Permit.io Policy Decision Pointfile-watcher: Monitors thedocsdirectory and syncs files to MongoDBlangchain-app: The Secure RAG API, accessible athttp://localhost:8000
Sync Documents to Permit.io
-
The file-watcher will sync docs to MongoDB automatically.
-
To sync docs to Permit.io, run:
python sync_documents.py -
Update the
file_pathinsync_documents.pyto the document you want to sync (e.g.,./docs/engineering/api_design.md).
Generate Embeddings for Documents
Run the following to generate embeddings for all documents and store them in MongoDB:
python generate_embeddings.py --all
Test the Secure RAG API
Query the API with a user ID to test Secure RAG:
curl -X POST http://localhost:8000/query \
  -H "Content-Type: application/json" \
  -d '{"query": "What is API design?", "user_id": "alice"}'
alice (engineering) can access engineering docs; bob (marketing) cannot.
Final Thoughts & Resources
User Identity:
- The API receives a
user_id(e.g., alice) in the query request.
Permission Checks:
- The LangChain app queries Permit.io to determine which documents alice can read.
- Permit.io evaluates the ReBAC policy and returns a list of accessible document IDs.
Filtered Retrieval:
- LangChain queries MongoDB Atlas, filtering by the permitted document IDs and the user's query (e.g., "What is API design?").
- MongoDB performs a vector search on the
vector_embeddingfield to retrieve relevant documents.
Answer Generation:
- The retrieved documents are passed to OpenAI to generate a context-aware answer.
- Only content from permitted documents is used in the response.
This ensures that sensitive data is only accessible to authorized users, making the RAG system secure.
For more information and to deepen your understanding, check out these resources: