LangFlow Integration
LangFlow is a low-code, drag-and-drop framework for building AI applications with LLMs. It lets both developers and non-developers visually design and deploy LLM-driven workflows. When your AI workflows handle sensitive data, like personal bookings, financial information, or internal operations, they need proper access control.
In this guide, we’ll show how to wrap LangFlow workflows with Permit.io to enforce policy-based controls at every level using Permit’s Four Perimeter Model.
This guide uses Permit’s Four Perimeter Model for AI Access Control. These perimeters help ensure:
- Only eligible users can interact with your AI agent
- Sensitive data is protected based on user roles
- External actions are never triggered without authorization
- Outputs are policy-compliant before reaching the user
Use Case
To demonstrate this integration, we’ll build a secure flight booking system using Langflow and Permit.io. The app will include:
- A Flight Search Flow: Users search for flights, but pricing/availability is restricted unless authorized
- A Policy Info Flow: Access to baggage rules or services based on permission
- A Flight Booking Flow: Only verified, premium users can complete bookings
By the end of this guide, you’ll have a fully operational Langflow app that enforces access control across prompts, retrieved data, external actions, and responses.
Prerequisites and Tech Stack
Tools & Services
| Tool | Purpose |
|---|---|
| LangFlow | Visual LLM workflow builder |
| Permit.io | Policy-as-code access control |
| OpenAI | LLM + embeddings for RAG |
| Astra DB | Vector store for flight search |
| Docker | To run Permit PDP locally |
Required Environment Variables
Add the following to your .env file:
PERMIT_API_KEY=your_api_key
PERMIT_PDP_URL=http://localhost:7766  # Or your cloud PDP
JWKS_URL=https://your-domain/.well-known/jwks.json  # For JWT validation
OPENAI_API_KEY=sk-...  # From OpenAI
For a PDP setup guide, see Permit PDP Overview
Your PERMIT_API_KEY is available in the Permit.io dashboard
Planning our Policies
Before jumping into implementation, it's essential to define what we're protecting, who needs access, and under what conditions.
We'll use a flight booking AI assistant as our example. It allows users to search for flights, view information, and book tickets, with access controlled by user attributes and policies.
Policy Model: Resources, Roles & Rules:
Resources & Actions
Flight- Available Actions:
search,info,viewprice,viewavailability - Attributes:
type(String) – Specifies the type of operation (info, search, booking).sensitivity(String) – Defines data sensitivity (public, protected, private).
- Available Actions:
Booking- Available Actions:
create,modify,cancel,view - Attributes:
type(String) – Defines booking operation types.sensitivity(String) – Controls access to booking data based on its sensitivity.
- Available Actions:
User Attributes
User access is determined by three key attributes:
membership_tier(Array) – Defines a user's access level (e.g.,basic,premium).region(String) – Specifies the user’s geographical location (domestic,international).verified(Boolean) – Indicates if the user’s identity has been confirmed (true/false).
Condition Sets
These condition sets define who can access what, controlling how users interact with resources:
-
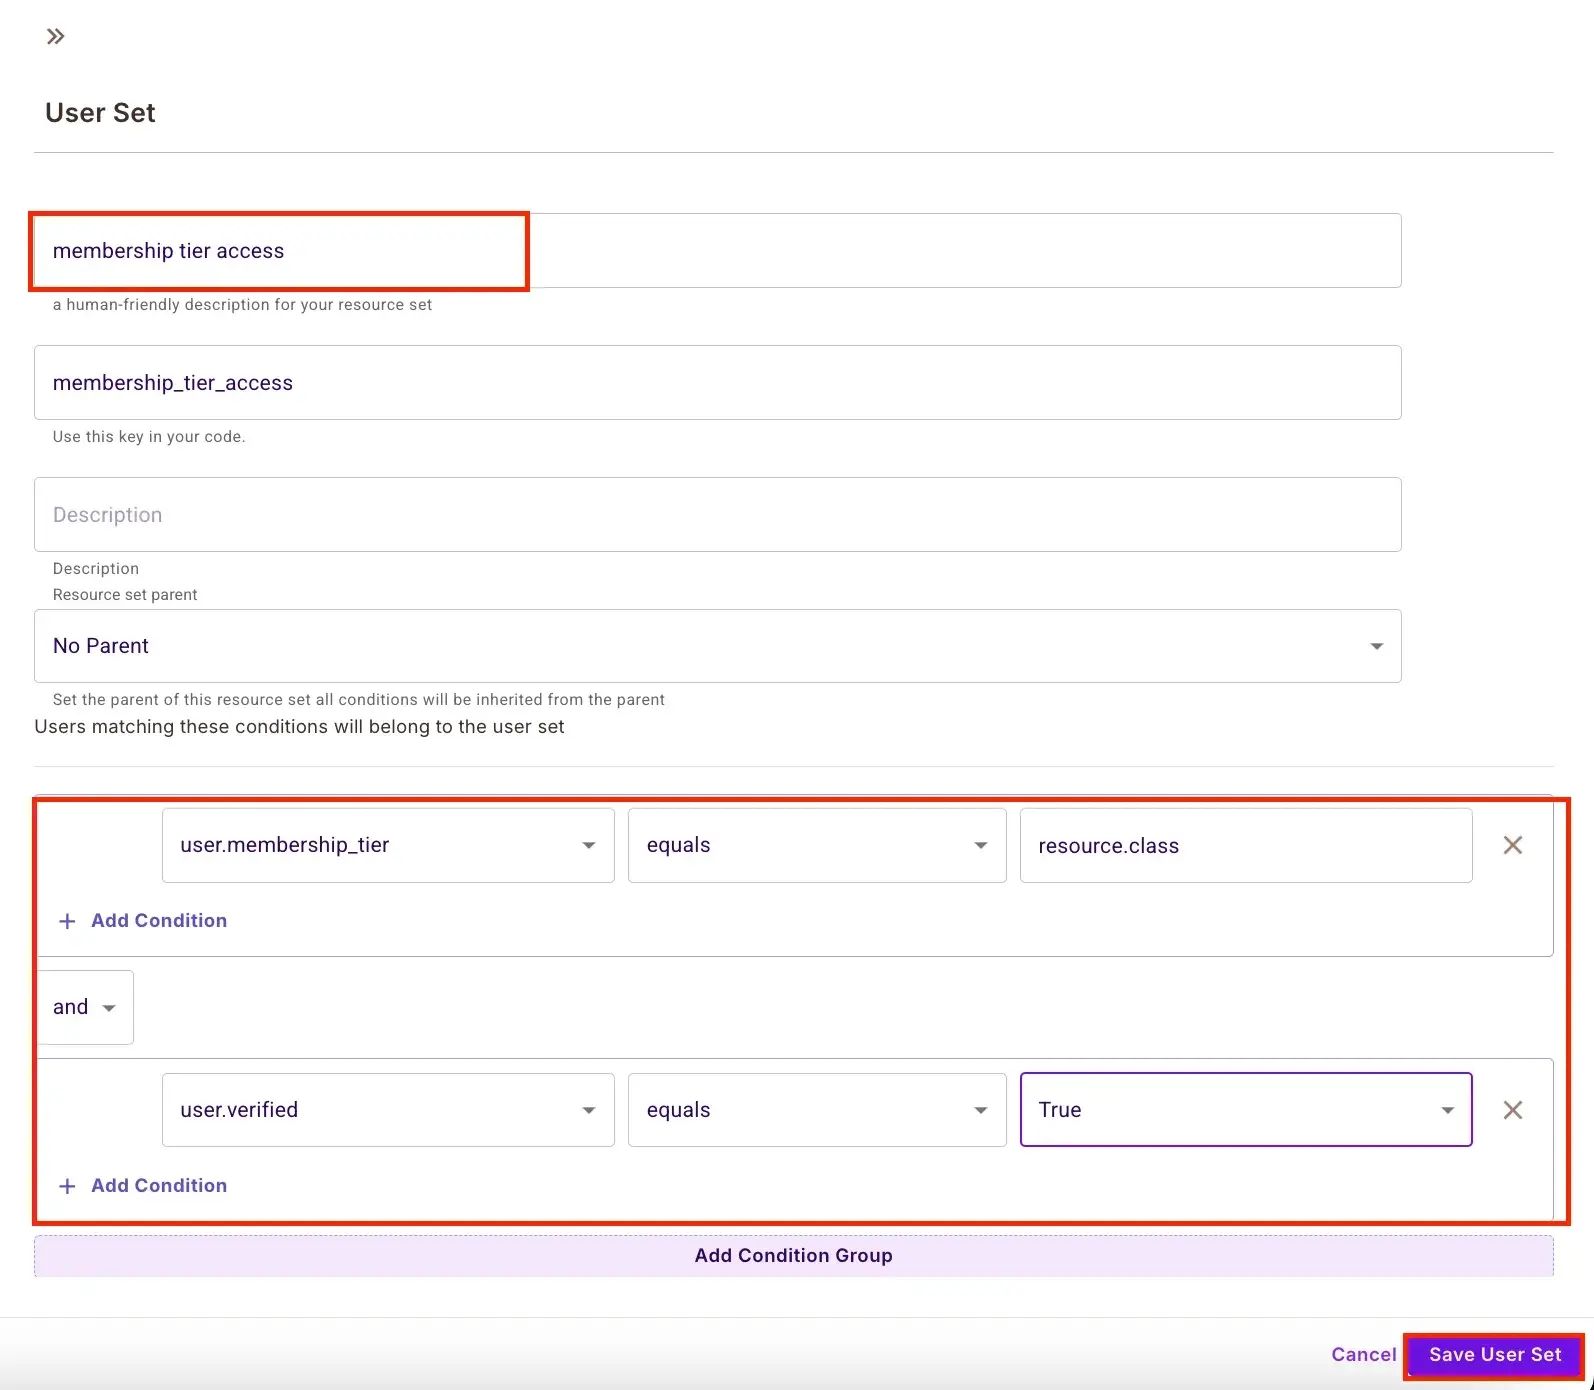
Membership Tier Access:
user.membership_tierincludesresource.classANDuser.verified == true -
Regional Restrictions:
user.region == "domestic" -
Sensitive Data Access:
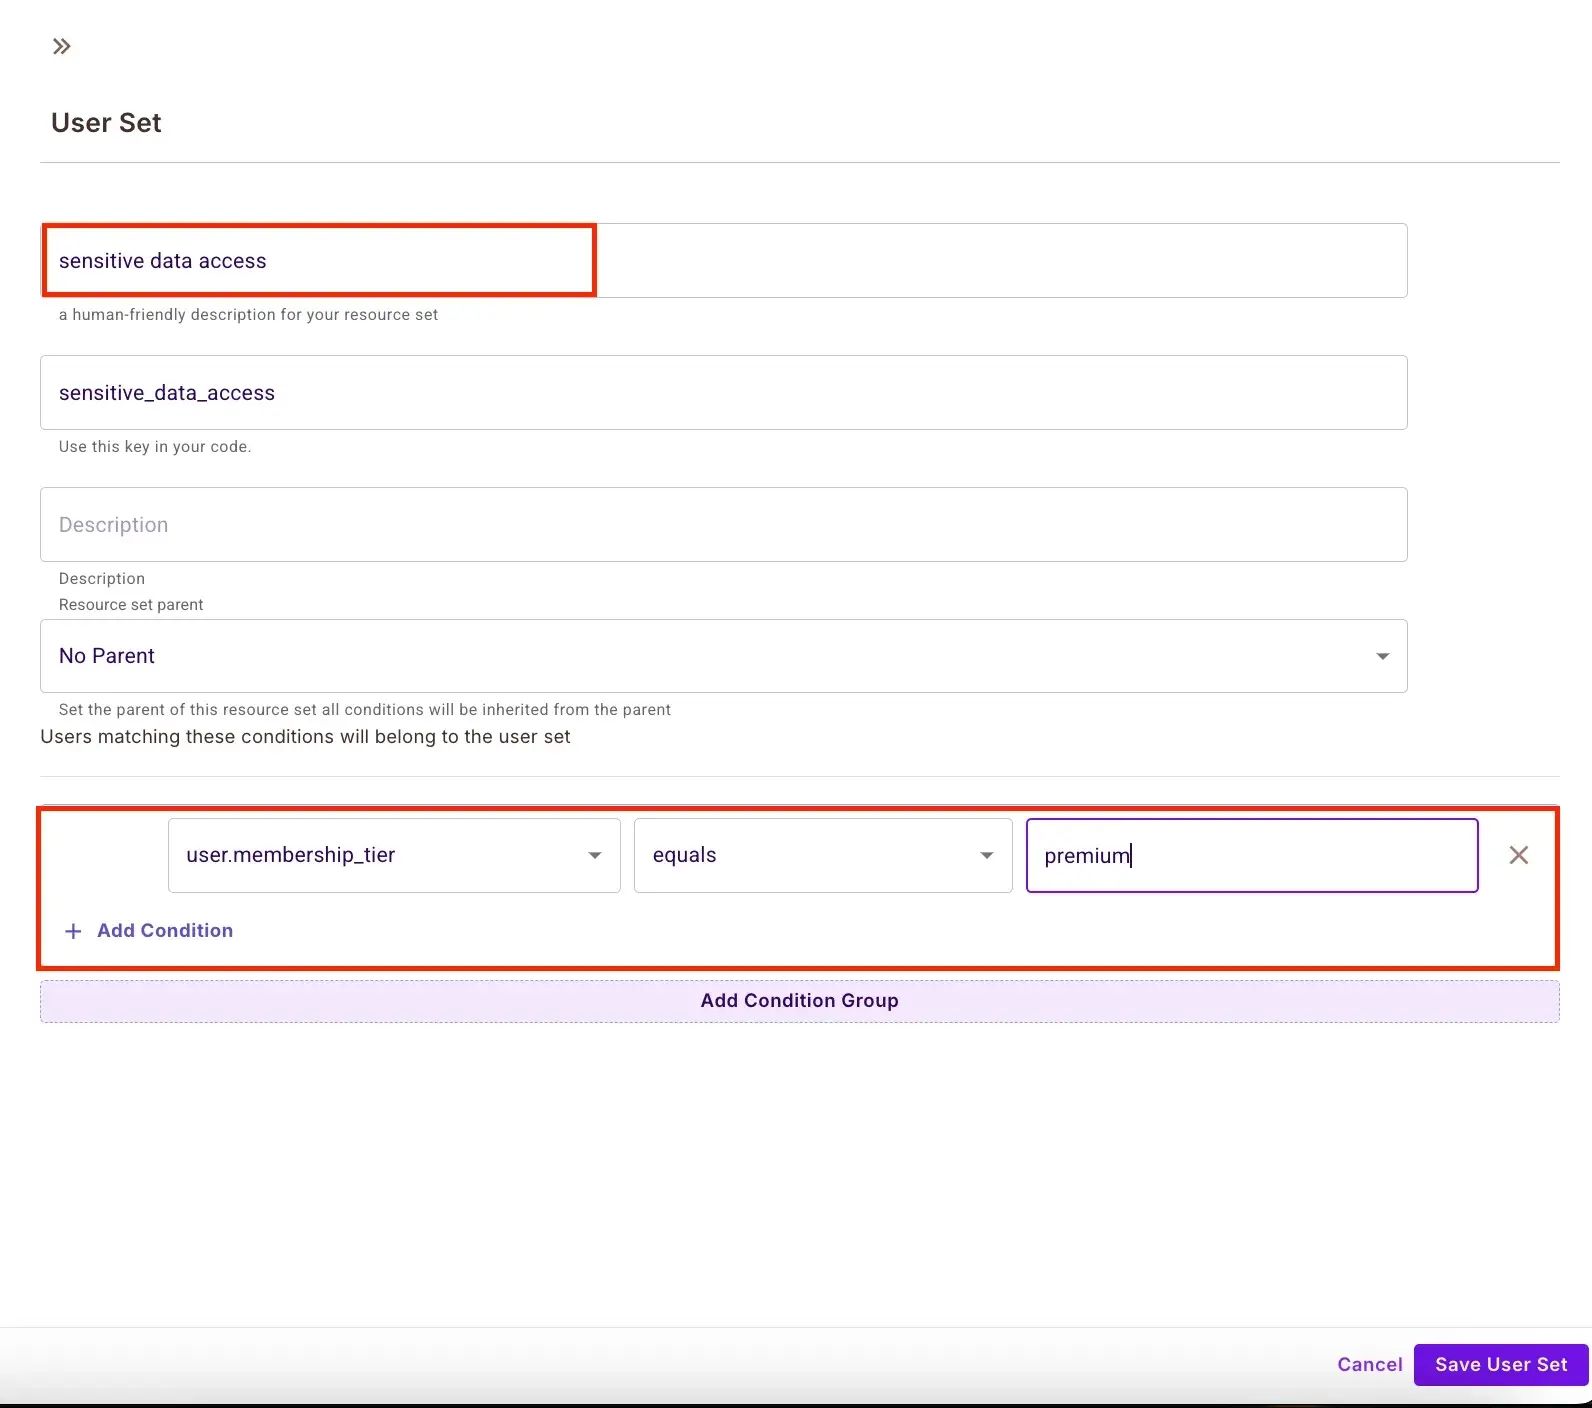
user.membership_tierincludes"premium"
Let’s set up attribute-based (ABAC) policies using the Permit.io dashboard.
Permit Schema Setup
With our perimeters and policies mapped out, it’s time to configure our authorization schema in the Permit.io dashboard. This includes defining resources, actions, user and resource sets, and ABAC rules.
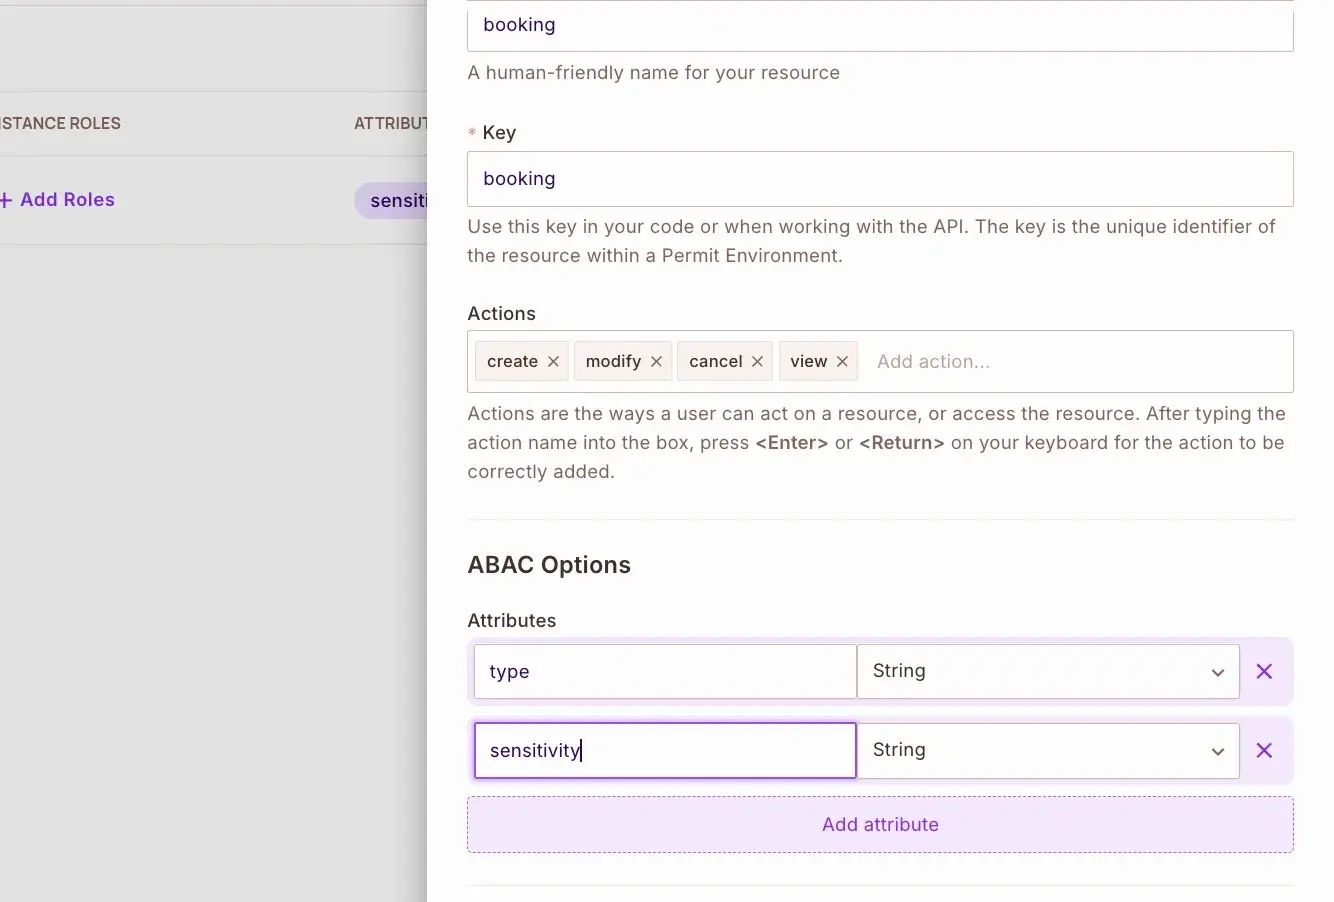
Define Resources
Navigate to Policy → Resources in your Permit.io dashboard.
First, let’s create a flight resource. This will handle everything related to flight information and searches:
{
  "actions": [
    "search",       // Search for available flights
    "info",         // Get flight details
    "viewprice",    // Access pricing information
    "viewavailability" // Check seat availability
  ],
  "attributes": {
    "type": "String",        // Controls the type of operation ("info", "search", "booking")
    "sensitivity": "String"  // Defines data sensitivity ("public", "protected", "private")
  }
}

Next, create a booking resource for managing actual flight bookings:
{
  "actions": [
    "create", // Create new bookings
    "modify", // Change existing bookings
    "cancel", // Cancel bookings
    "view"    // View booking details
  ],
  "attributes": {
    "type": "String",        // Defines booking operation types
    "sensitivity": "String"  // Controls booking data sensitivity
  }
}
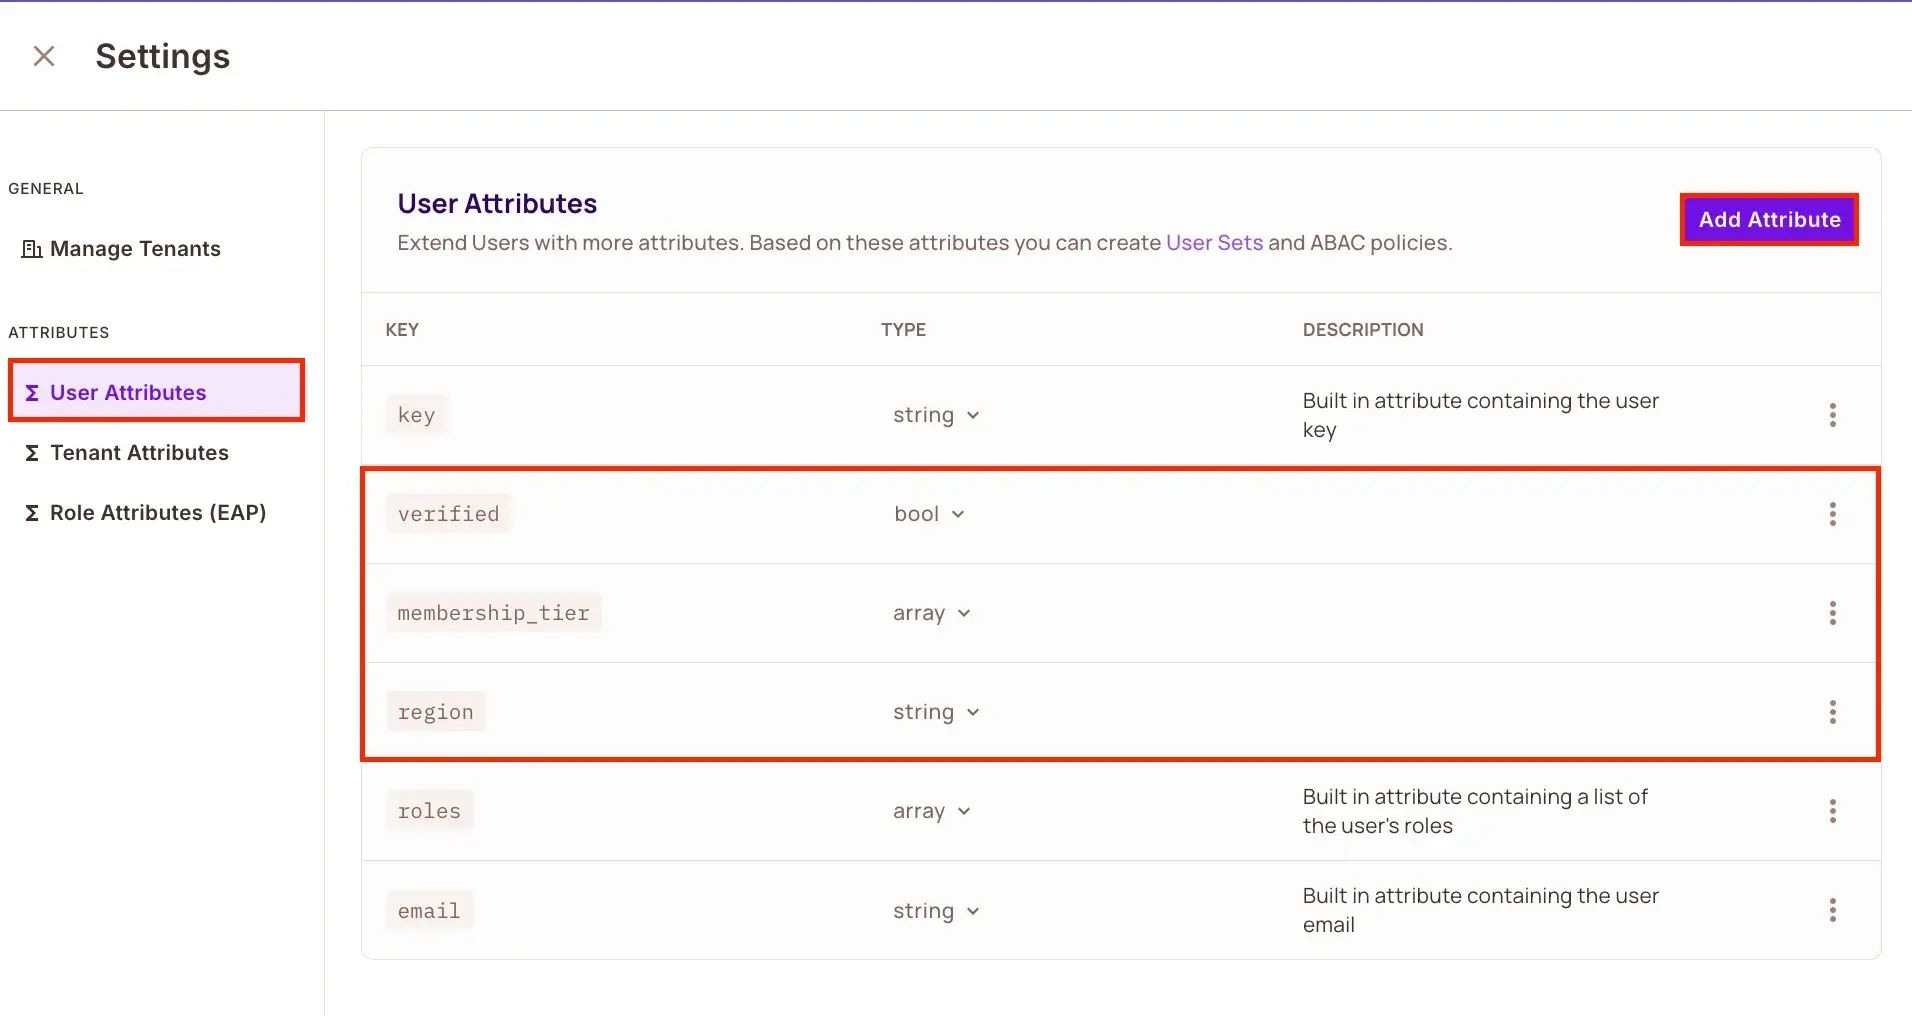
Define User Attributes
In the Directory → Users → Settings page, define the following user attributes to enable fine-grained access control based on user properties like membership tier, region, and verification status:
{
  "membership_tier": "Array",
  "region": "String",
  "verified": "Boolean"
}
Create Condition Sets
Navigate to Policy → ABAC Rules and click ABAC User Sets. Create the following sets:
user.membership_tier includes resource.class AND user.verified == true
user.region == "domestic"

user.membership_tier includes "premium"
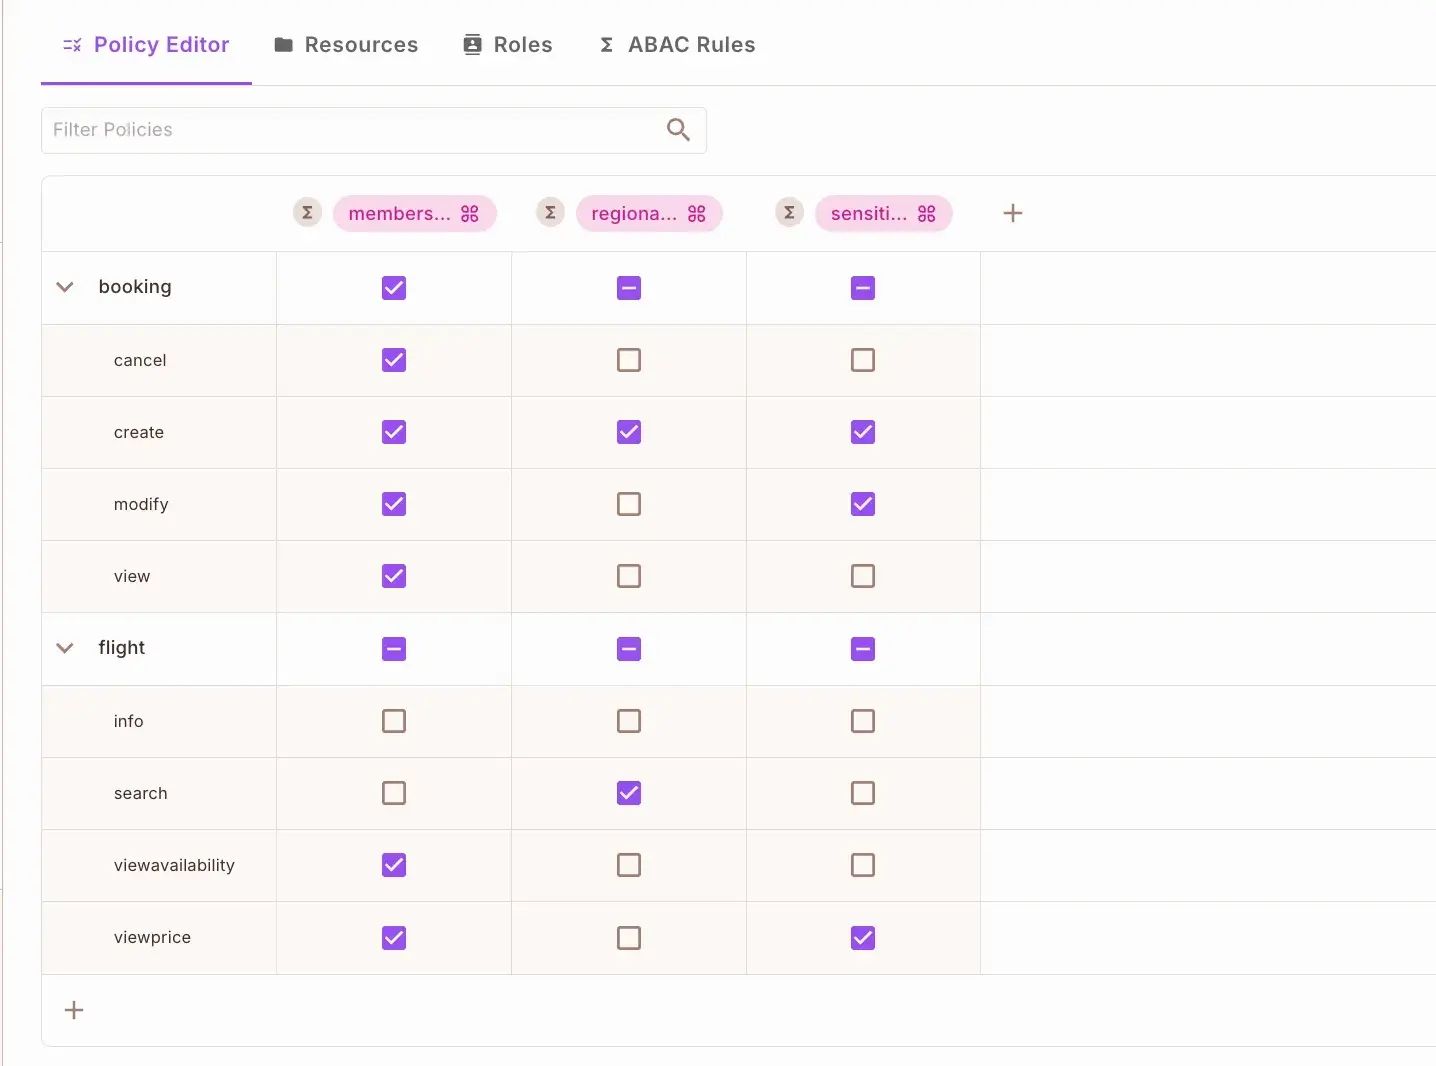
Enforce Policies
Use the policy editor to enforce your access control rules. In the policy matrix, you’ll see your resources and actions with checkboxes for each condition set at the top. These checkboxes enforce your conditions; when multiple boxes are checked for an action, all conditions must be satisfied for the action to be allowed.
Now that your access control infrastructure is configured, you can start building your flows!
Running the Permit PDP Locally
To enable real-time policy evaluations in Langflow, we’ll run Permit.io’s PDP locally. The PDP acts as the enforcement engine, evaluating access requests against the policies you defined in the dashboard. To do that:
Pull the PDP Docker Image Make sure Docker is installed and running on your machine, then pull the latest version of the PDP:
docker pull permitio/pdp-v2:latest
Start the PDP Container Run the PDP with your Permit API key:
bash
CopyEdit
docker run -it -p 7766:7000 \
  --env PDP_DEBUG=True \
  --env PDP_API_KEY=<YOUR_API_KEY> \
  permitio/pdp-v2:latest
Replace <YOUR_API_KEY> with your actual API key from the Permit.io dashboard (found under Settings → API Keys).
- The PDP will listen on port
7766 - All permission checks in Langflow will route to this local instance
You can also point to the cloud PDP instead of running locally, by setting pdp_url to https://cloudpdp.api.permit.io.
For detailed capabilities and limits, see Cloud PDP Capabilities.
Building the Flows
Now that we’ve set up our access control infrastructure, let’s build our Flight Booking Agent! We’ll create three flows that demonstrate how to implement security while providing a great user experience.
Flight Search Flow
The Flight Search Flow is the first and most fundamental part of our secure AI agent. It allows users to search for flights while enforcing access policies to ensure that only authorized users can interact with the system.
This flow demonstrates Prompt Filtering using Permit.io’s JWT Validator and Permissions Check components.
Overview of Flow Components
In your Langflow canvas, drag the following components:
- Text Input – for entering a JWT token
- Chat Input – for entering the flight search query
- JWT Validator – to authenticate the user
- Permissions Check – to enforce access policies
- If-Else Router – to direct access based on the permission outcome
- City Selection Agent – parses and validates city queries
- Astra DB – retrieves flight data
- Parse Data – formats results
- Two Chat Outputs – to display allowed and denied responses
Component Configuration
JWT Validator
- JWT Token: Connected from Text Input
- JWKS URL:
https://your-domain/.well-known/jwks.json(Replace with your real endpoint)
Permissions Check
PDP URL: `http://localhost:7766`
API Key: Your Permit API Key
Resource: `flight`
Action: `search`
City Selection Agent - Model: gpt-4o-mini
Instructions:
You are a flight search assistant. Your job is to:
1. Extract departure and arrival cities from user queries
2. Validate that these are real cities with airports
3. Format the search request for our database
4. Handle cases where cities are unclear or invalid
Astra DB
- Collection Name:
flights - Database:
flight_db(replace with your Astra DB details)
Parse Data Template:
Flight {row_number}: {departure_city} to {arrival_city}
Departure: {departure_time}
Airline: {airline}
Flight Number: {flight_number}
Price: ${price}
Available Seats: {seats}
Flow Logic
Connect your components like this:
- Text Input → JWT Validator
- JWT Validator → Permissions Check
- Permissions Check → If-Else Router
- True path → City Selection Agent → Astra DB → Parse Data → Chat Output (Allowed)
- False path → Chat Output (Denied)
- Chat Input connects to both the router and the City Selection Agent
- Users must pass JWT validation
- Users must be permitted to perform a
searchaction on theflightresource - Only authorized users can proceed to the AI-powered city lookup and DB search
Example Behavior
Authorized User:
- Sees a list of flights formatted clearly
- Can query locations like “Find flights from NYC to Paris next week”
Unauthorized User:
- Receives an “Access Denied” message before any AI or database interaction
Flight Information Flow
The Flight Information Flow is designed to answer user queries about travel policies, baggage allowances, and general flight service information.
This flow enforces the Secure External Access perimeter using the Permissions Check component and ensures only authorized users can access policy data.
Overview of Flow Components
For this flow, you’ll use the following Langflow components:
- Text Input – JWT token
- Chat Input – User’s policy-related question
- JWT Validator – Validates and extracts user identity
- Permissions Check – Checks if the user can access flight info
Component Configuration
JWT Validator
Connects to your identity provider’s public JWKs.
JWKS URL: https://your-domain/.well-known/jwks.json
Permissions Check
PDP URL: `http://localhost:7766`
API Key: Your Permit API key
Resource: `flight`
Action: `info`
Local Expert Agent - Model: gpt-4o-mini
Instructions:
You are a knowledgeable Local Expert that provides accurate flight policy and service information. You should:
1. Answer questions about baggage policies
2. Explain flight rules and restrictions
3. Provide information about services and amenities
4. Always maintain privacy by not revealing sensitive pricing or route details without authorization
URL Component
- URLs:
https://api.flightpolicies.com/baggagehttps://api.flightpolicies.com/services
- Output Format:
Text
Parse Data Template
Policy Information:
------------------
{policy_title}

Details:
{policy_details}

Additional Information:
{additional_info}
------------------
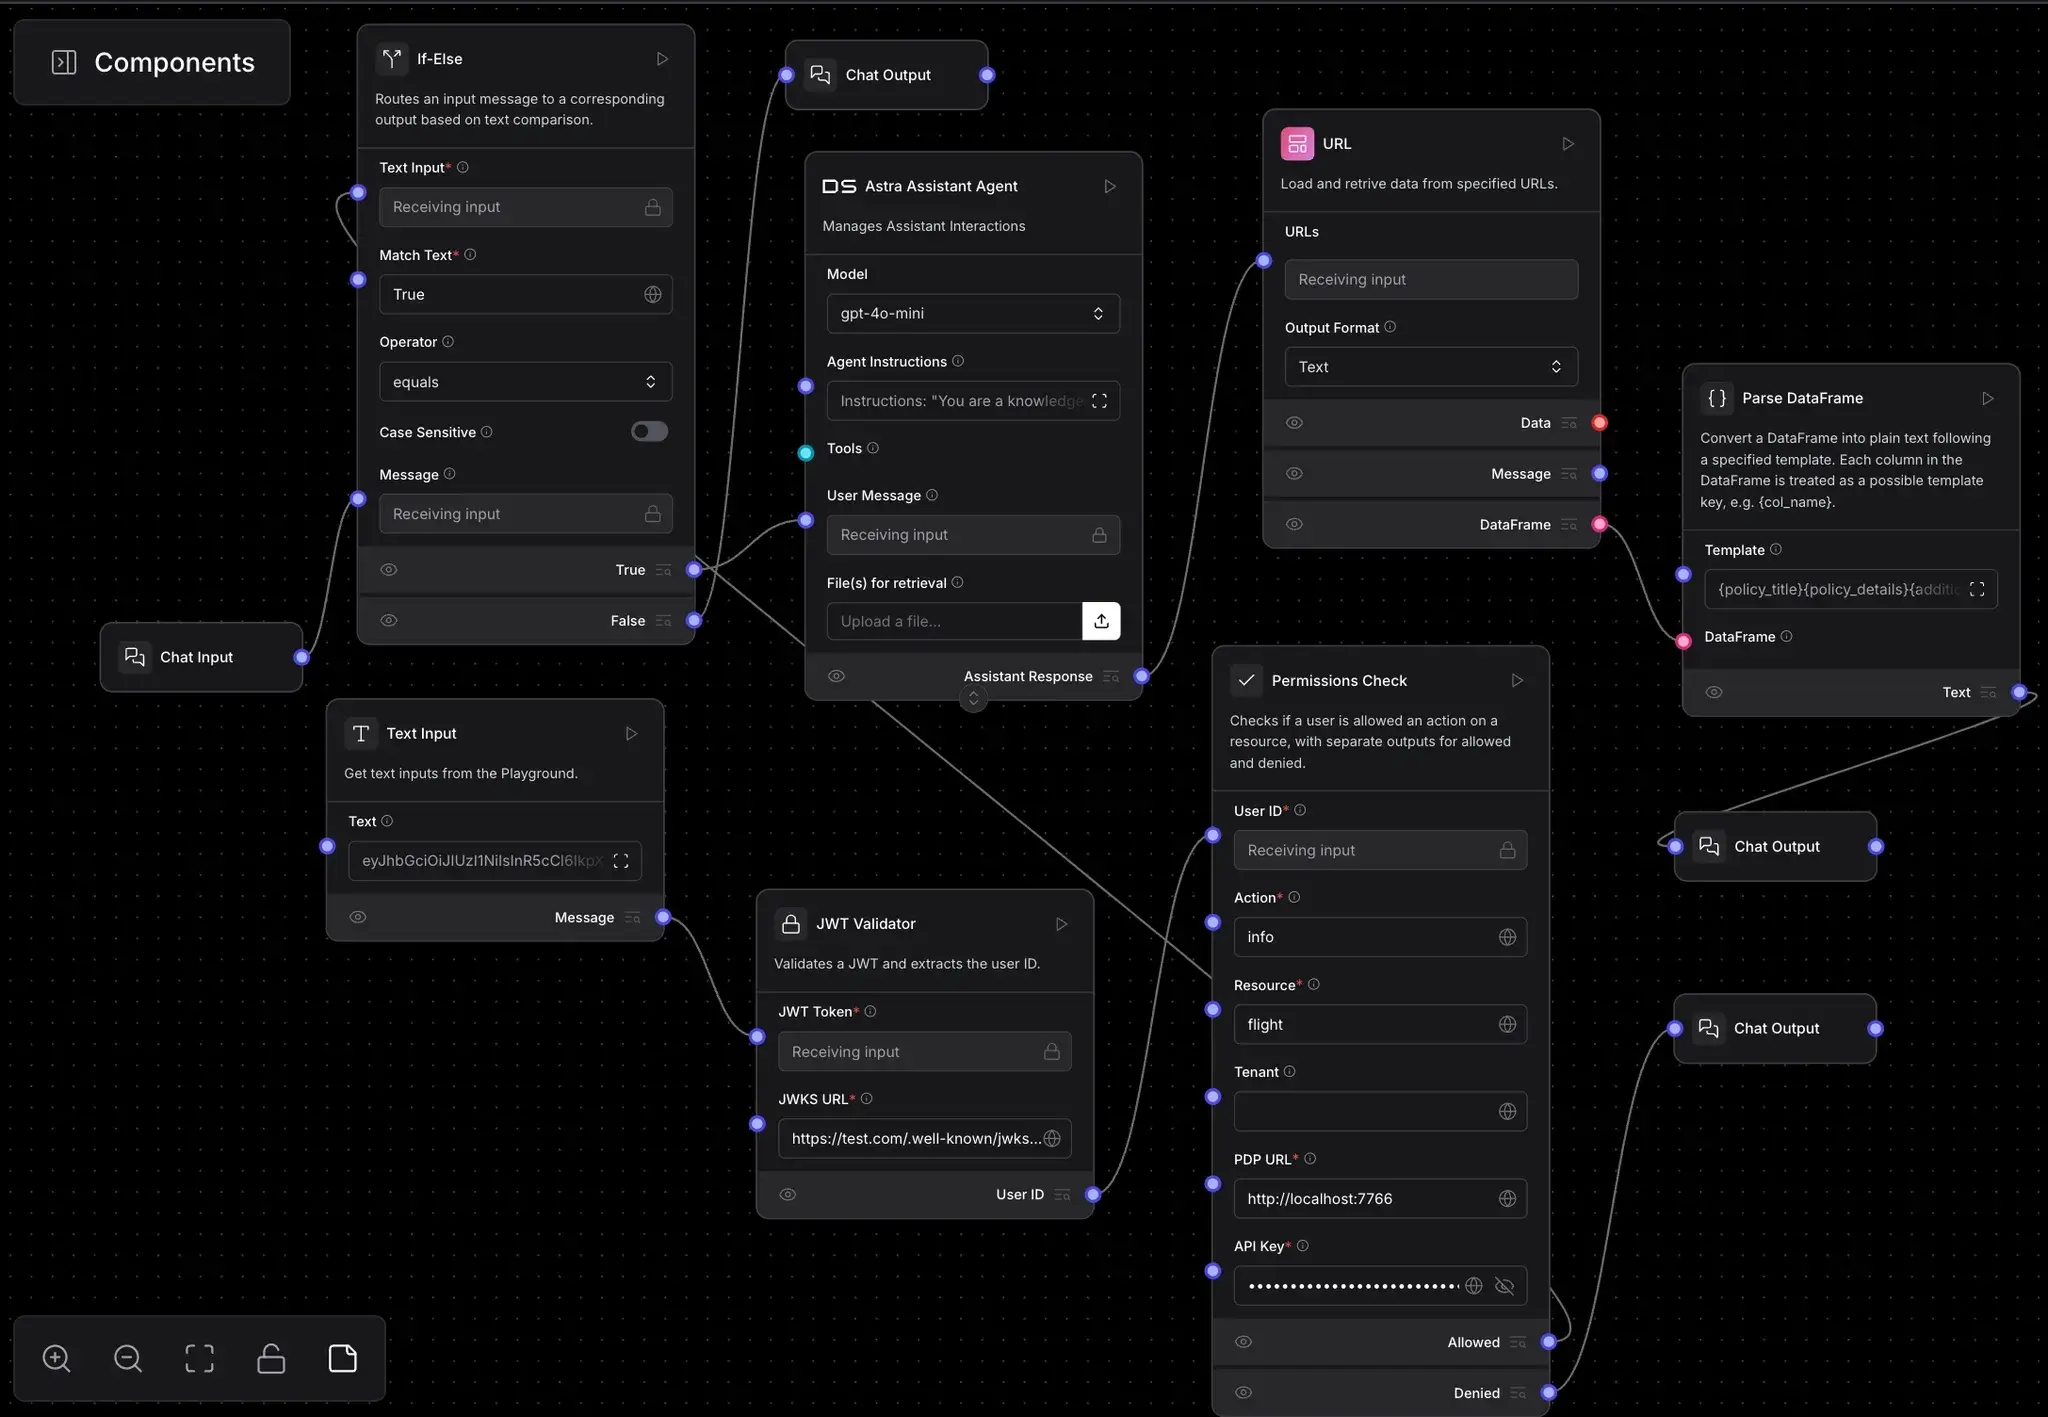
Flow Logic
Connect your components like this:
- Text Input → JWT Validator
- JWT Validator → Permissions Check
- Chat Input → If-Else Router
- Permissions Check determines routing:
- If allowed → Local Expert Agent → URL → Parse Data → Chat Output (Allowed)
- If not allowed → Chat Output (Denied)
Example Behavior
Example Queries:
- “What’s the baggage allowance for international flights?”
- “What are the rules for pet travel?”
| User Attributes | Result |
|---|---|
| Verified, authorized user | ✅ Full response |
| Unverified or not allowed by policy | ❌ Access denied |
This ensures users only access policy data when permitted, even though the actual content may live behind APIs or LLM prompts.
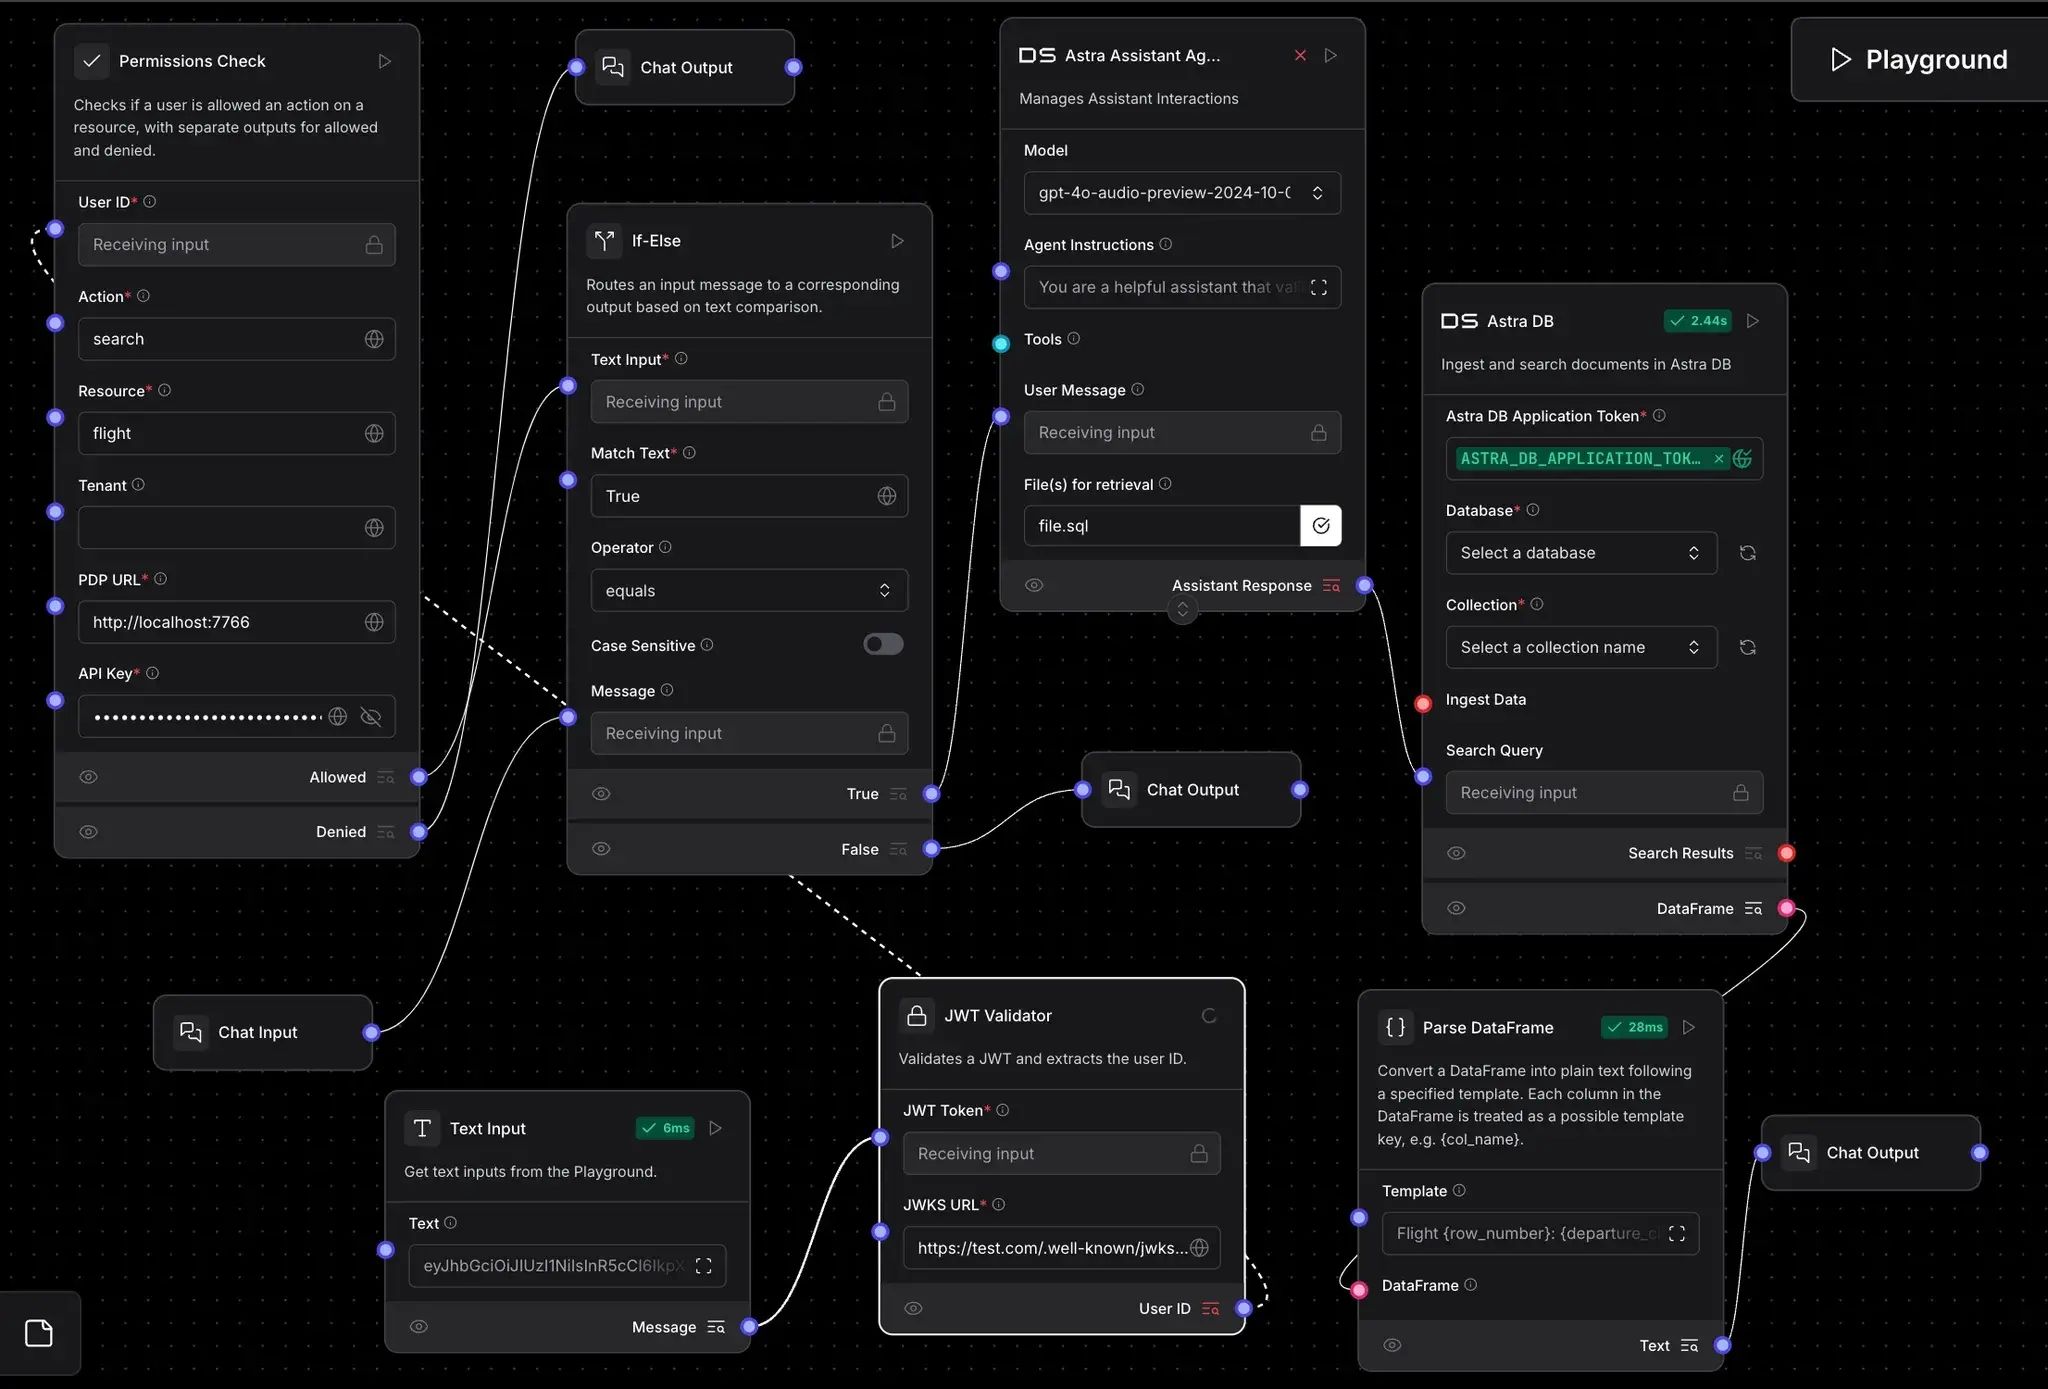
Flight Booking Flow
The Flight Booking Flow is the most important part of the app. It lets users finalize bookings — a privileged action that requires strict permission checks and response controls. This flow demonstrates:
- Secure External Access using
Permissions Check - Response Enforcement using
Data Protection,Filter Data, and controlled formatting
Components Used
This flow includes standard identity and policy components, plus booking-specific tools:
- Text Input – JWT token
- Chat Input – Booking intent or user prompt
- JWT Validator – Authenticates the user
- Permissions Check – Verifies booking access
- Data Protection – Filters resource access
- If-Else Router – Controls access routing
- API Request – Executes booking (mocked)
- Astro Assistant Agent – Helps process booking intent
- OpenAI – Generates responses
- Data to Message, Filter Data – Shapes the final output
- Chat Output – Displays booking result
Component Configuration
JWT Validator
Connects to your identity provider’s public JWKs.
Permissions Check
PDP URL: `http://localhost:7766`
API Key: Your Permit API key
Resource: `booking`
Action: `create`
Data Protection
- Resource Type:
booking - Action:
create - Filter IDs (optional): List of specific booking records to restrict
API Request (Mocked for Tutorial)
- URL:
https://api.flights.com/v1/bookings - Method:
POST
Astro Assistant Agent - Model: gpt-4o-mini
Instructions:
You are a booking assistant that helps process flight booking requests.
Always ensure the user is authorized before confirming anything.
Flow Connections
The full flow wiring looks like this:
- Text Input → JWT Validator
- JWT Validator → Permissions Check AND Data Protection
- Chat Input → Permission Check → If-Else Router
- If allowed:
- → API Request → Assistant Agent → Chat Output
- If not allowed:
- → Denied Chat Output
- Data Protection → Filter Data → Format → Chat Output
This layered setup ensures that:
- Unauthorized users can’t book flights
- Users only see booking-related data that they’re allowed to access
Example Scenario
User sends: “Book me a flight from NYC to LA for next Monday.”
| User Attributes | Outcome |
|---|---|
verified: true, membership_tier: premium | ✅ Booking succeeds, full response |
verified: false | ❌ Access denied before booking |
tier: basic, region: international | ❌ Might be restricted (based on policy) |
Running the Demo & Verifying Behavior
With all three flows complete—Search, Information, and Booking—your Langflow app now includes end-to-end access control using Permit.io. This section walks through running the full system, verifying security boundaries, and testing common scenarios.
Start the Local PDP Ensure your local PDP is running:
docker run -it -p 7766:7000 \
  --env PDP_DEBUG=True \
  --env PDP_API_KEY=<YOUR_API_KEY> \
  permitio/pdp-v2:latest
Replace <YOUR_API_KEY>
You can get your actual key in the Permit.io dashboard.
Launch Langflow If you're running Langflow locally:
poetry install
poetry run langflow run
Or use Langflow Cloud to import your flows via JSON.
Set up .env and JWTs
You’ll need a .env file with:
PERMIT_API_KEY=...
PERMIT_PDP_URL=http://localhost:7766
JWKS_URL=https://your-domain/.well-known/jwks.json
Use test JWT tokens with embedded attributes to simulate different user roles and access levels.
Example: Fully Authorized Premium User
{
  "sub": "user-001",
  "attributes": {
    "membership_tier": ["premium"],
    "region": "domestic",
    "verified": true}
}
Example: Limited Basic User
{
  "sub": "user-002",
  "attributes": {
    "membership_tier": ["basic"],
    "region": "international",
    "verified": false}
}
Interact with the Flows
Use the Langflow Playground or UI:
- Search: Try
“Flights from NYC to LA” - Info: Ask
“What’s the pet travel policy?” - Booking: Say
“Book a ticket for me from LAX to BOS”
Expected Behavior Matrix
| Flow | Fully Authorized | Unverified | Basic Tier |
|---|---|---|---|
| Search Flights | ✅ Shows results | ❌ Blocked | ✅ Limited area |
| Info Query | ✅ Full response | ❌ Denied | ✅ Public info |
| Booking Request | ✅ Allowed + created | ❌ Blocked | ❌ Blocked |
Where to View Permissions & Logs
Audit Logs in the Permit dashboard let you trace each check and see why a user was allowed or denied. You can use the Policy Editor to tweak conditions and immediately affect runtime behavior.
- Build secure LLM flows using Langflow
- Enforce four critical authorization perimeters
- Model and apply fine-grained ABAC policies with Permit.io
- Keep AI workflows safe and compliant
By combining Langflow’s visual interface with Permit’s policy engine, you can ship secure, compliant AI systems without writing custom enforcement logic from scratch.
Further Reading & Resources
- Got Questions? Join the Permit.io Slack Community
- Guide: Building a Secure Flight Booking AI Agent with Langflow
- Github: langchain-permit