Version: 2.0.0

Access Request Element

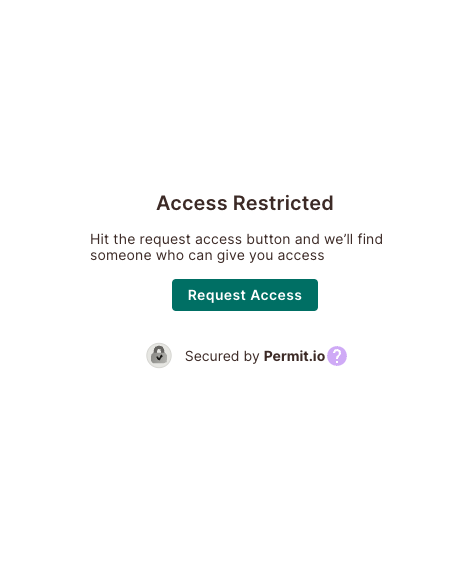
The Access Request Element is a Frontend component that allows users to request access to restricted resources, or resources that requires specific permissions. When a request is made, it is sent to the workspace owner, who can either approve or deny it.

ar-element

Overview

The Access Request Element allows users to submit access requests through a dedicated UI embedded in your application. This allows your end-users to ask that you make dynamic changes to their permissions within your application in case they are currently denied the access they require. After a user submits a request, it is sent for approval by an admin (or any other "Level 1" role defined in the "User Management" Element), who can either approve or deny it.

This element is especially useful when users request access to resources that are unavailable to them by default.

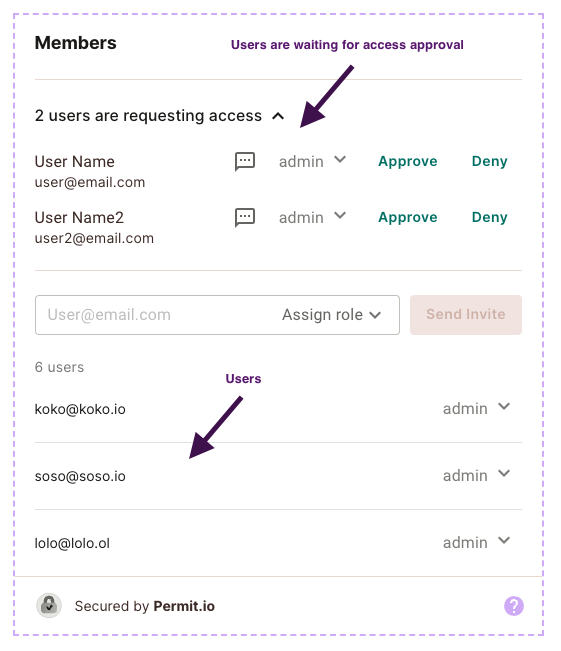
Using the "Access Request" Element is as simple as embedding it into your Frontend application. Once embedded, users can request access to restricted resources by clicking the "Request Access" button. Later, an admin can view a list of all pending access requests in the "User Management" Element, where they can approve or deny them.

Example

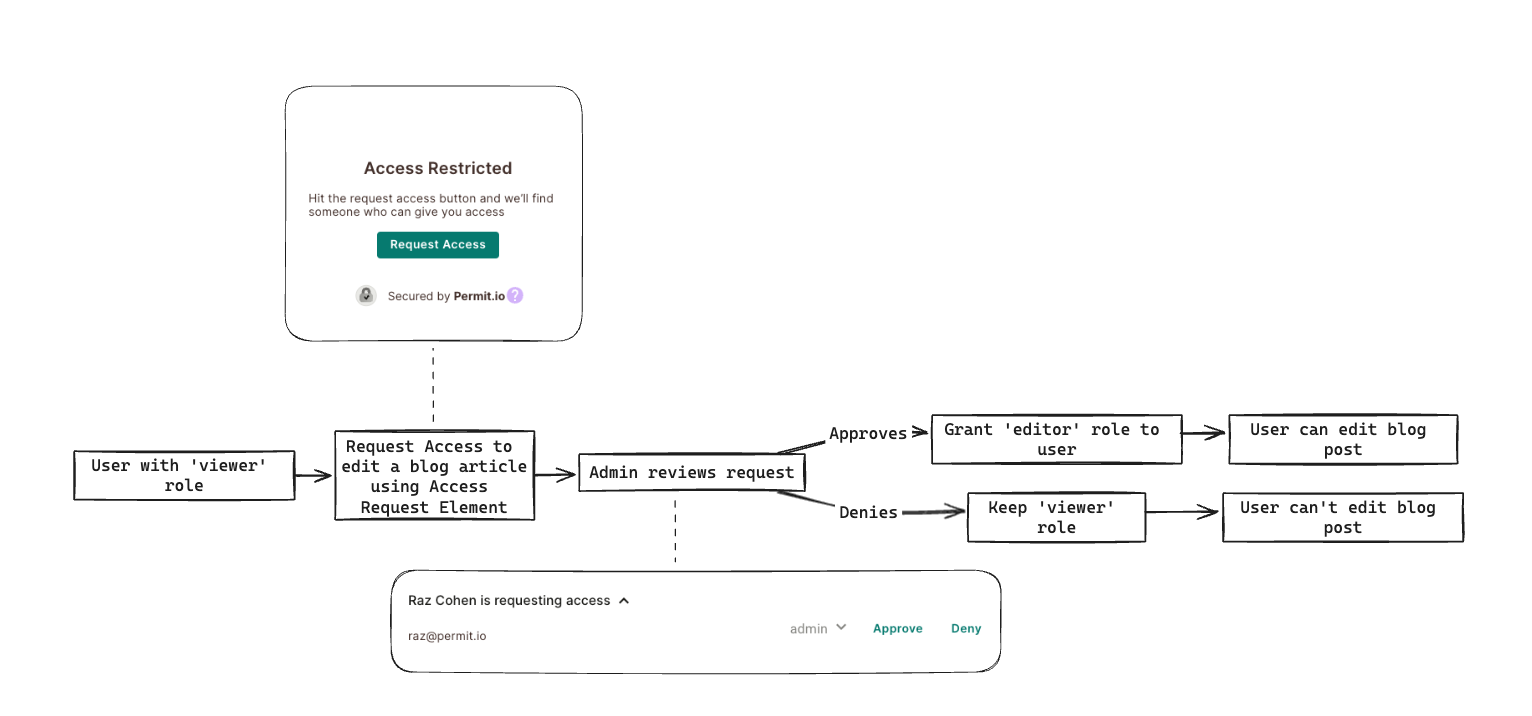
Say we have a blog where users have defined roles, each assigned specific permissions. A user with the "viewer" role, for example, cannot write new blog articles, while a user with the "editor" role does.

If a user assigned the "viewer" role wishes to write an article, they must request access. This can be done by submitting an access request through the "Access Request" Element. Upon receiving this request, the system administrator reviews it to determine whether or not to grant them the necessary permissions (essentially, the editor role), allowing them access to write articles.

access-request

User Management Element

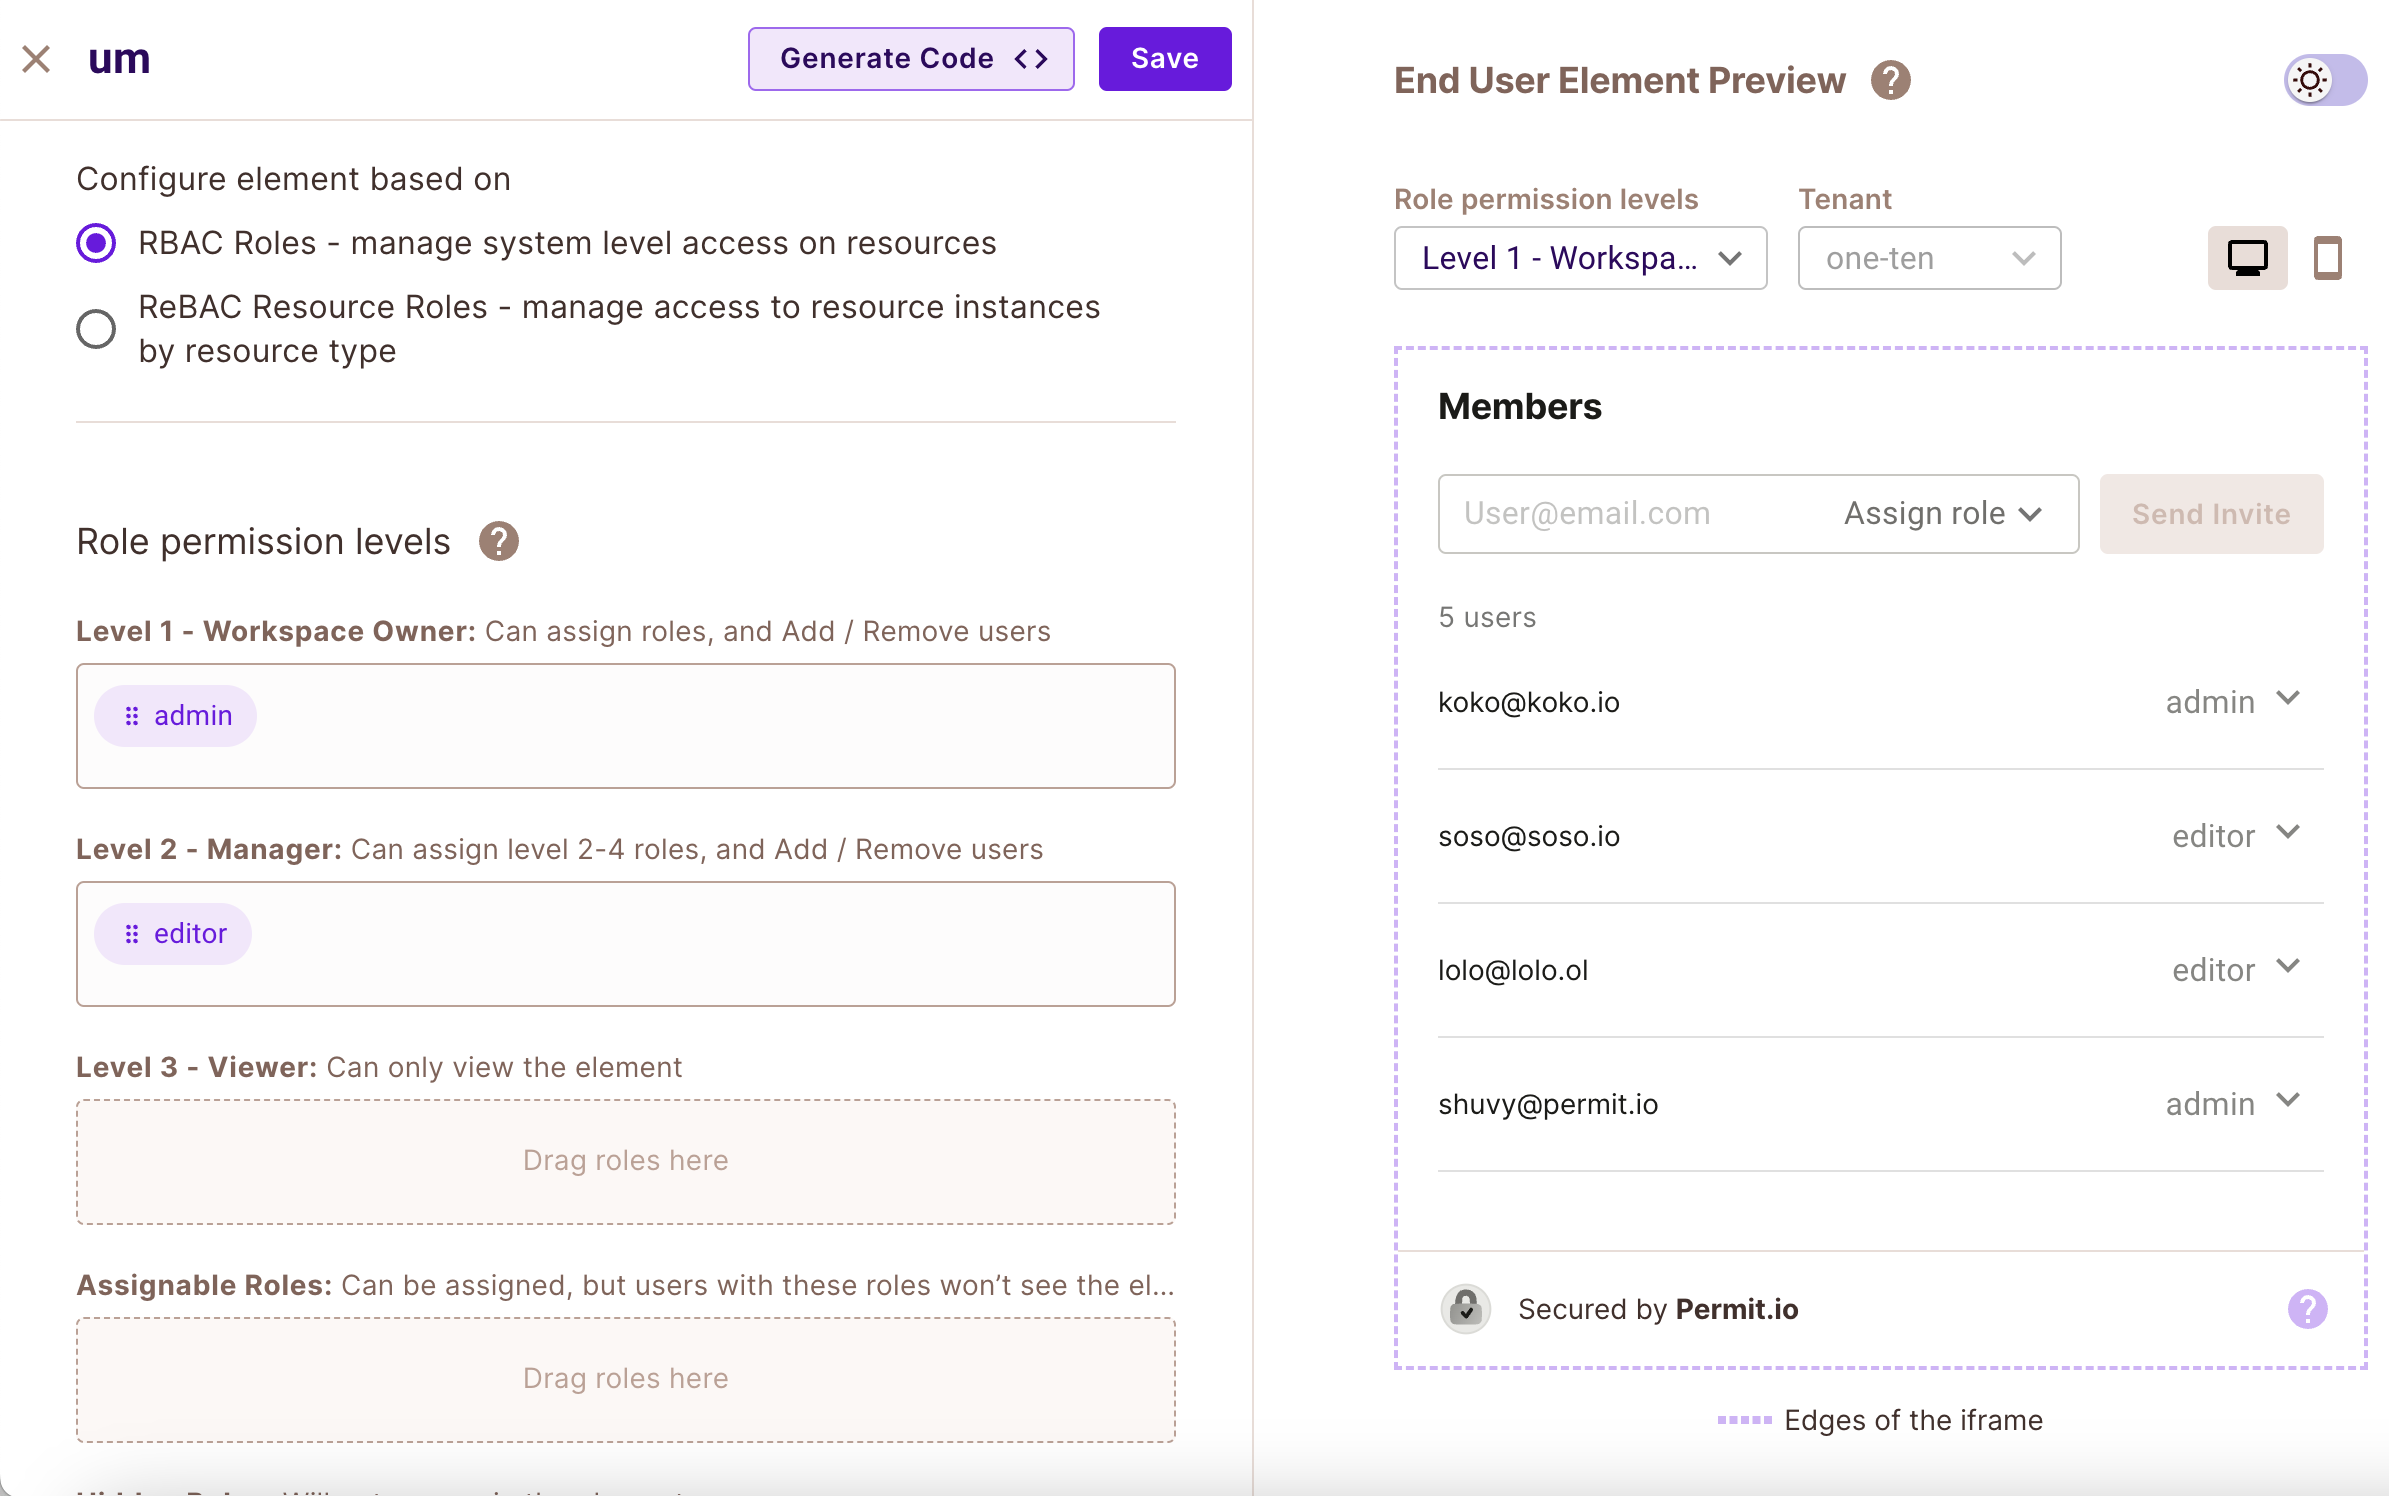
To use the Access Request Element, it is essential that you first have a User Management Element in place. The User Management Element is where the workspace owner can review access requests once they are submitted.

create-um

note

In order to configure the User Management Element, you’ll need to create roles for your policy. This can be done via the “Roles” page

create-um

Creating and Connecting the Element

1. In the Elements Screen, under Access Request, click on "Create Element".

create-access-request

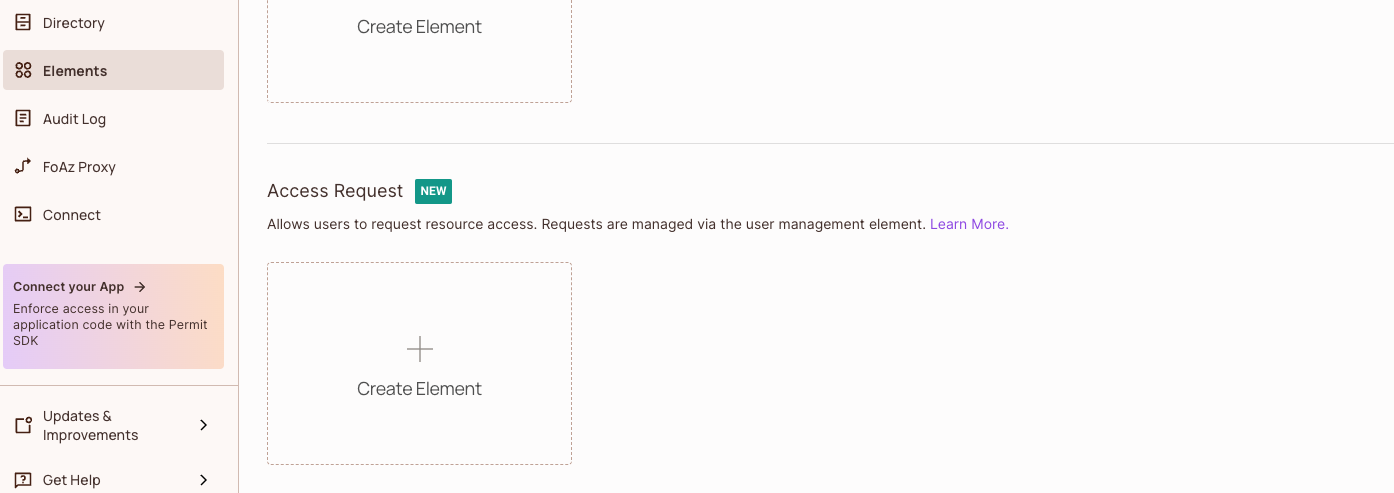
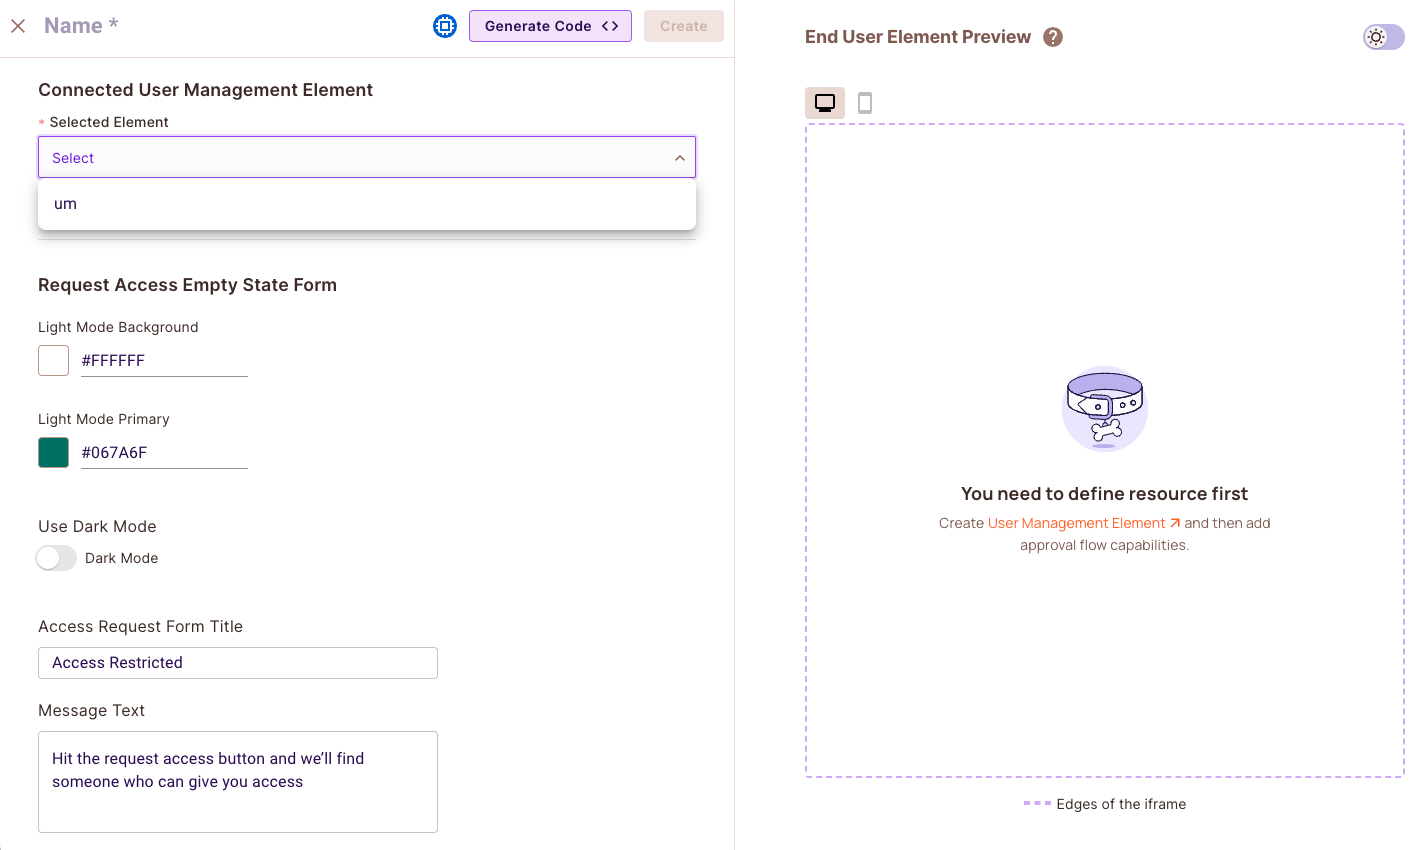
2. Select the User Management Element to which you want to connect this Access Request Element

create-a-r-element

3. Give the element a name, and click on "Create".

4. Go back to the Elements Screen, and open the User Management Element to which you want to connect the Access Request Element.

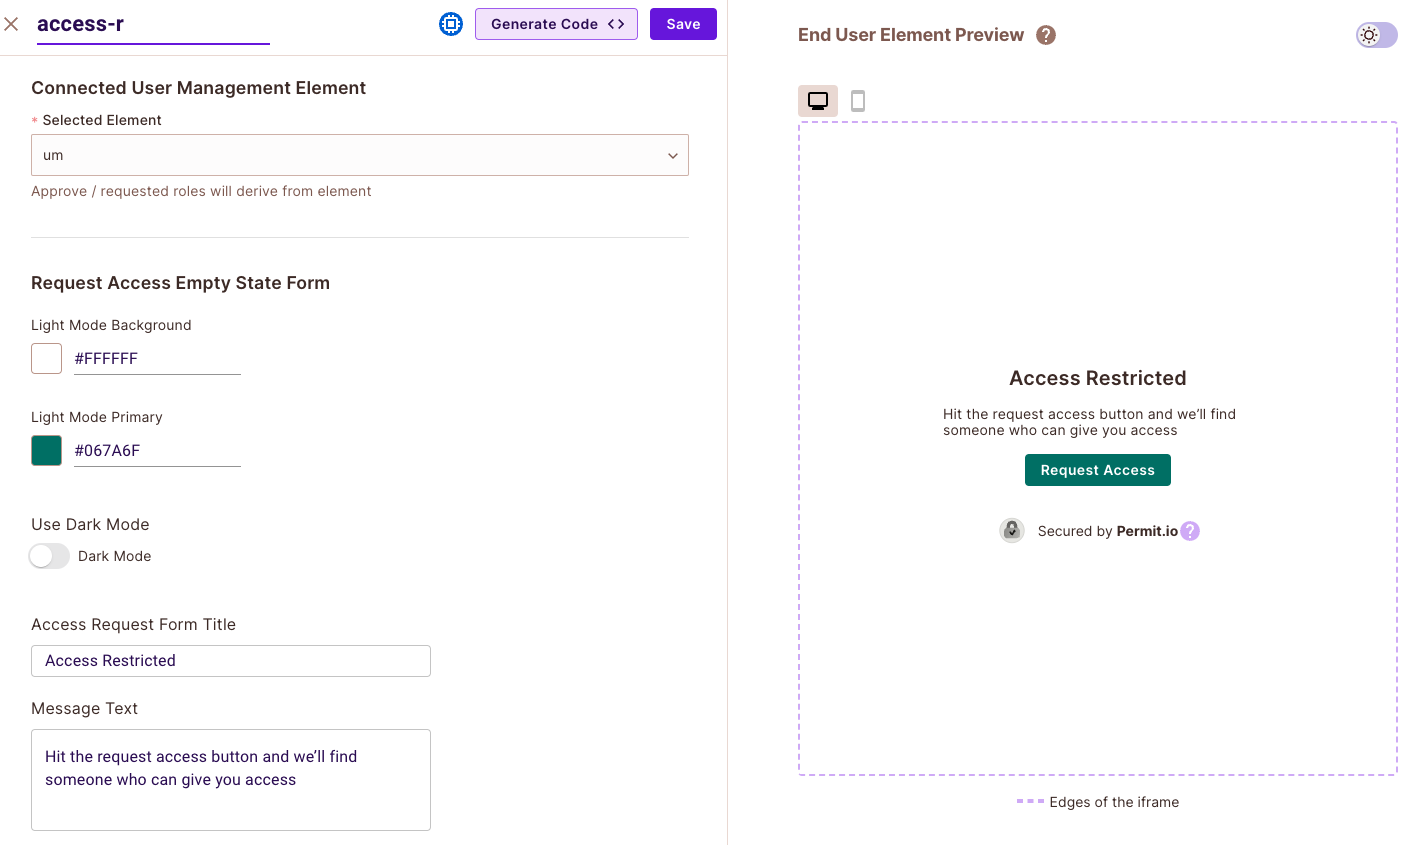
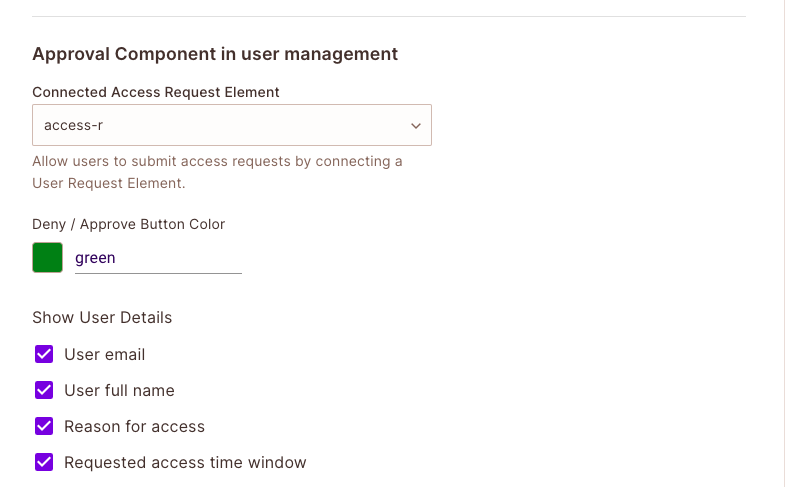
5. Under "Approval Component in user management", select your newly created element.

Our element has now been created, connected to a user management element, and is ready to be edited and customized to our needs!

Element Customization

With every new element, you will be able to adjust it to ensure the look and feel of it fits your application.

  • You can change the background color and the color of the button
  • You can change the title, message and button text to make it more user friendly

after-selected-um

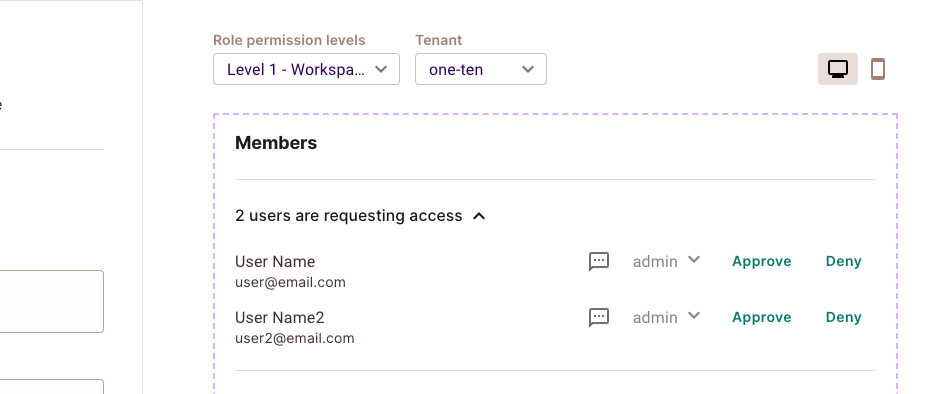
In the user management element, you can also change the button color according to your theme, and toggle which details will be displayed.

approval-setting-in-um

You will be able to see the list of users awaiting approval in the user management element.

pending-users-in-um

Creating an iFrame

In your newly created element, click the "Generate Code" button on the top of the screen

embed-code

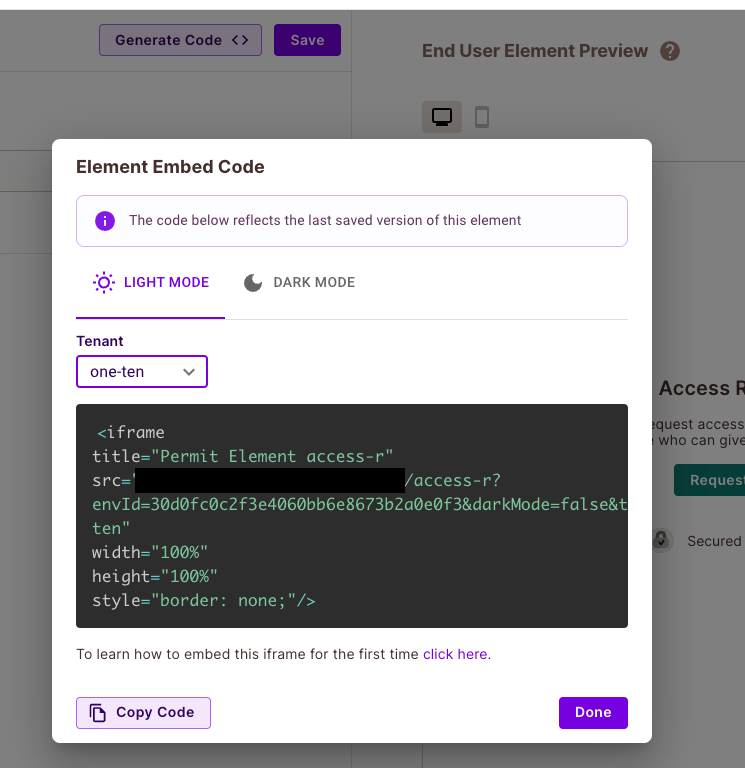
A code snippet for the element will be generated for you. This will be an <iframe> that you can insert anywhere into your application. It will look like the code snippet below:

note

Note that it is crutial to select the Tennant relevant for this element for it to fuction properly.

The dynamic values in src are:

  • <ELEMENT_NAME> - The name of the element you have created.
  • <SOME_UNIQUE_ID> - The unique id of the environment you are using.
  • <TENANT_KEY> - The tenant key you are using.

Replace them with your values.

<iframe
title="Permit Element Name"
src="https://embed.permit.io/<ELEMENT_NAME>?envId=<SOME_UNIQUE_ID>&darkMode=false&tenantKey=<TENANT_KEY>"
width="100%"
height="100%"
style="border: none;"
/>

Once the iframe is ready, we need to embed it. To do that, you'll need to create a login. In the next section, we'll walk you through logging in. Choose a way to log in that's convenient for you:

Embedding the Element

Initializing Permit

1Server-side

Server-side Login Route

You need to create a route in your backend server to allow your client to loginAs themselves and get access the Permit Element.

The backend loginAs route is matched based on the Authentication methods you have implemented inside your App. Most applications authenticate with the Bearer Token or Cookies, but we also allows you to use any other HTTP Security Header. The important part here is, that you use the appropriate code example below based on your Authentication method.

The loginAs function takes two parameters. You need to pass in the unique userId you get from your JWT (JSON Web Token), and a tenant_key or tenantId.

permit.elements.loginAs({ userId, tenant });
IMPORTANT

The user must belong to the tenant that he will be logged into. If he is not, you will see a login error saying USER_NOT_FOUND.

If the user gets logged out, he also exits the current tenant specificed in the loginAs method. If you want to change tenants for a user, you need to log them out, and log them back in to a different tenant.

Passing in the tenant is compulsory when logging in a user server-side.

2.1Using CookiesServer-side
2.2Using Bearer TokenServer-side
2.3Using Other HeadersServer-side
2.4Using frontendOnlyServer-side

Install Permit-js

Once you have your application ready, you need to install Permits's JS SDK. This gives you access to our prebuilt embeddable Element components.

3Client-side

Add the Permit JavaScript SDK to you app:

npm
yarn
# Navigate to your application's root directory cd yourapp npm install –-save @permitio/permit-js

Client-side login method

This function should be called as early as possible in your App. This is best done inside a App/index file; right after the users had just had their identity confirmed by the Authorization provider you are using, but just before the Embededd component is loaded.

With any of these login frontend methods, it's optional to pass in your tenant key, in comparison to the server-side call where it is required. The server-side tenant will always take precedence. We do however encourage passing in the same tenant in your frontend and backend login calls for best practices and for adding clarity to your code.

4Client-side

This is the permit element object that is calling the backend route we have configured previously and logging in the user.

Node
1 2 3 4 5 6 7 8 permit.elements.login({ loginUrl: 'https://your_app_url.com/permit_login, tenant: 'your_tenant_key', token:'<TOKEN>', loginMethod: LoginMethod.bearer }).then((res: any) => {//optional handle success }).catch((err: any) => {//handle error });

There are four things that need to be configured here:

  1. loginUrl - The url that corresponds to your backend login route you created in the last step.
  2. loginMethod - The login method you are using in your backend.
  3. tenant (Optional) - Required for frontendOnly login method. the name of the tenant that the user is part of, you can set it at your backend as well, if you are using frontendOnly this is required.
  4. token (Optional) - Required for bearer token login method, you need to pass the token here.
  5. headers (Optional) - Required for custom headers login method, you need to pass the headers here.
  6. userJwt (Optional) - Required for frontendOnly login method, you need to pass the user jwt here.
  7. envId (Optional) - Required for frontendOnly login method, you need to pass the env id here.

There are 4 supported login options choose the one that you are using in your backend.

4.1Cookie Login MethodClient-side
4.2Bearer Token Login MethodClient-side
4.3Other Header Login MethodClient-side
4.4FrontendOnlyClient-side
After you run login successfully you will **get a cookie** called `permit_session` which will allow you to load your Permit Element securly and successfully.

Client-side logout method

This function should be called along with the logging-out logic that you have within your App, to make sure the user does not continue to have access to the Permit Element.

5Client-side

This logout method should be called as part of the logic of logging your user out with your authentication solution.

JS
1 permit.elements.logout();

Login Errors

There are a few possible errors you might find yourself come across while working with the embedding of Permit Elements.

ErrorDescription
USER_NOT_FOUNDThis error can appear if you are trying to log in as a particular user, but that user does not exist within Permit. You can also experience this login error when you are trying to login a user into a tenant that he does not belong to.
TENANT_NOT_FOUNDThis error can appear when you are passing in a tenant, either in the frontend permit.elements.login function, or in your backend URL endpoint, where the tenant has not been created in Permit.
INVALID_PERMISSION_LEVELThis error will emerge when you are trying to access part of the Element which you have not been given access too. This usually means the role that the person obtained has remained in the Hidden Roles permission level.
FORBIDDEN_ACCESSThis error will emerge when you are trying to login to an Element you have not been given permission to see.

Early Access

Permit.io Approval Flows is currently in Early Access, and we will gradually open the feature to more users. If you are interested in participating, please fill out the form below -