Create and Manage Access with Natural Language using the Permit MCP server
The Permit MCP server provides tools to create and manage resource access and approval requests based on natural language.
This tutorial will guide you through setting up and using the server in Claude Desktop and how to use it in a production setup for AI-powered applications.
Features:
The Permit MCP server allows your users to:
- Create an access request.
- List access requests.
- Approve and deny access requests.
- Create an operation approval request.
- List operation approval requests.
- Approve and deny operation approval requests.
- List resource instances.
Deployment and Use
There are two ways the Permit MCP server can be used:
-
Locally: The server can be run locally by individuals with the required credentials (environment variables), allowing them to view, approve, or deny access requests from end-users submitted through an AI assistant like Claude Desktop.
-
Hosted / Production Deployment: The server can be used to allow end-users to send access requests from within an AI application. In this type of setup, the MCP server and the LLM run in a secure environment where user queries are processed. You can find an implementation of this in the Family Food Ordering System example.
Prerequisites
- Python >= 3.10
uv>= 0.6.1
Installation
git clone https://github.com/permitio/permit-mcp
cd permit-mcp

# Create a virtual environment, activate it, and install dependencies
uv venv
source .venv/bin/activate # For Windows: .venv\Scripts\activate
uv pip install -e .
Environment Variables
To set up the server, you need to supply the environment variables defined in the .env.example file.
Create a .env file in the root directory and specify the following variables:
TENANT=  # default
RESOURCE_KEY= # The key of the resource you want to manage access for.
PERMIT_PDP_URL=  # defaults to the cloud PDP https://cloudpdp.api.permit.io
PERMIT_API_KEY=
PROJECT_ID=
ENV_ID=
ACCESS_ELEMENTS_CONFIG_ID=
OPERATION_ELEMENTS_CONFIG_ID=
You can use the following resources to help with that:
- PERMIT_PDP_URL
- PERMIT_API_KEY
- PROJECT_ID
- ENV_ID
- ACCESS_ELEMENTS_CONFIG_ID: The ID of the user management element.
- OPERATION_ELEMENTS_CONFIG_ID: The ID of the approval management element.
Running the Permit MCP Server With Claude Desktop
First, install Claude Desktop, then configure Claude to use the server with the following configurations:
{
    "mcpServers": {
        "permit": {
            "command": "uv",
            "args": [
                "--directory",
                "/ABSOLUTE/PATH/TO/PARENT/FOLDER/src/permit_mcp",
                "run",
                "server.py"
            ]
        }
    }
}
Building a Family Food Ordering CLI Tool With the Permit MCP Server
In this section, we will demonstrate how to use the Permit MCP server in a production setup to build a simple command-line interface that lets authenticated family members browse restaurants, place orders, and manage access.
How it works:
The CLI tool will allow parents and children to order dishes from various restaurants. Children can only access certain restaurants or dishes if they've been granted permission to do so.
- To access restricted restaurants, children must submit an access request.
- For certain dishes, children must request one-time approval before they can order.
Setting up Permit
Let's start by defining the resource for which we wish to create and manage access requests, along with its access control policies and Elements.
Permit Elements are a set of prebuilt and embeddable UI components that provide fully functional access control, enabling us to set up access requests and operation approval flows.
There are four types of Permit Elements: two for access request flows and two for operation approval:
- Access Request Element: Enables users to request access to restricted resources.
- User Management Element: Controls which users are eligible to manage access requests submitted by others, based on their permission levels, and approve/deny requests.
- Operation Approval Element: Enable users to request approval for a specific action on a resource.
- Approval Management Element: Manages operational approval requests.
In addition to being used as UI components, Permit Elements can also be interacted with via the Permit API, which is used to build the Permit MCP Server.
Access Control Design
For our food ordering system, we'll define:
- A resource called
restaurant - Two roles, one for parents and the other for children who have access to a restaurant.
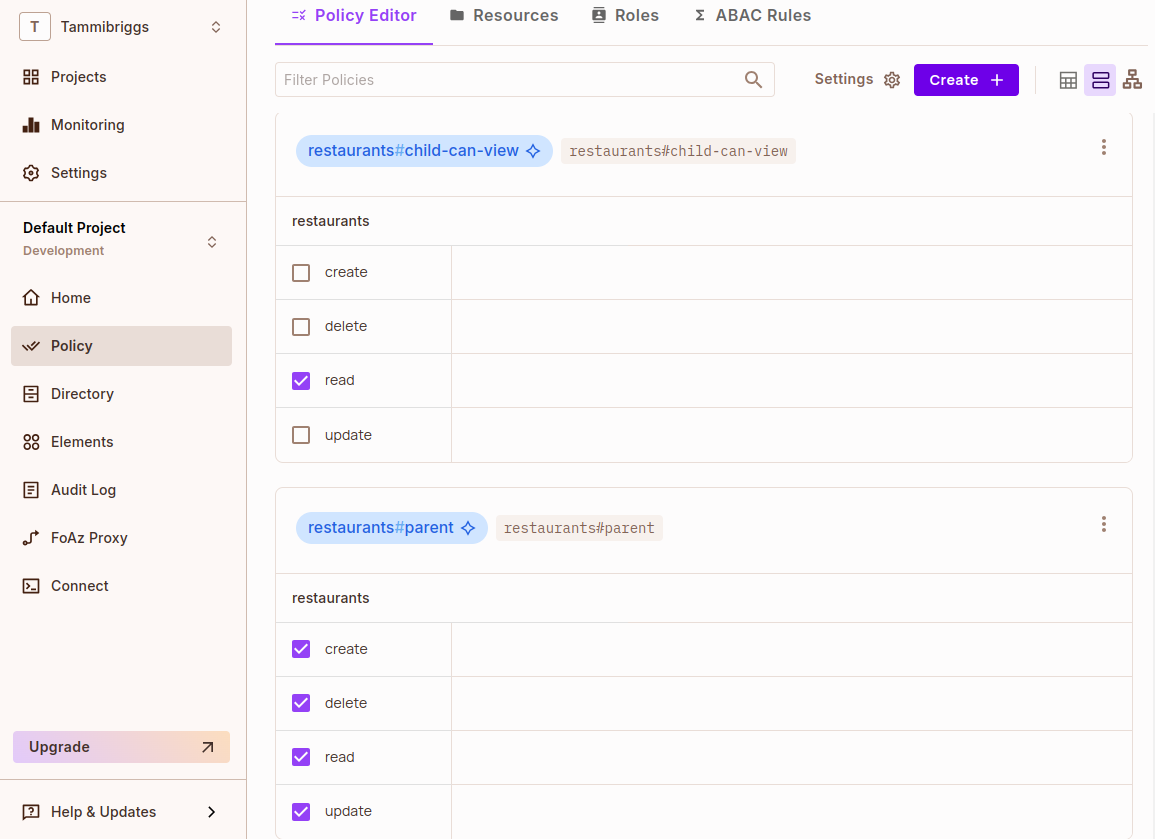
parent: Cancreate,read,update, anddeletedishes in a restaurant.child-can-view: Can only read dishes.
- A user management element called "Restaurant requests" that allows parents to manage restaurant requests sent by their children.
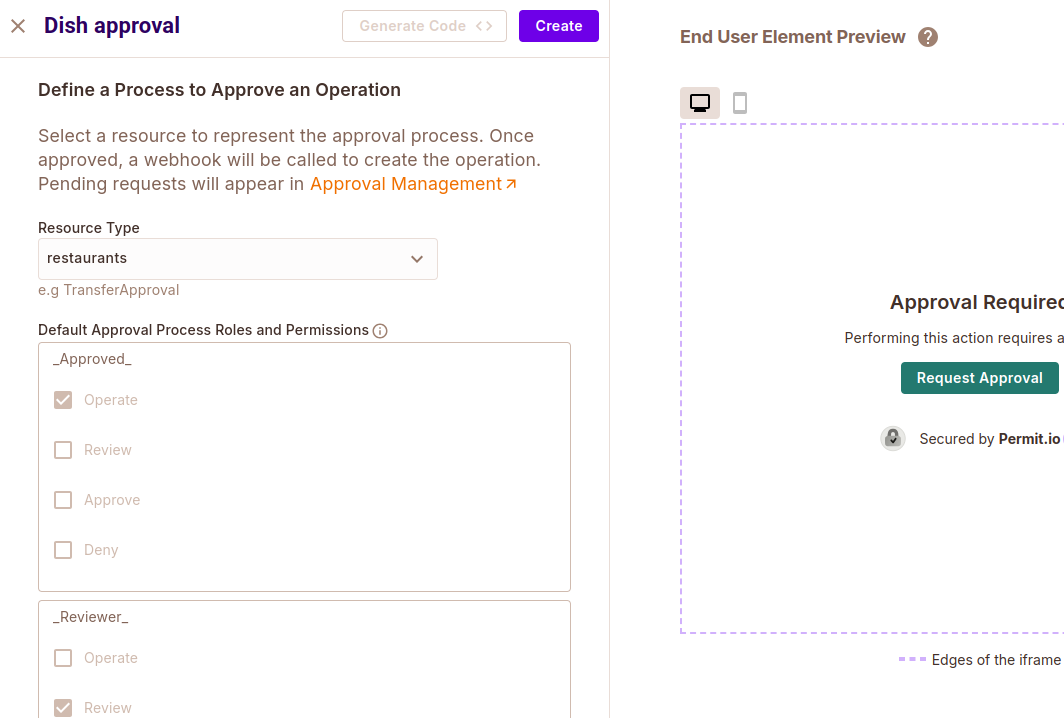
- An operation approval element called "Dish approval", which will add two extra roles to the restaurant resource (
ReviewerandApproved). These roles will determine who can review an approval request and whose request has been approved. - An approval management element called "Dish requests".
Creating a Resource
In the Permit dashboard, navigate to Policy > Resources, then click on the Create a Resource button.

Name the resource "restaurants" and add these two ReBAC roles: parent, child-can-view.
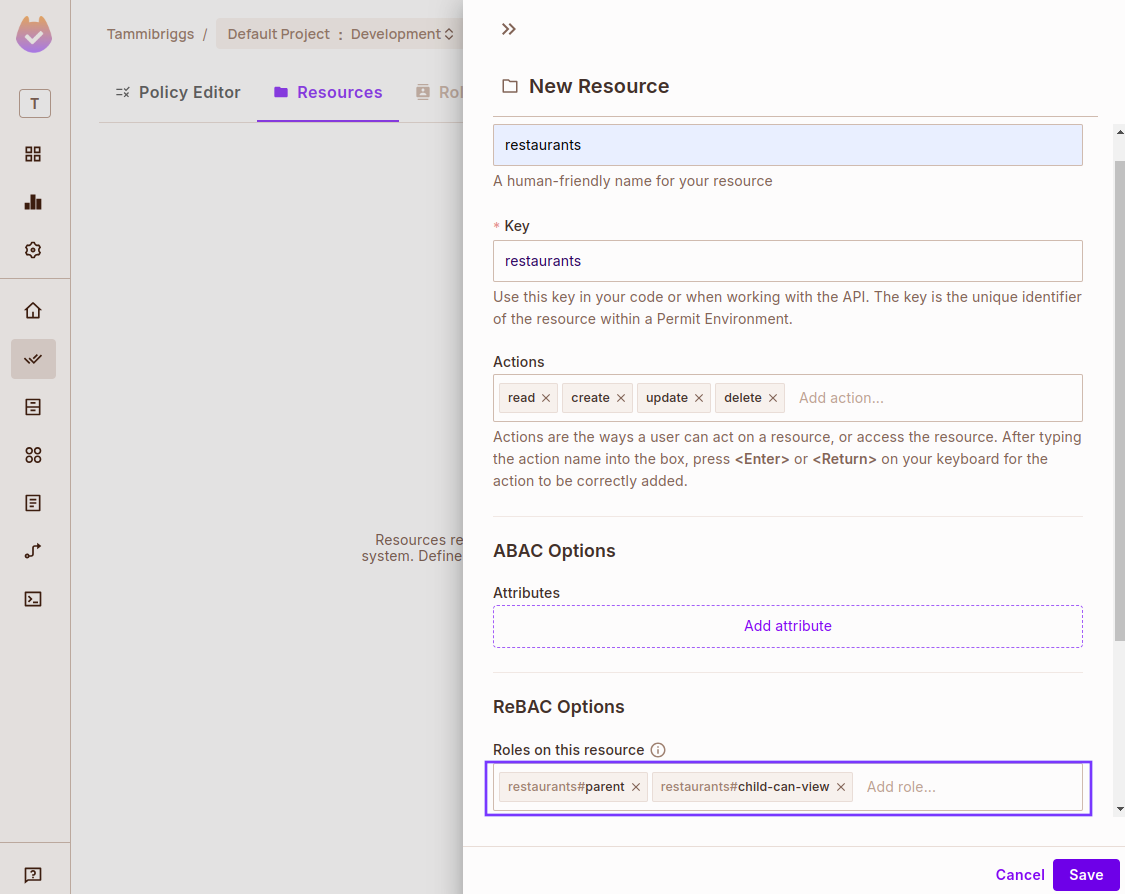
In the Policy Editor tab, give the added ReBAC roles the following permissions:
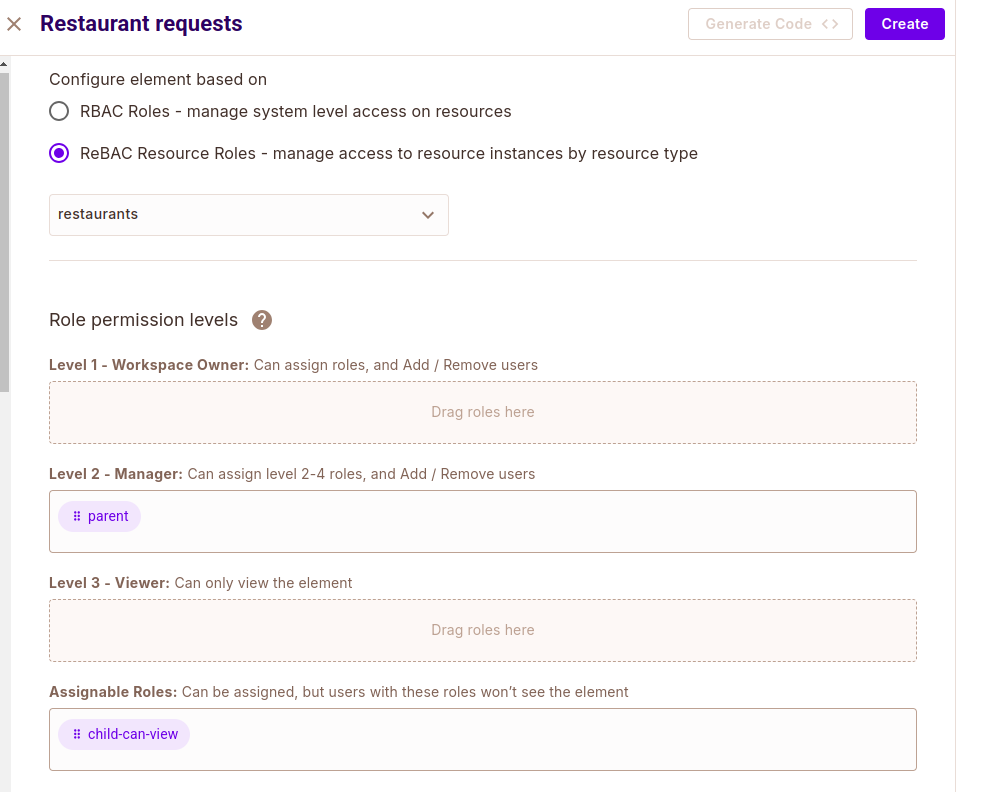
Creating a User Management Element
Navigate to the Elements page from the sidebar and create a user management element with the following values:
- Name: Restaurant Requests
- Configure elements based on: ReBAC Resource Roles
- Resource Type: restaurants
- Role permission levels:
- Level 1 - Workspace Owner: parent
- Assignable Roles:
child-can-view
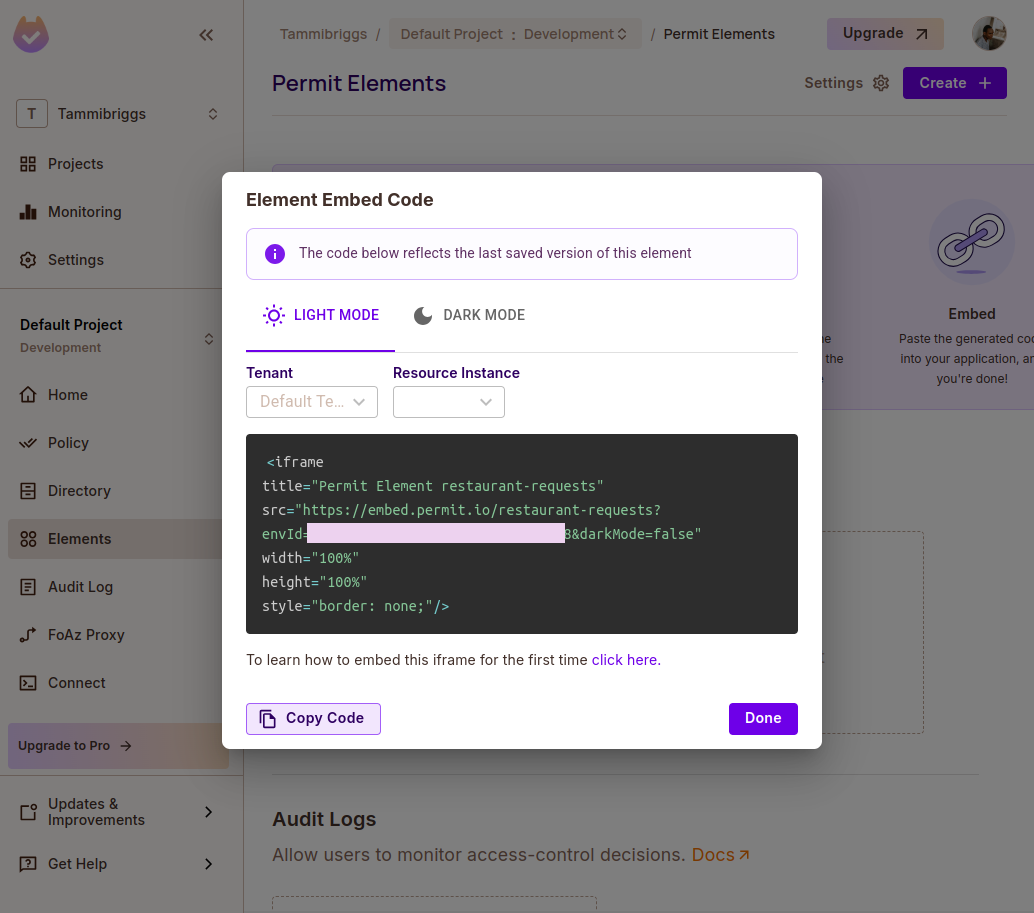
Click Create. Then, click on Get Code in the new user management tab, and you will see the element config ID "restaurant-requests". Take note of it as we will use it later on.
Creating an Operation Approval Element
Create an operation approval element with the following values:
- Name: Dish approval
- Resource Type: restaurants
Creating an Approval Management Element
Create an approval management element called "Dish requests".
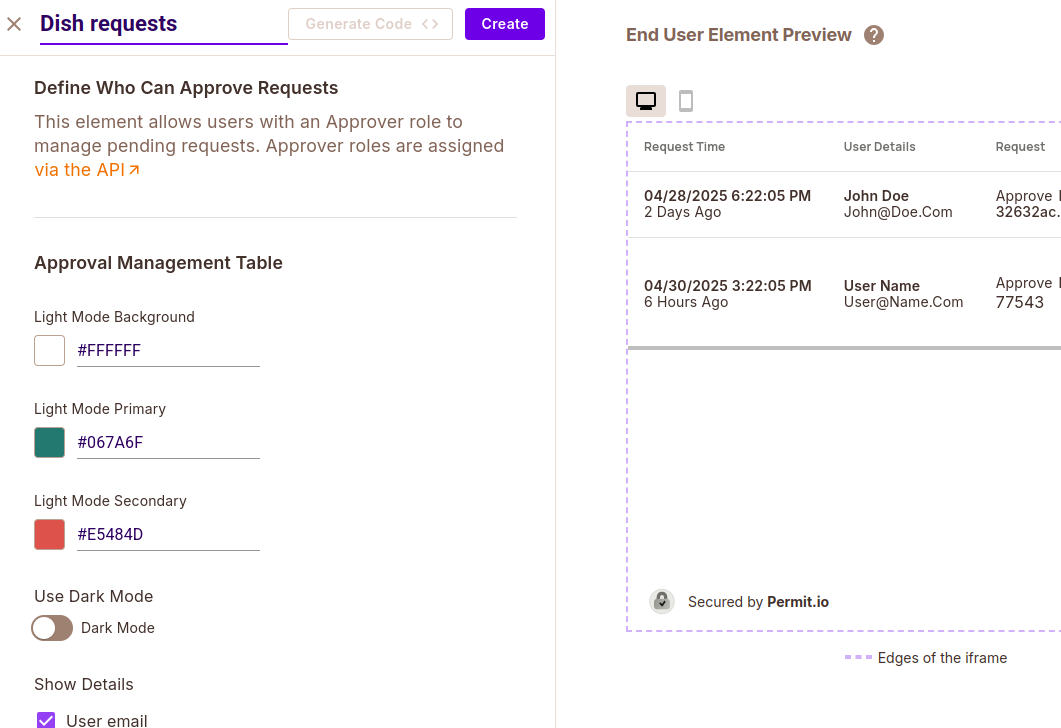
Get the element config ID "dish-requests" and take note of it, as we will use it later on.
Creating a Custom MCP Server and a FastAPI Backend
Let's start by installing the additional dependencies we will need:
uv add 'fastapi[standard]' google-genai bcrypt 'python-jose[cryptography]' rich websockets
Next, specify the following environment variables. You can get the Gemini API key from Google AI Studio.
PERMIT_PDP_URL= # The local Permit PDP URL http://localhost:7766
GEMINI_API_KEY=
DB_NAME=food_ordering.db
In this project we are using the local Permit PDP instead of Cloud PDP primarily for network and operational control reasons (running close to the app, fully within your own infrastructure).
For more details on when to use Cloud PDP vs. a local PDP, see Cloud PDP Capabilities.
Extending the Permit MCP Server With Additional Tools
To build a functional food-ordering CLI, we need to augment the Permit MCP server with a few additional capabilities:
Currently, family members cannot order dishes or even list the available dishes at a restaurant, even though they can view available restaurants by listing resource instances. To address this, we'll create a custom MCP server that includes the existing Permit tools along with two new tools:
list_dishes: Display available meals.order_dish: Place an order for a dish.
Let's start by creating a file to initialize Permit, making it easy to import and use.
Create a permit_client.py in the root directory of the clone repo and add the following lines of code.
import os
from permit import Permit
from dotenv import load_dotenv

# Load environment variables
load_dotenv()

PERMIT_PDP_URL = os.getenv("PERMIT_PDP_URL")
PERMIT_API_KEY = os.getenv("PERMIT_API_KEY")

permit = Permit(
    pdp=PERMIT_PDP_URL,
    token=PERMIT_API_KEY,
)
Next, create a food_ordering_mcp.py file in the root directory.
Then, import the necessary libraries, load environment variables, determine the database name from command-line arguments, and establish a connection to a SQLite database.
from typing import List, Tuple
import aiosqlite
import sqlite3
from mcp.server.fastmcp import FastMCP
from dotenv import load_dotenv
import os
import sys
from src.permit_mcp.server import PermitServer
from mcp.server.fastmcp.exceptions import ToolError
from permit_client import permit

load_dotenv()

TENANT = os.getenv("TENANT")

if len(sys.argv) > 1:
    DB_NAME = sys.argv[1]
else:
    DB_NAME = "test.db"


conn = sqlite3.connect(DB_NAME)
cursor = conn.cursor()
To make all the Permit MCP server tools available in our custom MCP server, add the following code to the file:
# Initialize FastMCP instance and
# the Permit MCP server to make it's tools available.
mcp = FastMCP("family_food_ordering_system")
permit_server = PermitServer(mcp)
Next, add the list_dishes tool, which, if a user is permitted, returns a list of dish names and their prices from a database.
Otherwise, it raises an access denied error:
@mcp.tool()
async def list_dishes(user_id: str, restaurant_id: str) -> List[Tuple[str, float]]:
    """
    Lists the dishes available at a given restaurant along with their prices in dollars.
    Dishes are only listed when the user has access; otherwise, an access request must be sent.

    Args:
        user_id: The ID of the user.
        restaurant_id: The key of the restaurant.
    """

    # Check if a user is permitted in the restaurant
    permitted = await permit.check(user_id, 'read', f"restaurants:{restaurant_id}")
    if not permitted:
        raise ToolError(
            "Access denied. You are not permitted to view dishes from this restaurant."
        )

    async with aiosqlite.connect(DB_NAME) as db:
        # Fetch dishes
        dishes_query = """
            SELECT name, price FROM dishes
            WHERE restaurant_id = ?
        """
        cursor = await db.execute(dishes_query, (restaurant_id,))
        dishes = await cursor.fetchall()
        await cursor.close()
        return dishes
Next, add the order_dish tool, which processes a user's dish order. It validates the dish, checks if the user has permission to order it (e.g., enforcing price limits for children), and places the order if authorized.
On success, it returns a confirmation message and removes any temporary approval role. It raises errors if the dish is invalid or the user lacks permission.
@mcp.tool()
async def order_dish(user_id: str, restaurant_id: str, dish_name: str) -> str:
    """
    Processes an order for a dish.

    Args:
        user_id: The ID of the person ordering.
        restaurant_id: The key of the restaurant.
        dish_name: The name of the dish to order.
    """
    MAX_ALLOWED_DISH_PRICE = 10  # 10 dollars

    async with aiosqlite.connect(DB_NAME) as db:
        # Get dish price
        dish_cursor = await db.execute(
            "SELECT price FROM dishes WHERE name = ? AND restaurant_id = ?",
            (dish_name, restaurant_id),
        )
        dish = await dish_cursor.fetchone()
        await dish_cursor.close()

        if dish is None:
            raise ToolError(
                f"Dish '{dish_name}' not found."
            )

        # Get user role
        user_cursor = await db.execute(
            "SELECT role FROM users WHERE id = ?",
            (user_id,),
        )
        user = await user_cursor.fetchone()
        await user_cursor.close()

    if user is None:
        raise ToolError(
            f"User with ID '{user_id}' not found. Please check the user ID."
        )

    # Check if a user is permitted in the restaurant that serves this dish.
    permitted = await permit.check(user_id, "read", f"restaurants:{restaurant_id}")

    if not permitted:
        raise ToolError(
            "Access denied. You are not permitted to order from this restaurant."
        )

    # Check if a user is permitted to order costly dishes.
    permitted = await permit.check(user_id, "operate", f"restaurants:{restaurant_id}")

    # Apply price restriction for children
    if user[0] == "child" and dish[0] > MAX_ALLOWED_DISH_PRICE and not permitted:
        raise ToolError(
            f"This dish costs ${dish[0]:.2f}, and you can only order dishes less than "
            f"${MAX_ALLOWED_DISH_PRICE:.2f}. To order this dish, you need to request approval."
        )

    if permitted:
        await permit.api.users.unassign_role({
            "user": user_id,
            "role": "_Approved_",
            "resource_instance": f"restaurants:{restaurant_id}",
            "tenant": TENANT
        })

    return f"Order successfully placed for {dish_name}!"
Then, add the following lines of code to run the MCP server using the standard input/output (stdio) transport when the script is executed:
if __name__ == "__main__":
    mcp.run(transport="stdio")
With these two additional tools, an LLM will have everything it needs to power a working family food-ordering system.
Accessing the MCP Server from a Secure Environment
In this section, we will create a FastAPI backend where we will securely connect to the MCP server to access its tools and pass them to the LLM. The backend is necessary as we are working with some sensitive environment variables like our Permit API key and Gemini API key.
The FastAPI backend will include a login endpoint to authenticate users. This will allow us to control tool access based on user roles and pass relevant user-specific data to the LLM. It will also provide a WebSocket endpoint to handle user queries and return real-time responses.
To keep this concise, we've omitted some utility functions, such as database initialization and MCP-to-Gemini tool conversion helpers. You can find these in the utils file. Create a copy of the file in the root directory of your project.
Now, let's get started with creating the FastAPI backend.
In the root directory, create a server.py file. First, import the necessary libraries, set parameters for connecting to the food-ordering MCP server via stdio, initialize the GenAI client, and create the FastAPI app with a startup event to initialize the database.
from mcp import ClientSession, StdioServerParameters
from mcp.client.stdio import stdio_client
from datetime import timedelta
from typing import Dict
from utils import *
from fastapi import Depends, FastAPI, HTTPException, status, WebSocket, WebSocketDisconnect
from fastapi.security import OAuth2PasswordRequestForm
import os
from contextlib import asynccontextmanager
from google import genai
from google.genai import types
import asyncio
from contextlib import AsyncExitStack
import json

ACCESS_TOKEN_EXPIRE_MINUTES = 30
DB_NAME = os.getenv("DB_NAME")
GEMINI_API_KEY = os.getenv('GEMINI_API_KEY')

server_params = StdioServerParameters(
    command="python",
    args=["food_ordering_mcp.py", DB_NAME],
    env=None,
)

genai_client = genai.Client(api_key=GEMINI_API_KEY)


@asynccontextmanager
async def lifespan(app: FastAPI):
    await init_db()
    yield

# Create the app with lifespan
app = FastAPI(lifespan=lifespan)
Next, create a class to manage WebSocket connections:
class ConnectionManager:
    def __init__(self):
        self.active_connections: Dict[str, WebSocket] = {}

    async def connect(self, websocket: WebSocket, client_id: str):
        await websocket.accept()
        self.active_connections[client_id] = websocket

    def disconnect(self, client_id: str):
        if client_id in self.active_connections:
            del self.active_connections[client_id]

    async def send_message(self, message: str, client_id: str):
        if client_id in self.active_connections:
            await self.active_connections[client_id].send_text(message)


manager = ConnectionManager()`
Next, you'll need to create the login endpoint to authenticate users and then generate a JWT access token using the user's identity, which will be used for subsequent authenticated requests.
@app.post("/token")
async def login_for_access_token(form_data: OAuth2PasswordRequestForm = Depends()):
    user = get_user(form_data.username)
    if not user or not verify_password(form_data.password, user["hashed_password"]):
        raise HTTPException(
            status_code=status.HTTP_401_UNAUTHORIZED,
            detail="Incorrect username or password",
            headers={"WWW-Authenticate": "Bearer"},
        )

    access_token_expires = timedelta(minutes=ACCESS_TOKEN_EXPIRE_MINUTES)
    access_token = create_access_token(
        data={"sub": user["username"]}, expires_delta=access_token_expires
    )
    return {"access_token": access_token, "token_type": "bearer"}
Next, let's create the chat WebSocket endpoint, which will connect to the MCP server, pass its tool to the LLM, and process user queries. Since it's a bit lengthy, we'll break it into parts:
This first part sets up the WebSocket endpoint. It authenticates the user, registers the connection, and uses AsyncExitStack to manage the lifecycle of the MCP server connection by spawning it as a subprocess.
@app.websocket("/ws/chat")
async def websocket_chat(websocket: WebSocket):
    current_user = await get_current_websocket_user(websocket)

    if not current_user:
        await websocket.close(code=status.WS_1008_POLICY_VIOLATION, reason="Not authenticated")
        return

    client_id = current_user.get('id')

    await manager.connect(websocket, client_id)
    try:
        exit_stack = AsyncExitStack()
        stdio_transport = await exit_stack.enter_async_context(stdio_client(server_params))
        stdio, write = stdio_transport
        session = await exit_stack.enter_async_context(ClientSession(stdio, write))
Next, the MCP session is initialized, and its tools are then retrieved and filtered based on the user's role. The filtering ensures that children don't have access to tools to manage access or approval requests. The filtered tools are then formatted for use with Gemini's function calling.
await session.initialize()

    # Get MCP client and tools
    tools_result = await session.list_tools()

    filtered_mcp_tools = filter_tools_by_role(
        tools_result.tools,
        current_user['role']
    )

    mcp_tools = [
        {"function_declarations": convert_mcp_tools_to_gemini(
            filtered_mcp_tools)}
    ]

    contents = []
Next, an infinite loop is created to wait for messages from the client.
The user's message and conversation history are received and added to the contents array. Then, the Gemini model is called with the conversation history, filtered tools, and specific system instructions (including user ID, role, and required parameters). This process runs inside another loop, which continues until the LLM returns the final response to the user's message.
while True:
    # Wait for messages from the client
    data = await websocket.receive_text()
    data = json.loads(data)

    message = data.get('message')
    history = data.get('history')

    # Use provided history or continue with existing conversation
    if history:
        contents = history

    # Add the new user message
    contents.append({
        "role": "user",
        "parts": [{"text": message}]
    })

    # Process messages and handle function calls
    has_more_function_calls = True

    while has_more_function_calls:
        # Call Gemini API
        response = genai_client.models.generate_content(
            model="gemini-2.5-flash-preview-04-17",
            contents=contents,
            config=types.GenerateContentConfig(
                tools=mcp_tools,
                system_instruction=f"""
                - **current_user_role**: {current_user.get('role')}
                - **user_id**: "{current_user.get('id')}". This is the ID to be used for tool calls.
                - **role**: "child-can-view". This is the role to request if a user wants to create an access request.
                - **resource_instance** is required. Always specify this parameter as the ReBAC authorization model is used in this system.
                - **reason**: Ask the user to provide a value for the reason parameter directly, without generating one yourself.
                NOTE: The only assignable role is **child-can-view**. Therefore, please do not prompt the user to specify a role—this role should be applied automatically when needed.

                ALWAYS begin by listing the available resource instances. These contain the list of restaurants users can order from, along with the corresponding IDs and keys needed for tool calls, since the `resource_instance` parameter is required for all tools.

                Starting with this list allows you to:
                - Show users the restaurants they can choose from before ordering a dish.
                - Ensure you have access to the correct IDs and keys for any subsequent tool calls.

                NOTE: ALWAYS begin by listing the available resource instances using the list_resource_instances tool.
                """
            )
        )
Within the has_more_function_calls loop, if Gemini's response contains text, it is added to the conversation history and immediately sent back to the client.
If Gemini suggests any function calls, they are also added to the history, and a status message is sent to the client indicating that tool execution is in progress.
# Store and send the model's text response
if hasattr(response, 'text') and response.text:
    # Add the model's response to the conversation history
    contents.append({
        "role": "model",
        "parts": [{"text": response.text}]
    })

    # Send the text response immediately to the client
    await manager.send_message(json.dumps({
        "type": "text",
        "content": response.text
    }), client_id)

function_calls = getattr(response, 'function_calls', None)
if function_calls and len(function_calls) > 0:
    # Inform the client that function calls are being processed
    await manager.send_message(json.dumps({
        "type": "status",
        "content": "Processing function calls..."
    }), client_id)

    contents.append({
        "role": "model",
        "parts": [
            {"function_call": {
                "id": fc.id,
                "name": fc.name,
                "args": fc.args
            }
            } for fc in function_calls]
    })
This part executes any suggested function calls concurrently using the MCP server, with the results added to the history. Once all function calls are processed, the complete, updated conversation history is sent back to the client.
Note that the final line of the code that sends the full updated conversation history should be placed outside the has_more_function_calls loop. This ensures that the history is only sent after all function calls and interactions are fully processed.
# Check if there are function calls to process
if not function_calls or len(function_calls) == 0:
    # No more function calls, exit the loop
    has_more_function_calls = False
    continue

# Process all function calls in parallel
async def process_function_call(function_call):
    name = function_call.name
    args = function_call.args

    try:
        print(name, args)
        tool_result = await retry_tool_call(session, name, args)
        converted_content = []
        for text_content in tool_result.content:
            # Assuming TextContent has a 'text' attribute that holds the message content
            converted_content.append(
                {"text": text_content.text})
        return {
            "name": name,
            "response": {"result": {"content": converted_content, "is_error": tool_result.isError}}
        }
    except Exception as error:
        error_message = getattr(error, 'detail', str(error)) if hasattr(
            error, 'detail') else str(error)
        return {
            "name": name,
            "response": {
                "result": {
                    "error": error_message or "Tool execution failed after multiple attempts"
                }
            }
        }

function_call_tasks = [
    process_function_call(fc) for fc in function_calls]
results = await asyncio.gather(*function_call_tasks)

# Add function responses to conversation
contents.append({
    "role": "user",
    "parts": [{"function_response": result} for result in results]
})

# (outside the while has_more_function_calls loop) Send the full updated history to the client
await manager.send_message(json.dumps({
    "type": "history_update",
    "content": contents
}), client_id)
Finally, this block handles errors and ensures the WebSocket and MCP connections are cleaned up.
except WebSocketDisconnect:
    manager.disconnect(client_id)
except Exception as err:
    # Send error message to client
    await manager.send_message(json.dumps({
        "type": "error",
        "content": "An error occurred: " + str(err)
    }), client_id)
finally:
    manager.disconnect(client_id)
    await exit_stack.aclose()
You can find the complete code in this server.py file.
Building the Command-Line Chat Client
The client application will allow users to interact with the FastAPI backend via the command line. It will handle user login to obtain an authentication token and connect to the WebSocket endpoint to send messages and receive AI responses in real-time.
Create a client.py file directly in the root, and start by adding the following lines to import the necessary libraries and define the FastAPI server's base URLs.
import asyncio
import json
import httpx
import websockets
import sys
from typing import Dict, List, Optional

API_URL = "http://localhost:8000"  # Change if needed
WS_URL = "ws://localhost:8000"     # WebSocket URL
Next, add the function responsible for user authentication.
async def login(username: str, password: str) -> str | None:
    async with httpx.AsyncClient() as client:
        response = await client.post(
            f"{API_URL}/token",
            data={
                "username": username,
                "password": password,
            },
            headers={"Content-Type": "application/x-www-form-urlencoded"},
        )

        if response.status_code == 200:
            token = response.json().get("access_token")
            print("✅ Login successful!\n")
            return token
        else:
            print(f"❌ Login failed: {response.json().get('detail')}")
            return None
Now, let's set up the main chat session logic to manage the WebSocket connection and the real-time conversation flow with the server and the LLM.
We start by defining the chat function, initializing the message history, and setting up two flags: one to track whether a message is being processed, and another to track whether the "processing" message has been displayed.
async def chat(token: str):
    history: List[Dict] = []
    is_processing = False  # Simple flag to track message processing state
    is_displayed_processing = False

    print("\n--- Chat session started ---")
    print("Type 'exit' to quit.\n")
Next, we attempt to establish a secure WebSocket connection to the server using the user's token.
If the connection is successful, we define a nested async function receive_messages to run in the background.
It listens for incoming messages, parses them, updates the conversation state, and prints the appropriate response type.
The use of nonlocal allows it to modify variables defined in the outer chat function.
try:
    headers = {"Authorization": f"Bearer {token}"}

    async with websockets.connect(
        f"{WS_URL}/ws/chat",
        additional_headers=headers
    ) as websocket:
        # Start a background task for receiving messages
        async def receive_messages():
            nonlocal is_processing, history, is_displayed_processing

            while True:
                try:
                    message = await websocket.recv()
                    data = json.loads(message)

                    message_type = data.get("type")
                    content = data.get("content")

                    if message_type == "text":
                        print(f"Assistant: {content}")
                    elif message_type == "status":
                        print(f"[Status] {content}")
                    elif message_type == "error":
                        print(f"⚠️ Error: {content}")
                        is_processing = False  # Unlock on error
                        is_displayed_processing = False
                    elif message_type == "history_update":
                        history = content
                        is_processing = False  # Unlock when complete
                        is_displayed_processing = False
                except Exception as e:
                    print(f"\n⚠️ Error receiving message: {str(e)}")
                    is_processing = False
                    is_displayed_processing = False
                    break
We now start the receiver task using asyncio.create_task() so that message reception runs concurrently in the background while the main loop handles user input.
# Start the receiver task
receiver_task = asyncio.create_task(receive_messages())
The following is the main chat loop. It continuously waits for user input, but first checks if a message is still being processed. If so, it shows a "processing" message only once and waits briefly.
When ready, it reads user input from the terminal using input() inside a thread executor (to avoid blocking the async loop). If the input is exit, the chat ends.
Otherwise, it sends the user message and the current chat history as a JSON payload over the WebSocket.
while True:
    if is_processing:
        if not is_displayed_processing:
            print("⏳ Processing previous message. Please wait...")
            is_displayed_processing = True

        await asyncio.sleep(1)
        continue

    user_input = await asyncio.get_event_loop().run_in_executor(
        None, lambda: input("You: ")
    )

    if user_input.lower() == "exit":
        print("👋 Ending chat session.")
        break

    # Set the processing flag before sending
    is_processing = True

    # Send the message
    payload = {
        "message": user_input,
        "history": history
    }

    try:
        await websocket.send(json.dumps(payload))
    except Exception as e:
        print(f"⚠️ Error sending message: {str(e)}")
        is_processing = False
        is_displayed_processing = False
        break
After the chat loop exits (either due to an error or the user typing "exit"), we cancel the receiver task to stop the background message listener.
# Clean up
receiver_task.cancel()
Then, we handle potential exceptions, such as WebSocket errors or other unexpected issues, and print a warning to the user.
except websockets.exceptions.WebSocketException as e:
    print(f"⚠️ WebSocket connection error: {str(e)}")
except Exception as e:
    print(f"⚠️ Unexpected error: {str(e)}")
Next, we will define a main function as the entry point for the CLI tool.
The main async function greets the user, prompts for username and password, and calls the login function. If a login is successful (a token is received), it calls the chat function to start the WebSocket session.
The if __name__ == "__main__": block is the standard entry point. It runs the main coroutine and catches KeyboardInterrupt for graceful exit.
async def main():
    print("👋 Welcome Food Ordering CLI tool!")

    username = input("Username: ").strip()
    password = input("Password: ").strip()

    token = await login(username, password)

    if token:
        await chat(token)


if __name__ == "__main__":
    try:
        asyncio.run(main())
    except KeyboardInterrupt:
        print("\n👋 Program terminated by user.")
    except Exception as e:
        print(f"⚠️ Unexpected error: {str(e)}")
        sys.exit(1)
Run the CLI
First, run the FastAPI backend using the following command:
fastapi dev server.py
Next, in another terminal instance, run the CLI using the following command:
uv run client.py
With this, we can now log in using one of the following credentials and start using our family food ordering system.
[
    {"username": "joe", "password": "joe_password",  "role": "parent", },
    {"username": "jane", "password": "jane_password", "role": "parent"},
    {"username": "henry",  "password": "henry_password", "role": "child"},
    {"username": "rose",  "password": "rose_password", "role": "child"},
]
Best Practices
- Make sure to specify users' names when syncing or creating users in Permit. This will make it easier to identify which user submitted an access or approval request when reviewing the list of requests.
await permit.api.sync_user({
    "key": user_id,
    "first_name": firstname
})
- For ReBAC authorization models, if the resource instance key is not the same as its name, be sure to include the instance's name as an attribute—along with other necessary information—when creating it. This will make it easier for both you and the LLM to identify that instance.
await permit.api.resource_instances.create({
    "resource": "restaurants",
    "key": restaurant_id,
    "tenant": TENANT,
    "attributes": {
        "name": restaurant_name,
        "allowed_for_children": bool(allowed_for_children)
    }
})