Building ReBAC Policies
Relationship-Based Access Control (ReBAC) policies determine access based on the relationships between users and resources. Constructing ReBAC policies involves defining these relationships and specifying the associated permissions.
Before you start
Before you begin molding your own ReBAC policy within Permit, it's essential to establish a clear understanding of the various relationships that exist within your system, as these will form the core of your policy. Identify the key subjects (users or entities) and objects (resources) and how they interact with each other, mapping out both direct and indirect relationships.
Consider the nature of these relationships, whether hierarchical, peer-to-peer, or something more complex. You should also have a grasp of the specific permissions that correspond to different relationships, and a thorough understanding of the overall system architecture.
Permit implementation of Relationship-Based Access Control (RBAC) is fully compatible with the Tuples convention in the Google-Zanzibar paper.
Tuples are conventions that describe relationships like resource:instance, resource#role, resource:instance#role, and others.
An example is a user who is the moderator of the General chat room will be described as:
room:general#moderator
Having a well-defined set of roles and attributes for both subjects and objects can further refine the policy. Assessing these prerequisites and having a detailed understanding of the relationships within your system ensures a robust and effective ReBAC policy that aligns with your organization's needs and security requirements.
Using the policy editor to create ReBAC enforcements
The Permit policy editor is very flexible for creating all types of policies, including policies as complex as ReBAC. With ReBAC, we're going to map out not just the roles, but also how they interact with each other and the resources they access.
Creating resources
Resources are the fundamental entities that users interact with. Whether it's a folder, a module, or a project, identifying and categorizing these resources is the first step to establishing a permissions framework.
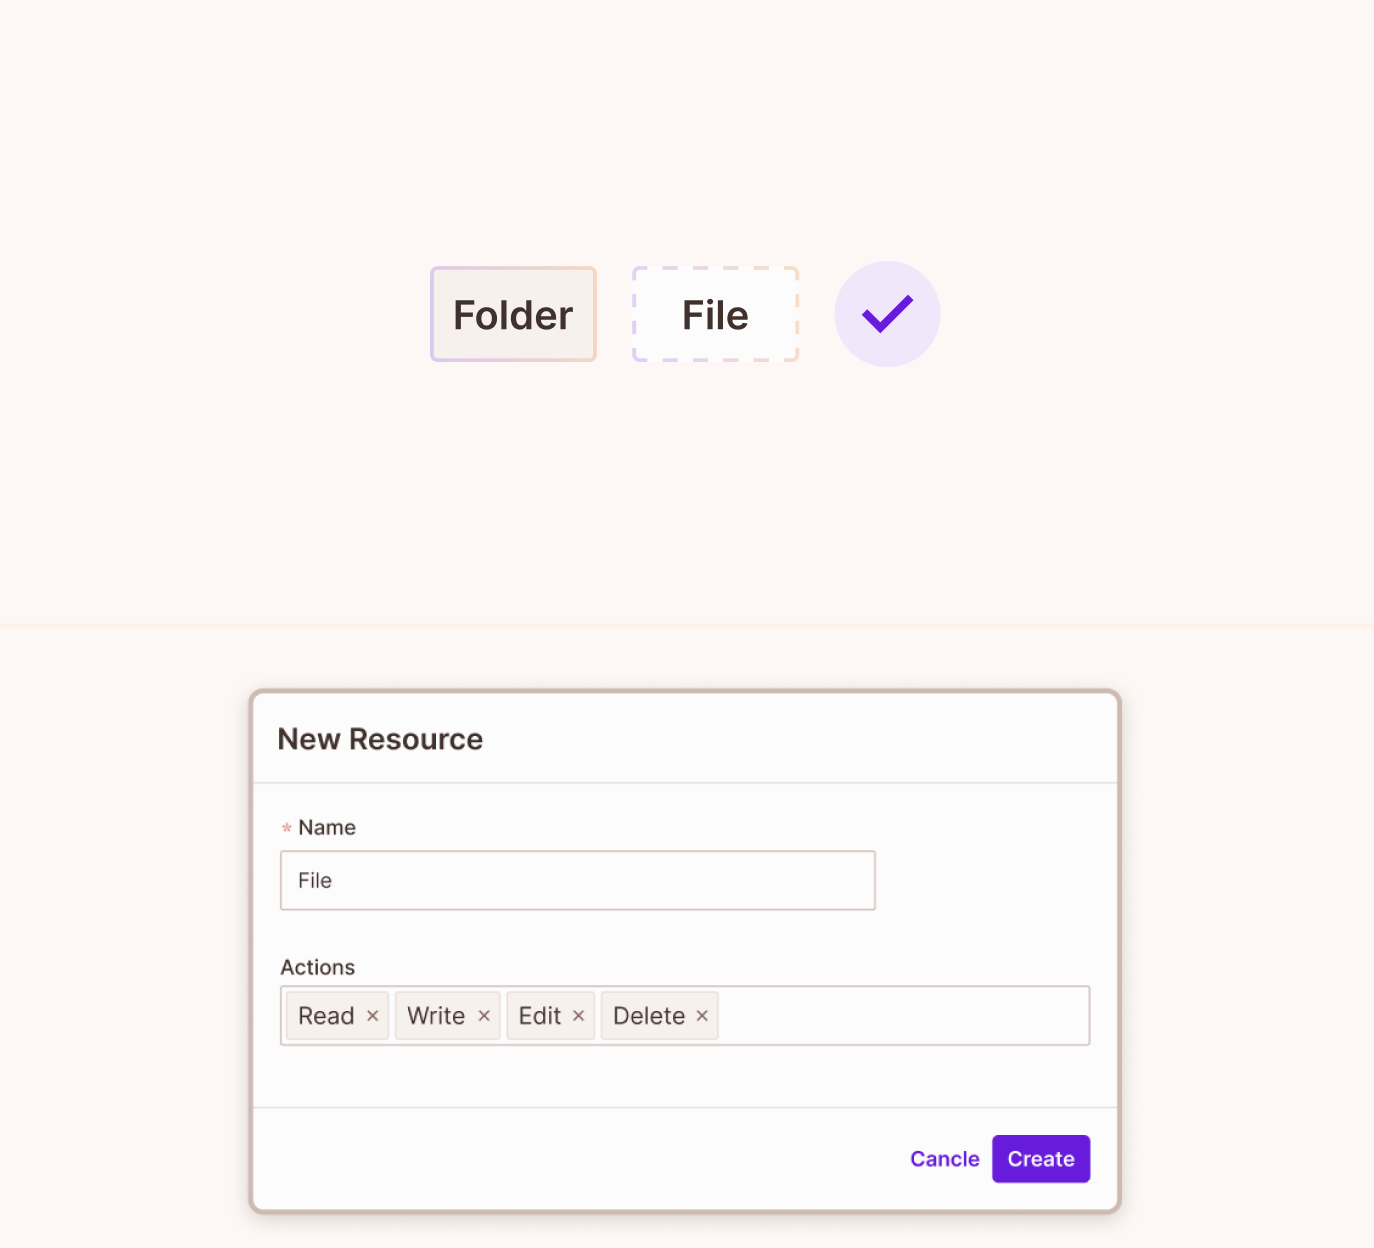
UI Example
Create resource relations
Relatios determine how different resources are connected or related to each other. By defining relations, we can create a structured hierarchy or network, enabling more granular control over access permissions based on these connections.
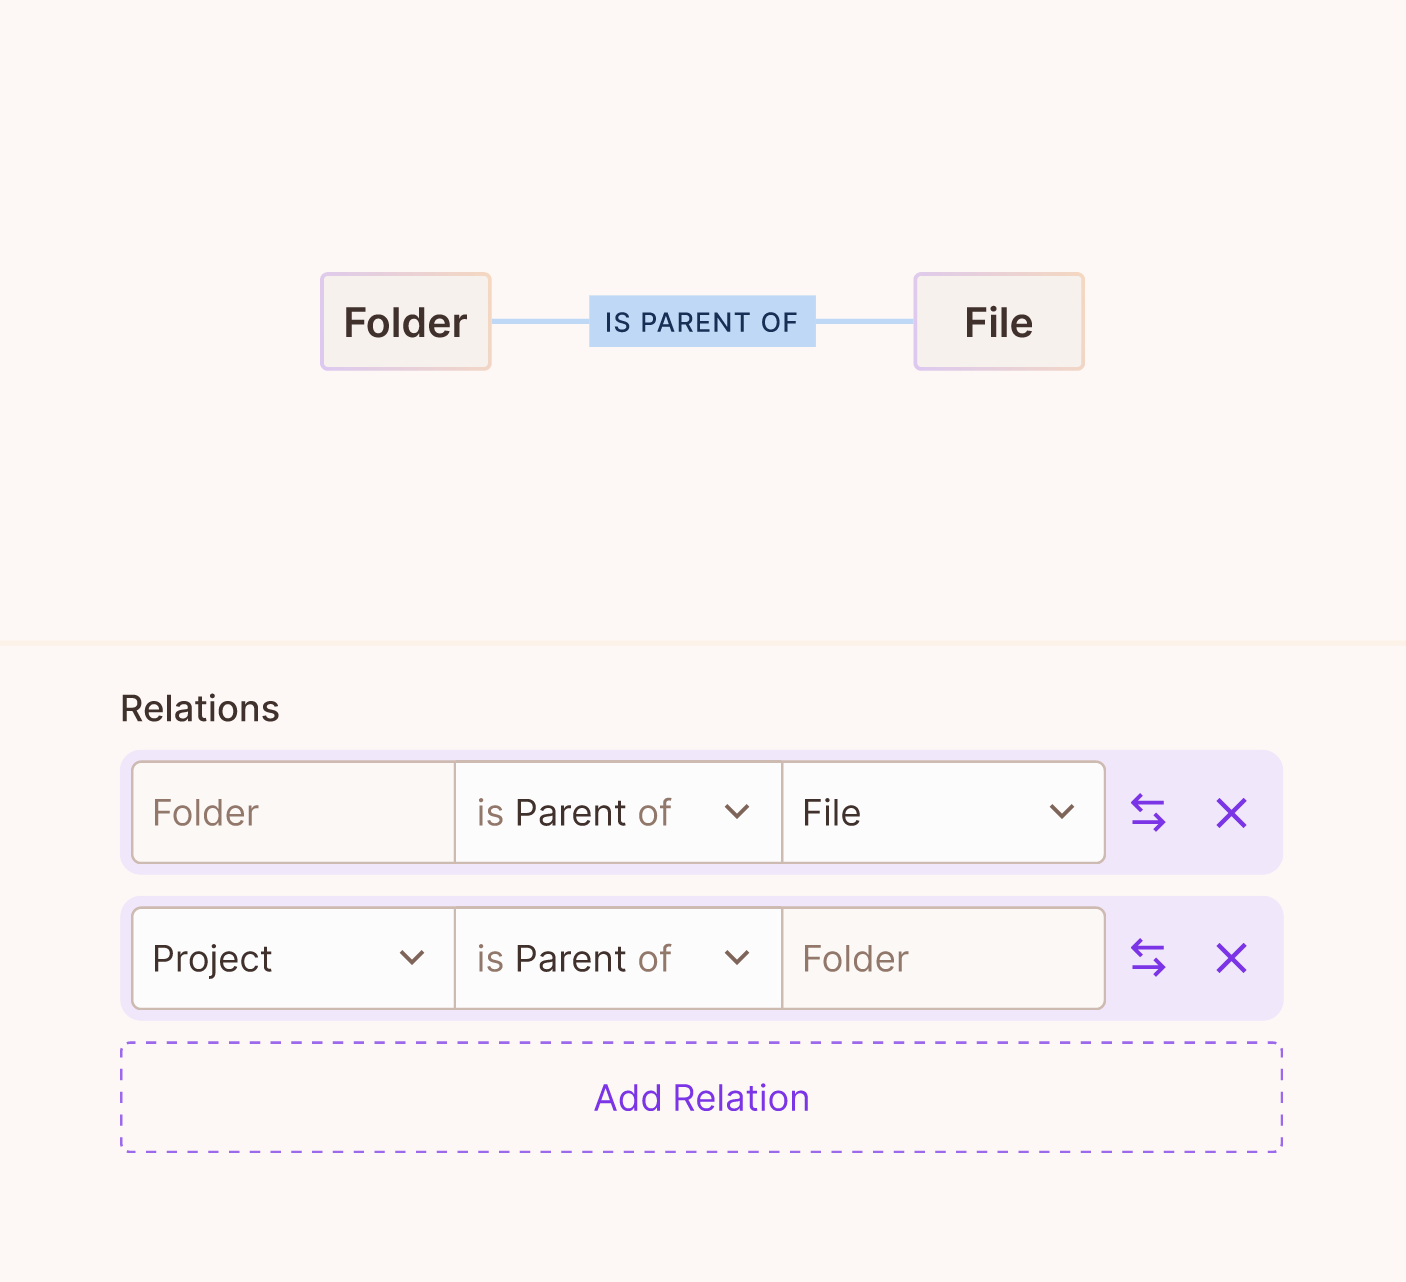
Relations are later instantiated between specifc resource-instances as relationships (also known as relationship-tuples) see below.
Parent relationA resource cannot be set as a parent of itself.
To establish a relation between a resource and itself, you can use alternative relation types such as owner or container.
UI Example
Once you successfully define the relationships on the roles - it will automatically create the roles for you in the policy editor.
Adding roles to resources
By associating roles with specific resources, we can determine what actions or levels of access a user or group of users can have with those resources. It forms the crux of ReBAC, ensuring that permissions are not just based on user identities, but their roles concerning various resources.
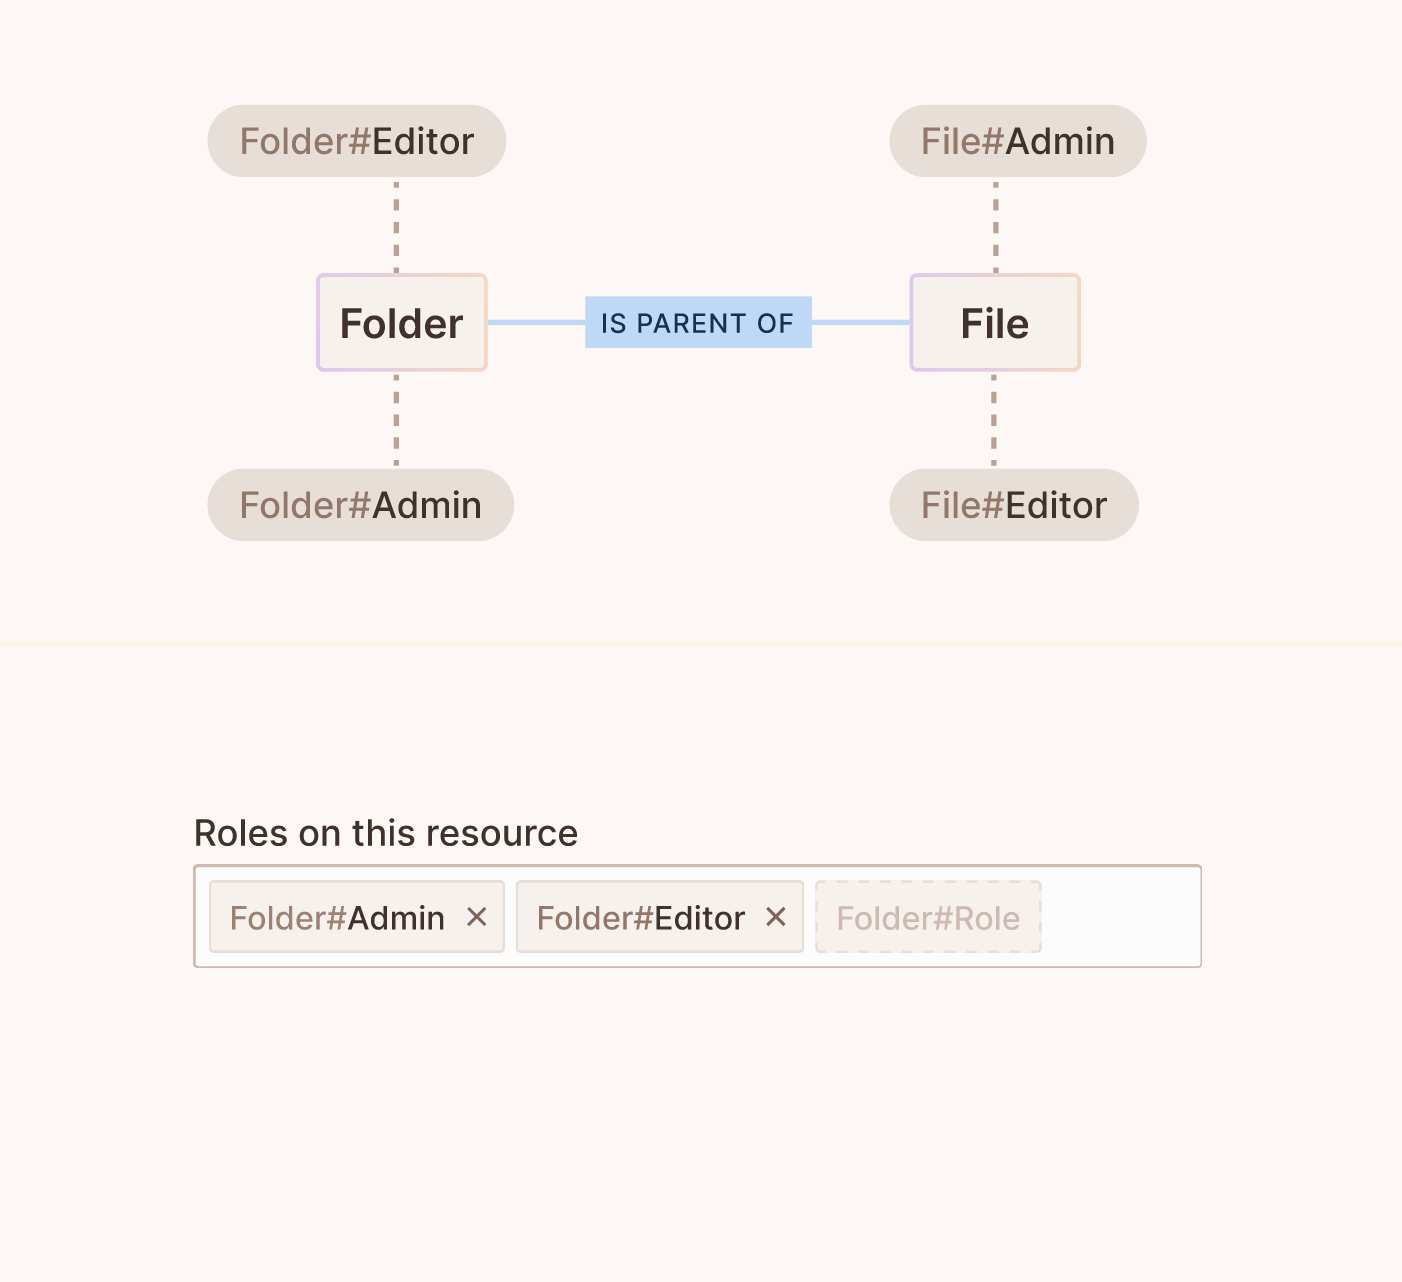
UI Example
Defining role derivations
Role derivation allows for the dynamic assignment or inheritance of roles based on certain conditions or relationships. This step ensures flexibility in the ReBAC system, allowing roles to be contextually derived based on factors like a user's relation to a resource.
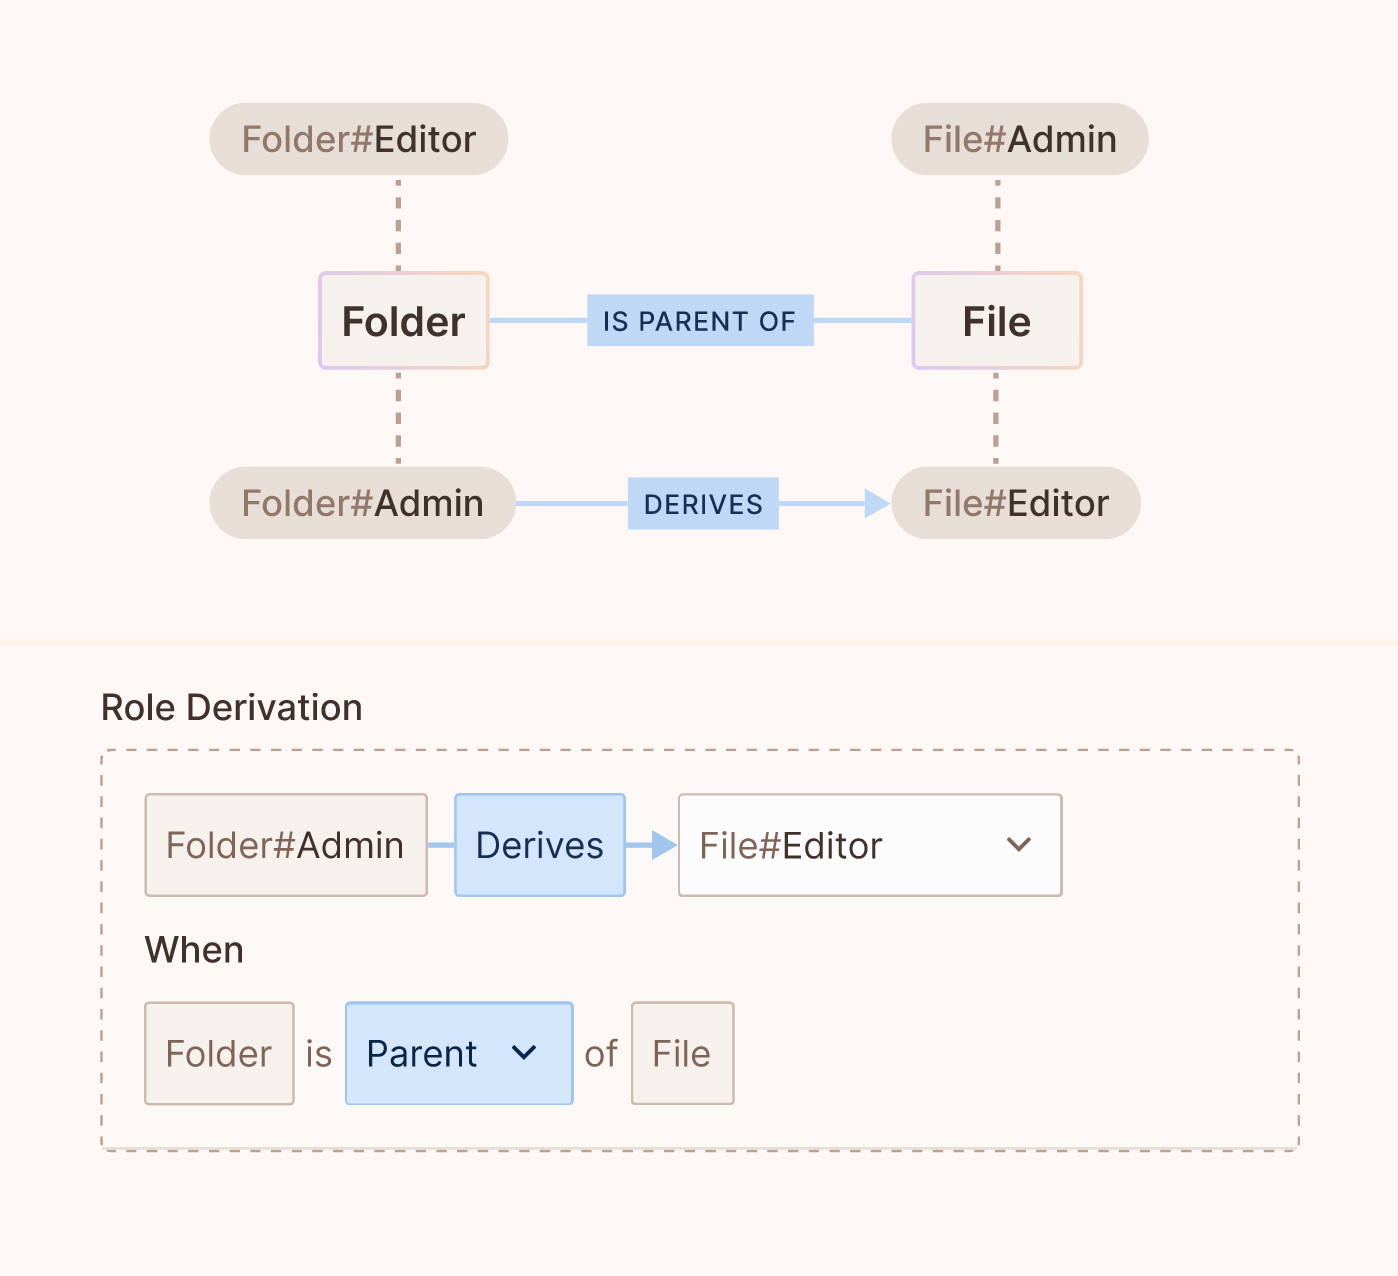
UI Example
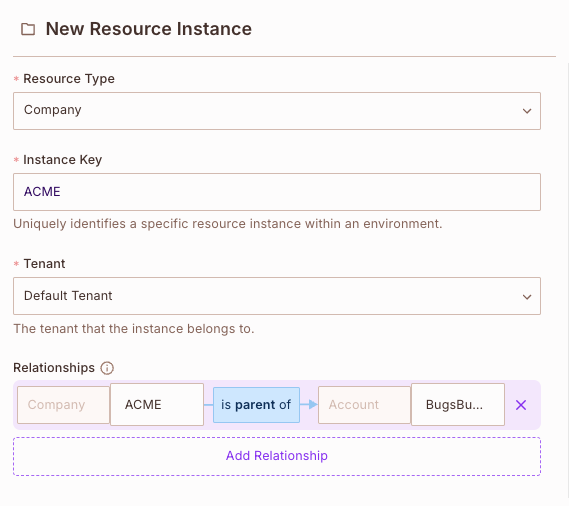
Creating a resource instance
A resource instance is a specific occurrence or version of a resource. While document is a resource, Document A or
Version 2 of Document A are its instances. Recognizing and differentiating these instances is crucial for pinpoint access control.
Connecting resource instances with a relationship
Relationships (also known as relationship-tuples) are specific connections on top of the relations defined in the policy schema.
Say you want to place a specifc document under a specifc folder, or a specifc account under a specfic company - you can do so via the Permit Directory under the instances tab.
While creating or editing a resource-instance, add a relationship between the edited instance and another instance (of possibly different resource types).
Example:
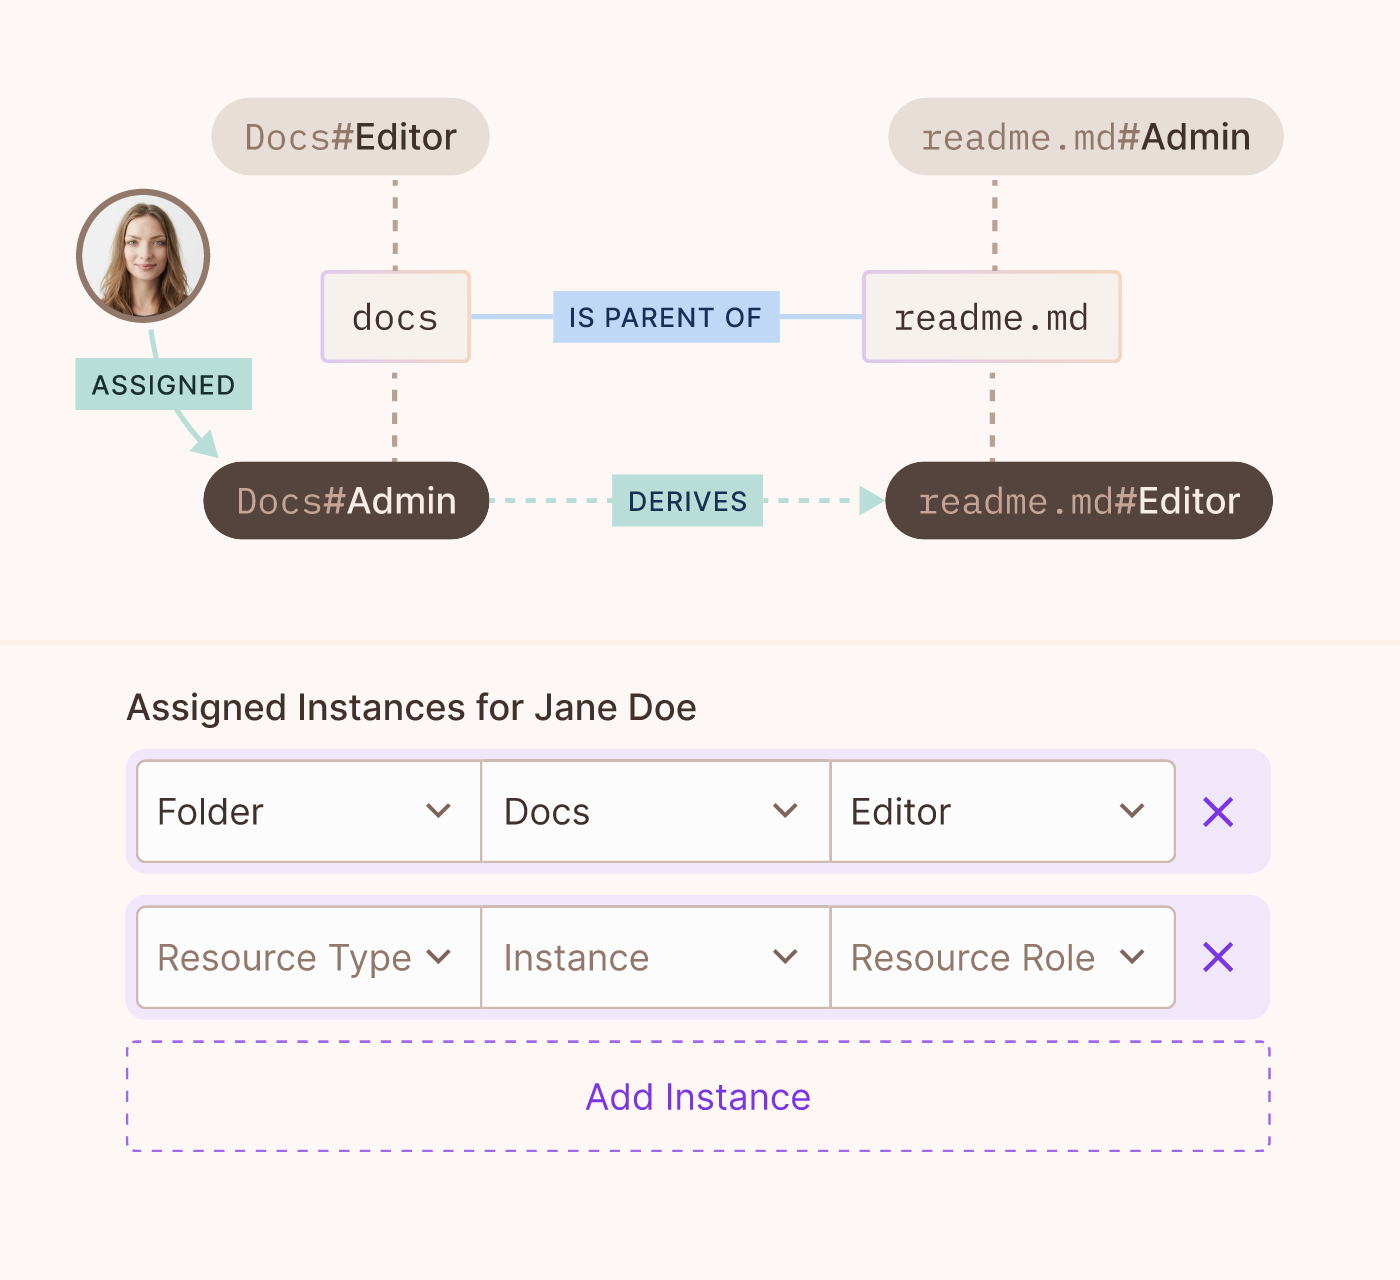
Assigning resource instances to a user
This final step ties everything together by associating a specific resource instance with a user, based on their role. This assignment ensures that users have the correct access to resources in the context of their roles, solidifying the principles of ReBAC.
UI Example
Enforcing your policies in your code
In the context of Role-Based Access Control (ReBAC), the enforcement of permissions becomes more granular and contextual. Instead of merely assigning permissions based on a user's static role, ReBAC looks at the relationships and interactions between users, their roles, and the resources they want to access.
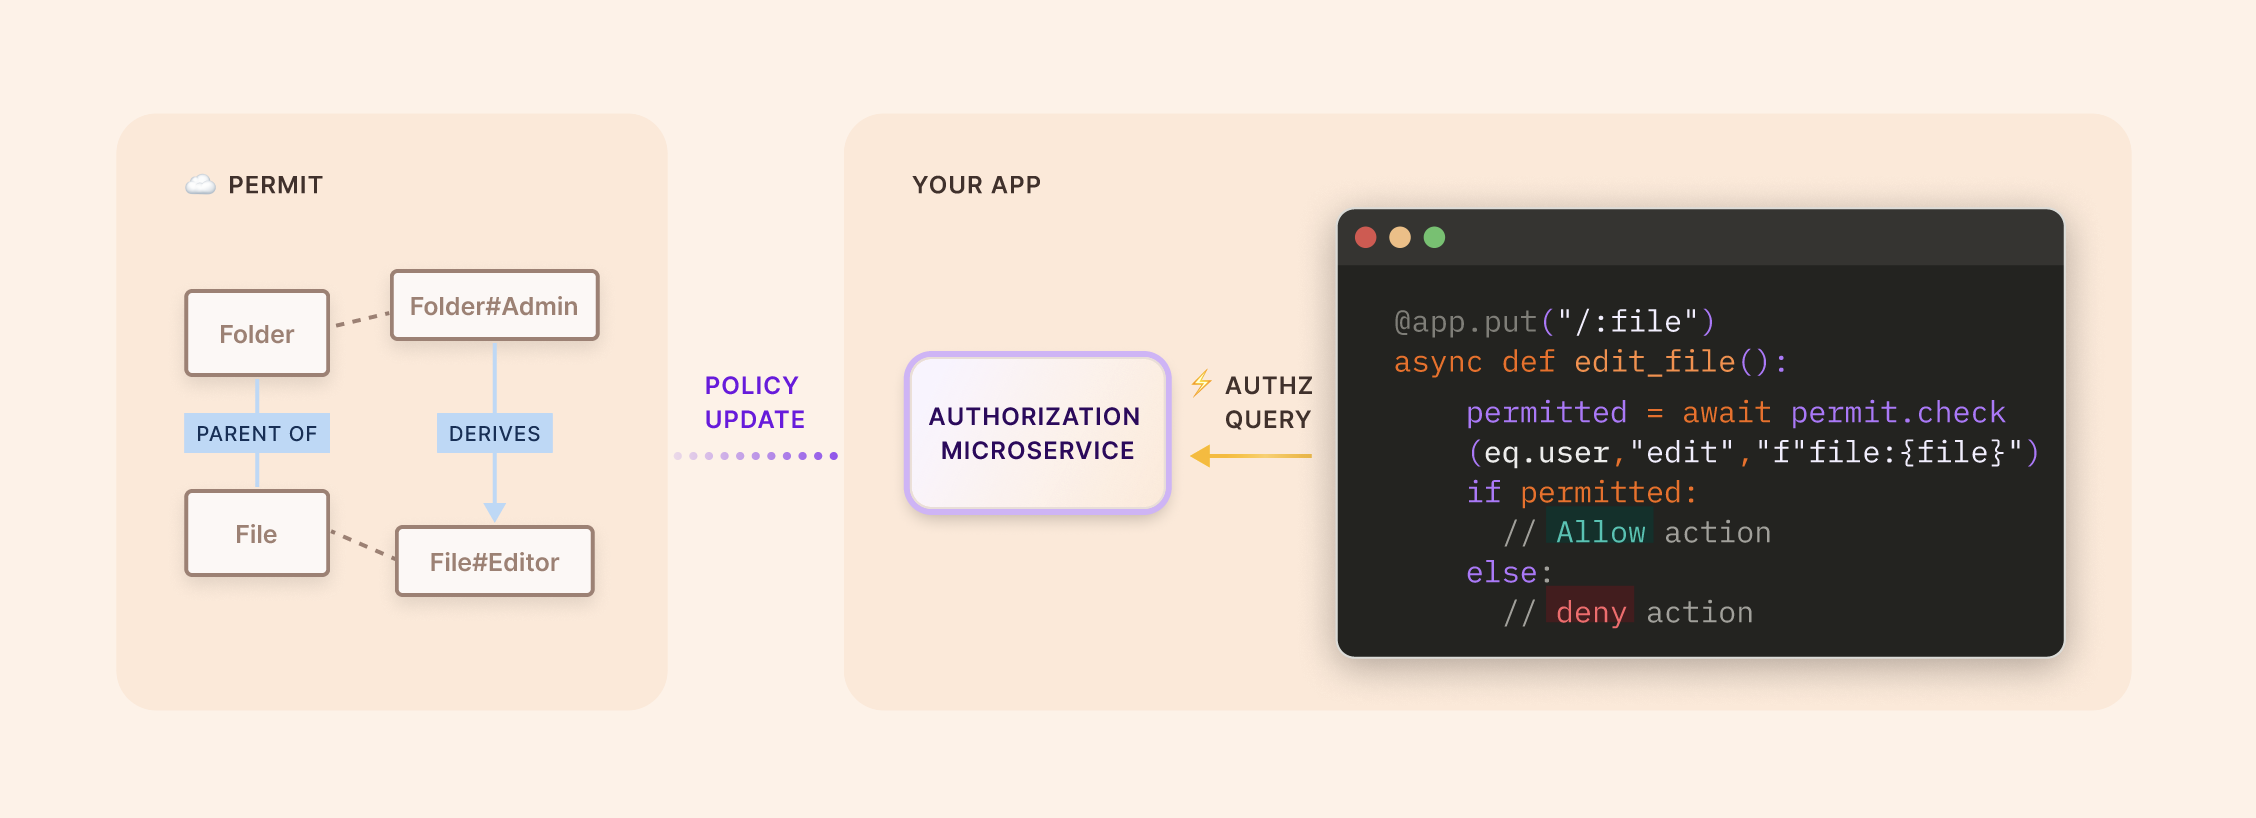
Here is a code snippet showing an enforcement being made, checking if a user can be assigned to a specific member group. The group key is rendered on the fly:
await permit.check(userId, "assign", `member_group:${group}`);
can be broken down and understood in the following manner:
Function: permit.check()
This function, as its name suggests, is used to check if a specific user has the necessary permissions to perform a particular action on a given resource.
Parameters:
userId
This represents the unique identifier for the user whose permissions are being checked.
assign
This is the action that the user wishes to perform. In this case, the user wants to "assign" a member to a group.xe
member_group:${group}
This is the resource upon which the user wishes to perform the action. It's formatted as a template string to allow for dynamic insertion of the group's resource instance.
Variant permit.check() ReBAC calls
We could of course also pass a hardcoded instance key:
await permit.check(userId, "assign", "member_group:group3");
And we can also pass, as in RBAC, an object with additonal data such as the tenant:
await permit.check(userId, "assign", {type:"member_group", key:"group3", tenant:"Tenant1"} );
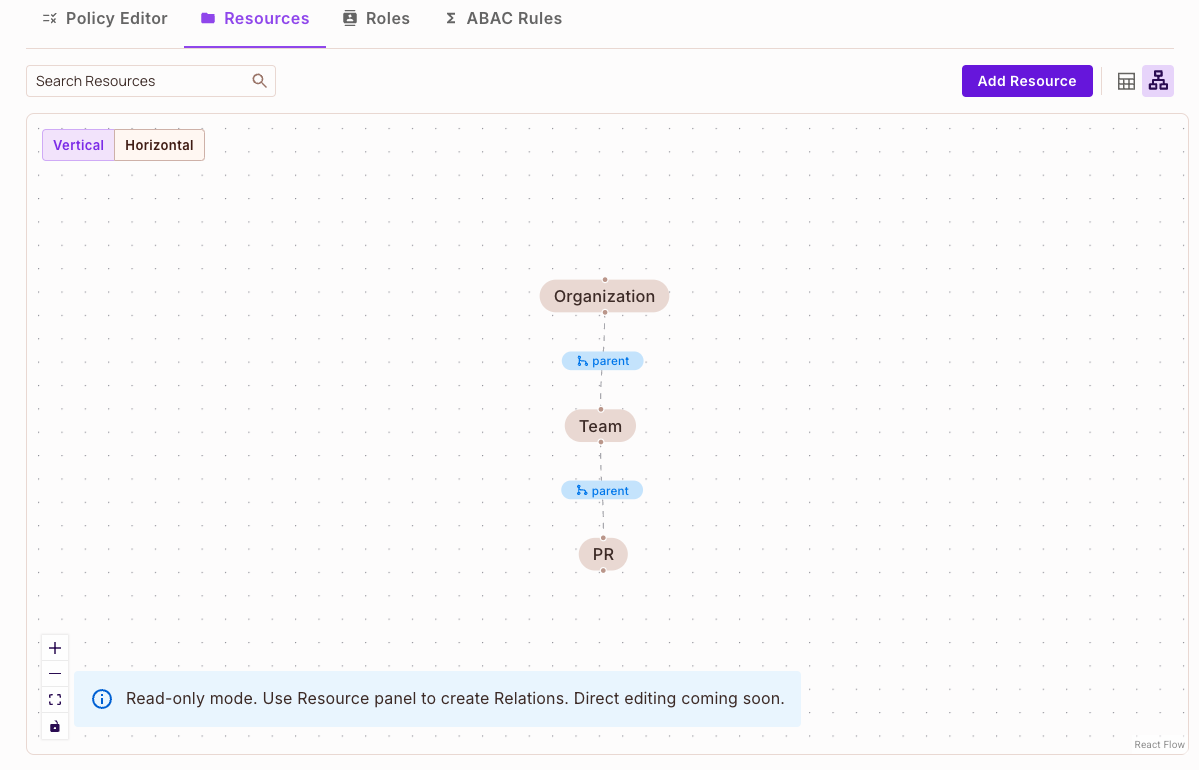
Visualizing your ReBAC policy - Resource Relationship Graph
The resource relationship graph visually represents the connections and dependencies between various resources in your system. The gray nodes in the graph represent a resource, while edges depict the relationships between them, such as ownership or permissions. This version of the graph is read-only This view helps provide clear insights into the resource hierarchy and relationships at a glance.
Here is how you can access the graph

Here is an example of a resource relationship graph:
Dive deeper into ReBAC with our example apps
- Google Drive - Your classic file sharing app - with file/folder hierarchy
- Galactic Healthcare - Healthcare app with user profile access delgation
- Pink Mobile - Teleco representive app - with account level access