Policy Basics
Writing and maintaining good authorization policies is hard. The Policy Editor plays a centric part into what we offer at Permit. It was designed to take away the hassle of dealing with complex code, and offer a UI solution that allows both novice and experienced users to create and edit authorization policies with ease - with code or low-code interfaces.
We combine the power of a powerful authorization engines with the ease of use of a simple web interface. Furthermore, our platform integrates advanced code generation, translating policies into recognized policy language code such as Rego and Cedar directly within Git. This approach not only simplifies policy definition but also champions the best practices of managing intricate logic through the "policy-as-code" methodology, ensuring scalability, traceability, and efficient policy management.
What is a Policy?
A policy is a way of defining rules of how permissions are granted. Within each policy, we focus on a hierarchy view of how permissions are applied.
A very basic policy consists of user roles, actions, and resources.
A policy resides inside an environment.
Supported Authorization Models
Our platform is designed to provide a flexible and holistic approach to access management, allowing you to define permissions based on:
- Roles: Assign and manage access based on predefined user roles. (Top Level in the UI)
- Relationships: Define permissions based on the interactions and connections between entities.
- Conditions: Set up permissions governed by specific attributes or conditions.
Each of these elements can be interwoven and introduced at various stages, providing a dynamic and adaptive framework for access control that prioritizes your unique operational needs.
Define Resources and Actions
Resources and Actions are at the core of the Policy Editor and are defined in the editor within the application's configuration or via the API. Once defined, resources and actions become the layout for permissions.
Resources
Resources refer to the target objects you want to protect or control access to. They can be virtual or physical entities. Resources are tied to a selected environment.
Example
In the context of a social media platform, "resources" could refer to user profiles, posts, comments, and private messages, all of which need specific permissions to dictate who can view, modify, or delete them.
Actions
Actions define the operations that can be performed on resources. They dictate what exactly a user or application is allowed or not allowed to do with a given resource. They can be custom and accommodate only to one specific resource.
Example
In the context of a music streaming platform, "actions" could include "Play", "Skip", "Add to Playlist", "Download", and
"Share" to define the different operations users can perform on songs or albums.
A role (Top Level in the UI) that is assigned (the checkbox is ticket) to a resource and action allows users with that role to perform the action on a resource.
ֿ

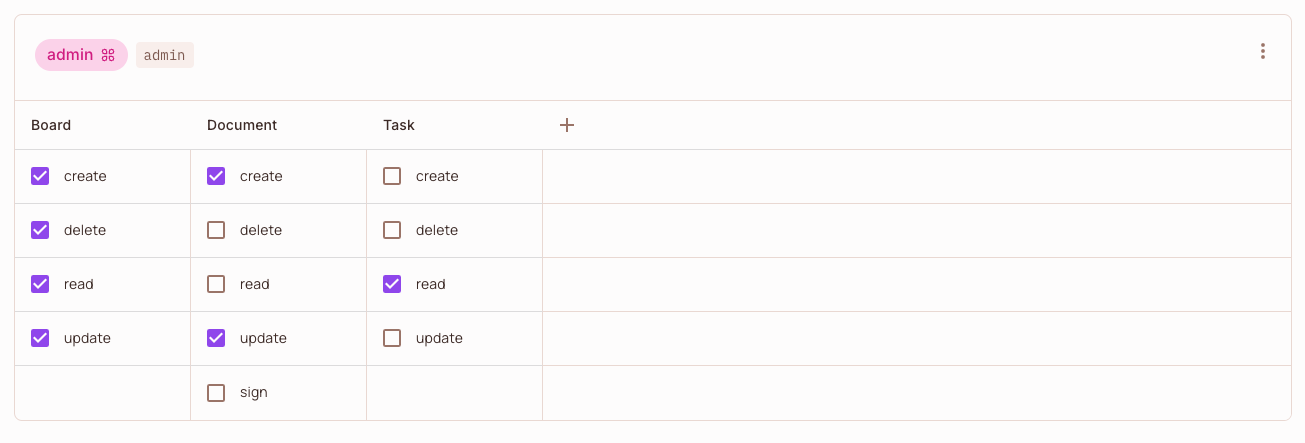
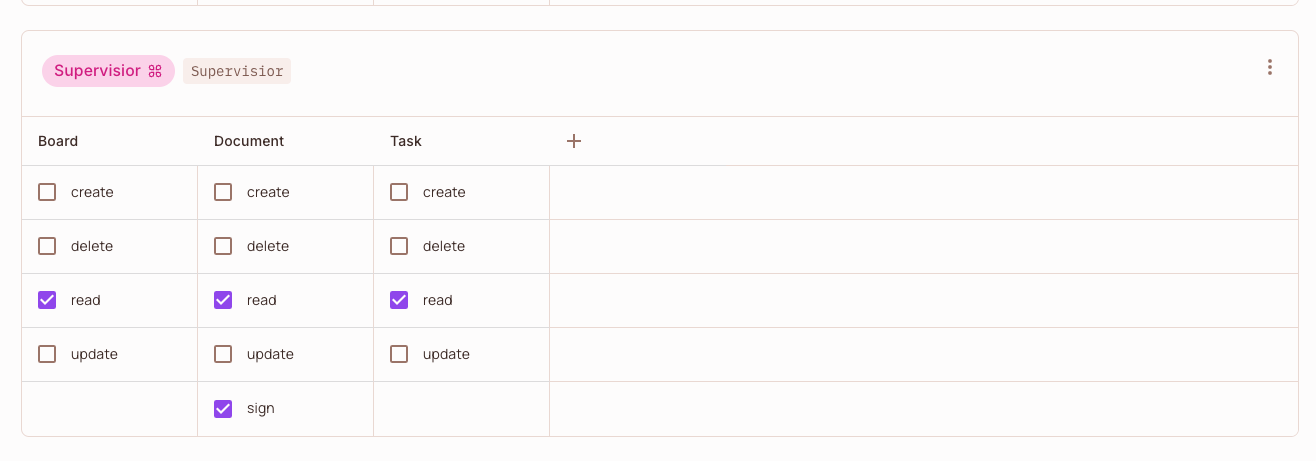
Above is a Policy Editor example with two roles (Top Level in the UI) - Admin & Supervisor - and three resources Board, Task, Document.
As an example, the Admin cannot sign a Document.
Default Permissions
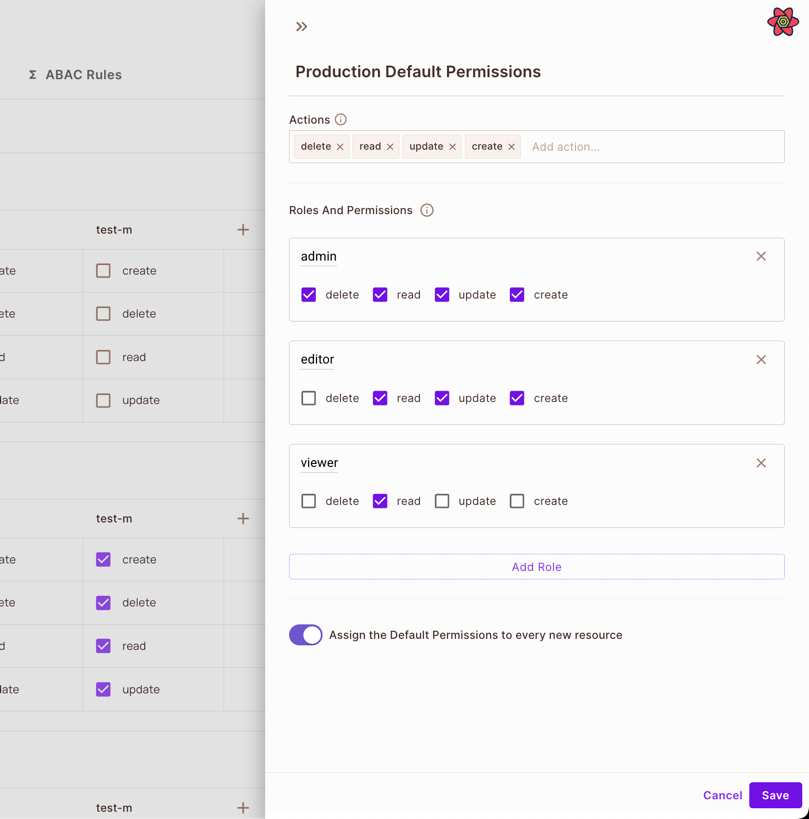
By default, every new resource will have default actions and roles (Top Level in the UI) assigned to it. The actions will appear by default when you create a new resource in the environment. Roles and permissions will automatically be added to the policy of every new resource in the environment (base on the resource action that you have defined). You can edit the default roles and actions based on your needs.
To disable Assign the Default Roles to every new resource visit the settings button in the policy editor section.
The default settings will only be applied to new resources created from the dashboard.
By default, the default permissions are:
Adminrole with actionsRead,Create,Update,DeleteEditorrole with actionsRead,Create,UpdateViewerrole with actionsRead
Create Roles (Top Level in the UI) and Permissions
Roles (Top Level in the UI)
A role is a collection of permissions that can be assigned to users or entities, serving as a template for access rights. Instead of granting permissions individually to each user, roles allow grouping permissions into a single entity.
Roles exist on an organization level - whether you change project, tenant, or environment, the same roles exist for you.
Roles are assigned to users via the User Management page.
Example
Roles are useful in organizations or systems with many users to manage access more efficiently. For instance,
in a company, there might be roles like Manager, Engineer, or HR, each with a different set of permissions.
Permissions are often grouped into roles, but can also be assigned directly to individual users or entities. For instance,
a permission might specify that a Manager user can "Read" a document but cannot "Edit" it.
Manage Users and Tenants
Your end-users are probably the main reason you create your application.
Via the User Management web interface you can control your users. You can:
- create new users
- update existing users
- delete users
- assign roles to each user
- assign users to tenants.
This is of course in addition to the API.
Users
Users are individual entities, often people, but can also be automated entities, that interact with a system or application. Each user has an identity that can be authenticated and authorized to access certain resources. Users are assigned to tenants (each user can belong to more than one tenant) and can then be assigned roles and permissions.
User identities are used to determine what actions they are allowed or not allowed to perform. Permissions and policies are often defined around the user's identity, roles, or group memberships.
Users are nested under tenants. Each user can be associated with multiple tenants.
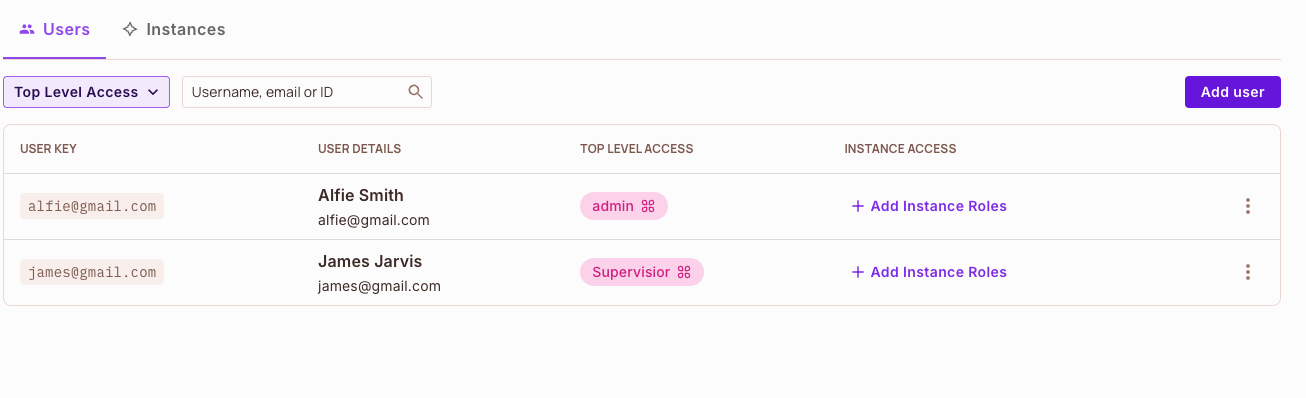
Above is a User Management example with two users - Alfie and James, both residing in the default tenant. Each user has a unique id (not visible in the screenshot), thats composed of:
- First Name
- Last Name
- Role
Tenants
Tenants represent a single instance of the application's environment, often used in multi-tenant architectures. Each tenant is a separate, isolated unit with its own set of users, data, configurations, and permissions.
In multi-tenant systems, different organizations or groups use the same application but operate within their own isolated environment. Permissions and policies can be defined at the tenant level, ensuring separation and privacy between different tenants.
Usually, each tenant will represent one of the end-customer companies in your product (i.e. the company that you sell to).
Users are contained within tenants, and can only access the resources within their tenant.
You can use the same user id within multiple tenants, so the user belongs to multiple tenants.
Using the low-code Policy Editor
The policy editor is the main tool you will be using for enforcing permissions for your users. We put a lot of time into making sure the experience of using the UI is extremely simple, yet vastly powerful for creating most of your enforcements.
Creating a role (Top Level in the UI)
Creating a resource
Adding a user and assigning a role (Top Level in the UI)
Assigning multiple roles (Top Level in the UI) to a user
Giving permissions to a role (Top Level in the UI)
Creating a new tenant
Switching between tenants
It's important to notice, that a user within each tenant can have different roles assigned, which of course, have different permissions.
Switching the policy editor view
We support two different views for the policy editor - a default block view, but also a grid view. You can change views by toggling the view buttons in the top right corner of the editor.
Permit & Cedar Policies
By default, Permit.io uses the Open Policy Agent (OPA) or Cedar and its code based policy language - which is Rego and Cedar - to create and maintain authorization policies.
Rego and Cedar code can be created by using the low-code Policy Editor UI, or by directly writing code. You can find an example of what the generated code looks like here.
Code created through the editor is merged into a Git repository. The stored policies are then deployed on the fly via OPAL to the multiple PDP microservices that you run.
GitOps
We support policy-as-code editing via the GitOps Feature, in which the policy editor commits the Rego or Cedar code it generate into a git repository of your choice.
With the GitOps feature, you can manage all your policies directly within Git by linking to a Git repository. OPAL will then handle the tracking and deployment from this repository. Additionally, Git ensures comprehensive versioning for all your policies.
As mentioned above - Policies created with the Policy Editor are merged into a Git repository, this allows us to create a controlled process for creating and maintaining policies. Code-reviews, tests and approval flows combine easily with GitOps and the Permit.io authorization development life cycle.
Follow this guide if you want to setup GitOps.