Demo Application
1. Introduction
1.1. The application
The demo application is a simple task management application. To demonstrate the relationship between authentication and authorization, we created a simple to-do application, with authentication already implemented into it based on the Auth0 Next.JS getting started guide. Let's clone it and run it on your local environment.
While this article does not require you to have Next.JS knowledge, it requires an Auth0 account with a basic configuration, and Node.JS installed in your local or remote environment.
You can see more information about RBAC Permit and Auth0 in this great blog post by Gabriel L. Manor
The full code of the demo application is available here
For our example App, we will create the following roles (it is recommended to use lowercase keys, as keys are case-sensitive):
- admin
- manager
- viewer
1.2. Create the right resources in Permit
In our example, we will set up a todo application, so we will create a task resource with the following actions:
- get
- post
- delete
Setting up roles and resources can be done through the Permit dashboard, by using the Permit API, or with one of our SDKs: Python, NodeJS and more. Additional SDKs are available in the SDK Reference section inside the docs.
1.3. Set up the right permissions in Permit.io:
adminshould have all the permissions for thetaskresource.managerwill only havegetandpostpermissions.viewerwill only have thegetpermission.
As noted earlier, these permissions can be set up through either the Permit dashboard or by using the Permit API.
2. Run the demo application
2.1. Clone the demo application:
git clone https://github.com/permitio/permit-next-todo-starter
git checkout auth0-integration
2.2. Put your Auth0 credentials in the .env file
To get your own keys in the desired format, use this link while logged in to your Auth0 account
AUTH0_SECRET='<auth0_secret>'
AUTH0_BASE_URL='http://localhost:3000'
AUTH0_ISSUER_BASE_URL='<auth0_issuer_base_url>'
AUTH0_CLIENT_ID=<auth0_client_id>
AUTH0_CLIENT_SECRET='<auth0_client_secret>'
2.3. Put your Permit credentials in the .env file
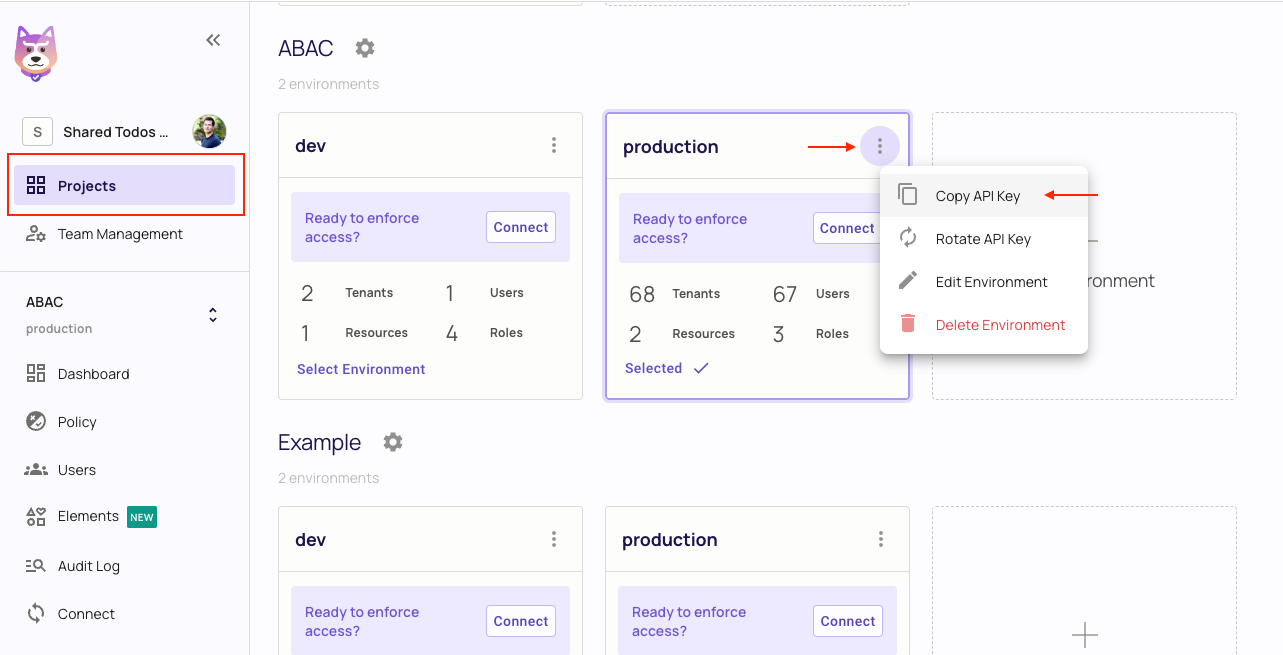
You can get your Permit API Key from the projects page by clicking on the three dots on the top right of your environment and selecting Copy API Key.
PERMIT_API_KEY=<permit_api_key>
3. How it works
3.1. Auth0
As we want to use Auth0 for authentication, we will use the Auth0 SDK to get each user's information and access token.
On the frontend side, we have the Auth0 useUser at index.tsx that will give us the user's information, and the userProvider in _app.tsx that redirects the user to the login page if they have not logged in.
// index.tsx
//...
const { user, isLoading } = useUser();
//...
// _app.tsx
//...
<UserProvider>
  <Component {...pageProps} />
</UserProvider>
//...
On the backend side, we have the Auth0 auth0 middleware at pages/api/auth/[...auth0].ts that manages all auth0-related requests.
We can also access the Auth0 session in any API route using the getSession function, as we did in pages/api/tasks.ts.
// pages/api/auth/[...auth0].ts
import { handleAuth } from "@auth0/nextjs-auth0";

export default handleAuth();
// pages/api/tasks.ts
import { getSession } from "@auth0/nextjs-auth0";
//...
export default async function handler(req: NextApiRequest, res: NextApiResponse) {
	const session = await getSession(req, res); // if the user is not logged in, session will be null
	if (!session?.user) {
    res.status(401).json({ message: 'unauthorized' });
    return;
  }
}
//...
3.2. Permit
As we want to use Permit for authorization, we will use the Permit SDK to get users' permissions and check if they have the right ones.
Authorization is only done on the backend side, so we will use the permit middleware at pages/api/tasks.ts to manage all permit-related requests.
// pages/api/tasks.ts
import { Permit } from "permitio";

export const permit = new Permit({
  pdp: "https://cloudpdp.api.permit.io",
  token: process.env.PERMIT_SDK_TOKEN,
});
export default withApiAuthRequired(async function handler(
  req: NextApiRequest,
  res: NextApiResponse<Task | Task[] | Response>
) {
  // Auth0 is checking if the user is logged in (who the user is)
  const session = await getSession(req, res);
  if (!session?.user) {
    res.status(401).json({ message: "unauthorized" });
    return;
  }
  // Permit is checking if the user has the right permissions (what the user can do)
  const isAllowedForOperation = await permit.check(
    (session?.user?.sub as string) || "", // the user identifier (Permit user id / or Permit user key, in this example we set the Auth0 user id as the key)
    req.method?.toLowerCase() as string, // the action (can be: get, post, delete)
    "task" // our resource key
  );
  if (!isAllowedForOperation) {
    res.status(403).json({ message: "forbidden" });
    return;
  }
  //... handle the request
});
4. The integration
Now that we have the user's information and permissions, we can integrate them. We need to make sure that Permit is synced with Auth0 so that each user who logs in will have the right roles and permissions.
4.1. Sync Auth0 with Permit
First, we need to make sure each user that logs into our app is synced with Permit.
This will be done in the pages/api/auth/[...auth0].ts file:
// pages/api/auth/[...auth0].ts
import { handleAuth, handleLogin } from "@auth0/nextjs-auth0";

export default handleAuth({
  async login(req, res) {
    await handleLogin(req, res, {
      returnTo: "/postLogin",
    });
  },
});
This will ensure that each user who logs into our app will be navigated to the postLogin page.
Now we need to sync the user with Permit - add the following code to the postLogin:
// pages/postLogin/index.tsx
export async function getServerSideProps({ req, res }: any) {
  const session = await getSession(req, res);
  const permitUserObj = {
    email: session?.user?.email,
    key: session?.user?.sub,
    first_name: session?.user?.name,
  };
  const permitUser = await permit.api.syncUser(permitUserObj);
  //... the sync role logic
}
This will sync the user with Permit, but we must still assign users the right roles. This can be done by configuring Auth0 Actions with a Post-Login trigger to add roles to the user's tokens. Here's how:
- Go to your Auth0 dashboard > Actions > Triggers
- Click on "post-login" under "Sign Up & Login"
- Click the "+" button to add a new action
- Select "Build from scratch"
- Name your action (e.g., "Add Roles to Tokens")
- Replace the default code with the following Action code:
/**
 * @param {Event} event - Details about the user and the context in which they are logging in.
 * @param {PostLoginAPI} api - Interface whose methods can be used to change the behavior of the login.
 */
exports.onExecutePostLogin = async (event, api) => {
  const namespace = 'my_app_name';
  if (event.authorization) {
    api.idToken.setCustomClaim(`${namespace}/roles`, event.authorization.roles);
    api.accessToken.setCustomClaim(`${namespace}/roles`, event.authorization.roles);
  }
};
- Click "Deploy"
- Click "Back to triggers arrow" and in the Post Login flow, drag your new action into the flow where you want it to execute
- Click "Apply"
Now your user's session object will include the roles in the following format:
auth0User {
  'my_app_name/roles': [ 'admin' ],
  nickname: 'test',
  name: 'test@permit.io',
  picture: 'https://s.gravatar.com/avatar/test.png',
  updated_at: '2023-07-05T10:56:35.831Z',
  email: 'test@permit.io',
  email_verified: false,
  sub: 'auth0|64a139da377fefdcbxxxxxxx',
  sid: 'I9xntALjR3M37Iw62Lgc3xxxxxxxxxx'
}
Then when a user logs into our app, we can sync their roles with Permit by adding the following code just below the permit.api.syncUser function:
    if (session?.user['my_app_name/roles']) {
        session?.user['my_app_name/roles'].map(async (roleKey: string) => {
            console.log(roleKey);
            const roleToAssign = {
                role: roleKey,
                user: permitUserObj.key,
                tenant: 'default'
            }
            const assignedRole = await permit.api.roleAssignments.assign(roleToAssign);
            console.log(assignedRole);
        });
    }
    redirect(res, 302, '/');
}
Now if you assign a role to a user (either in Auth0 or in Permit), the user will have the correct roles and permissions. (Make sure you use the exact same role names in both Auth0 and Permit - they are case-sensitive!)
Check out the postLogin page in this example to see the full code.