Working with the UI
Frontend-only-Authorization (FoAz) is a method allowing frontend applications to enforce protected access to APIs without requiring a dedicated backend.
FoAz allows frontend developers to securely use sensitive resources directly from the frontend, while gating for permissions and without exposing any secrets or sensitive data.
FoAz is deprecated and no longer supported, but it is still available at app.permit.io/foaz-proxy .
For URL-Based permission - we’re introducing URL Mapping.
Before you will be able to configure new mapping rules for your frontend-only authorization, you will need to fetch your JWKs from your authentication provider and add the JWKs to Permit.
The FoAz UI is intuitive and easy to navigate, making the process of configuring new mapping rules for your frontend-only authorization straightforward. You can access the UI inside the Permit App here.
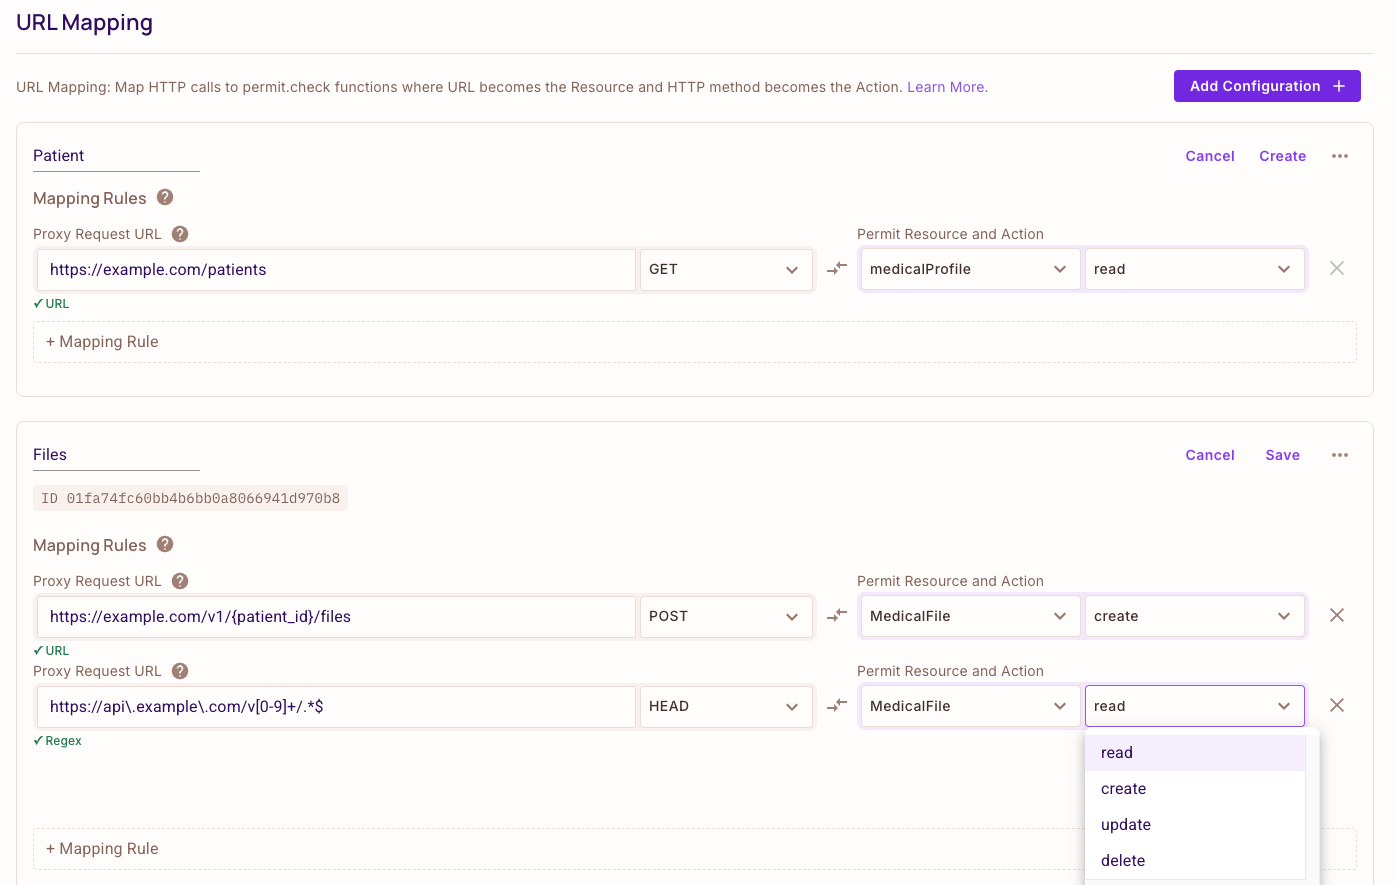
Here is a visual representation of the FoAz UI for better understanding:

Mapping Rules
Mapping rules are elegantly structured into four distinct components:
- The specified API endpoint URL to evaluate permissions prior to initiation.
- The designated HTTP method to categorize the nature of the request.
- The identified Permit resource being accessed or manipulated.
- The explicit action being undertaken on the said resource.
The mapping rules feature in the FoAz UI links HTTP URLs to particular resources and actions within the Permit.io platform. These rules are essential for controlling access and permissions on your website or application. Each rule defines the association between an incoming HTTP request and the corresponding resource within your application that the request should interact with.

By correctly setting up mapping rules, you can ensure that requests are correctly routed and that users only have access to the resources that they are authorized to view or modify.
Streamlining Mapping Rules with URL templating
Within the FoAz UI, you have the option to integrate variables directly into the URL, utilizing a syntax denoted as {var1}.
This process, referred to as URL templating, serves as a potent tool in minimizing the number of necessary mapping rules,
thus promoting a more streamlined approach.
To illustrate, consider the configuration of a URL in the following manner: example.com/v1/{customer_id}/payments.
Here, {customer_id} functions as a dynamic placeholder, primed to be substituted with the actual customer ID when a
request is initiated. This technique facilitates a more efficient system, where a solitary mapping rule can encompass
all customers, negating the need for individual rules per customer.
Secret configuration
The secret configuration is a critical part of the FoAz UI. It is where you provide the secret that can authenticate against the service you're proxying, for instance, if you're proxying Stripe requests, you would set your Stripe secret here.

Once the secret is authorized, it will be passed as part of the modified HTTP request. The HTTP request will be adjusted to include authentication details, enabling the request to access the required service securely and correctly.
This setup ensures the secure transmission of sensitive data and enables appropriate access control to your integrated third-party services.
Safeguarding these secrets is critical. Always follow best practices to keep these secrets secure and never expose them in places where unauthorized individuals might gain access.
Setting up the PDP
To use the URL Mapping permissions check, you must first set up the PDP. You must deploy the following version of the PDP that supports the URL Mapping check. First pull the PDP (Policy-decision-point).
docker pull permitio/pdp-v2:0.2.19-rc.2
Now run the PDP locally. Remember to replace your API key with the environment API key in which you are building your policies.
docker run -it -p 7766:7000 --env PDP_API_KEY=<YOUR_API_KEY> permitio/pdp-v2:0.2.19-rc.2
Checking for permissions
As part of the permission check, we will be authorizing the current logged in user, and hence we will need to verify that their
JWT matches with the previously configured JWKS (JSON Web Key Sets). We will be passing in the JWT as part of the Authorization
header in our HTTP request.
We then need to perform a basic fetch request, constructing our unique URL. Here is the example we will work with. Let's destructure it for easier understanding.
https://proxy.api.permit.io/proxy/<UNIQUE-MAPPING-ID>?url=https://some-rest-api.vercel.app/api/something
- The URL is composed of our
proxy URLwhich directly defines the proxy API endpoint and the current mapping rule we are referring to, by passing in themapping rule id.
https://proxy.api.permit.io/proxy/<UNIQUE-MAPPING-ID>
- The we are passing in a URL which is the secure endpoint that we are intending to call to retrieve sensitive data.
?url=https://some-rest-api.vercel.app/api/something
Now that the PDP is running, we have configured our policy within Permit, and have our logged in user synced with Permit, we can write fetch request, and perform this call securely vi the Permit proxy.
const sendFoazRequest = async (req, res) => {
	// This should be the JWT fetched from your current session, depending on the AuthN provider you are using.
	const token = await getJWT();

	// This is the call to the desired API endpoint via the Permit authorization proxy.
	await fetch(
		"https://proxy.api.permit.io/proxy/1fc72853b4de83hdisisj3439fjkefm?url=https://some-rest-api.vercel.app/api/something",
		{
			method: "POST",
			headers: {
				"Content-Type": "application/json",
				// Passing in the current logged in user JWT as part of the Authorization header.
				Authorization: `Bearer ${token}`,
			},
			body: JSON.stringify({ secretCode: 123456 }),
		}
	)
		.then((response) => response.json())
		.then((data) => console.log(data))
		.catch((error) => console.error("Error:", error));
};
Copying the fetch request template from the UI
To make it even easier for you, we already provide you with the template code snippet for the fetch request.