Login Method
The Login Method for Permit Elements is a simple and secure way to embed Permit Elements into your application.
Overview
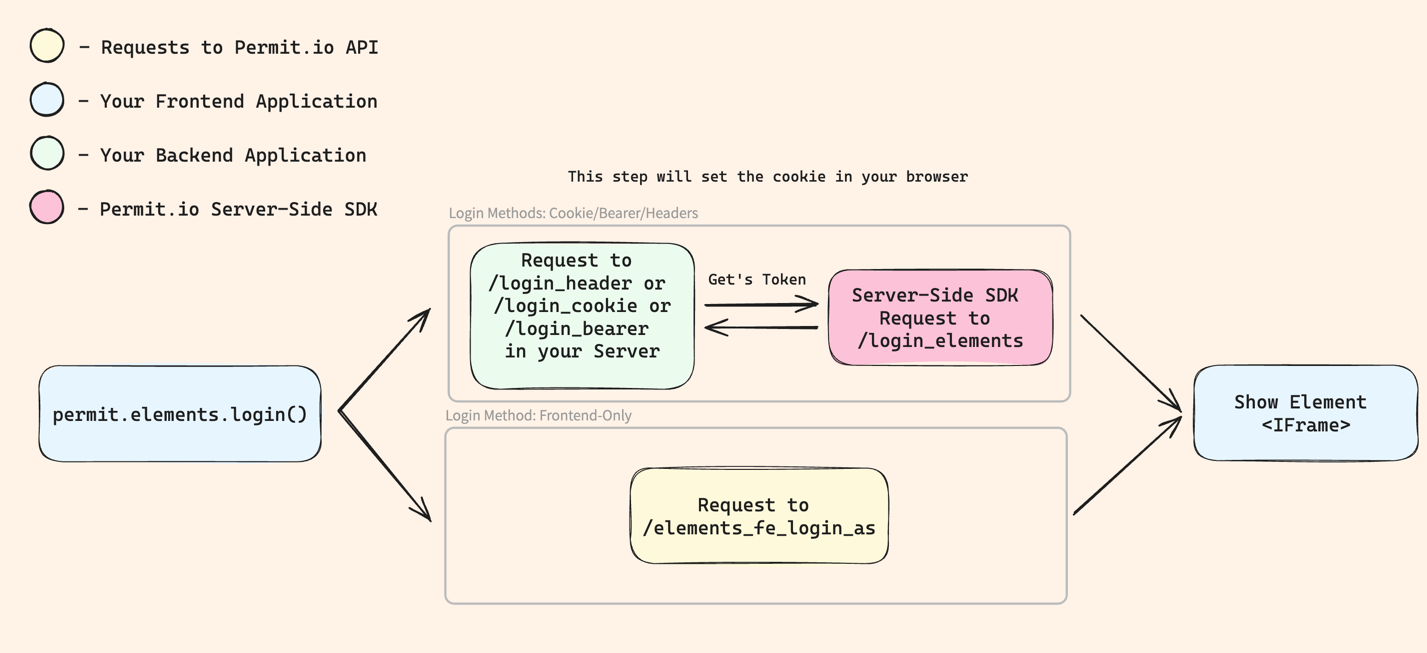
Before showing the Permit Element in your application, you need to log in the end-user. In order to login you'll first need to decide which login method you want to use. There are two main ways to login a user to the Permit Element:
-
🌏 Client-side Login - This is used when you want to log in a user from your frontend application - this is the most common way to log in a user.
-
⚙️ Server-side Login - This is used when you want to log in a user from your backend server - You can choose between Cookies, Bearer Token or Custom Headers login methods.
Here's a diagram to help you understand the flow of the login process:
⚙ Server-side Login method
In the server side, We have the permit.elements.loginAs() method takes two parameters.
You need to pass in the unique userId that your end-user has in Permit.io, and a Tenant Key or ID.
Passing in the tenant is compulsory when logging in a user server-side.
permit.elements.loginAs({ userId, tenant });
The user must belong to the tenant in order to login. Otherwise, the user will get an error saying USER_NOT_FOUND.
If the user want to change tenant, the user will have to log-out, and then log-in to a different tenant.
Initializing Permit
To use the Permit SDK, you need to initialize it with your API key. You can find your API key in the Permit.io dashboard.
- Node.js
- Python
- .NET
- Java
from permitio import Permit
const { Permit } = require("permitio");
const permit = new Permit({token: "<YOUR_API_KEY>", ...});
from permitio import Permit

permit = Permit(token="<YOUR_API_KEY>", ...)
using PermitIO;

var permit = new Permit("<YOUR_API_KEY>");
import io.permit.sdk.Permit;
import io.permit.sdk.PermitConfig;

Permit permit = new Permit(
    new PermitConfig.Builder("[YOUR_API_KEY]").build()
);
Use the loginAs function
You need to create a route in your backend server to allow your client to loginAs themselves and get access the Permit Element.
The backend loginAs route is matched based on the Authentication methods you have implemented inside your App. Most applications
authenticate with the Bearer Token or Cookies, but we also allows you to use any other HTTP Security Header. The important
part here is, that you use the appropriate code example below based on your Authentication method.
- Cookies
- Bearer Token
- Other Headers
- FrontendOnly
- Node.js
- Python
- .NET
- Java
const express = require("express");
 const app = express();
 app.get("/login_cookie", async (req, res) => {
     // const user_key = get_user_from_jwt();
     const ticket = await permit.elements.loginAs({userId: user_key, tenantId: TENANT});
     res.status(302).redirect(ticket.redirect_url);
 });
 app.listen(port, () => {
   console.log(`Example app listening at http://localhost:${port}`);
 });
from fastapi import FastAPI
 from starlette.responses import JSONResponse
 app = FastAPI()
 @app.post("/login_cookie")
 async def login():
     # get user from jwt
     # user_id = get_user_from_jwt(request)
     ticket = await permit.elements.login_as(USER, TENANT)
     return JSONResponse(status_code=302, headers={"Location": ticket.redirect_url}, content={})
using PermitSDK;
 namespace PermitOnboardingApp
 {
     class HttpServer
     {
         public static HttpListener listener;
         public static string url = "http://localhost:4000/login_cookie";

         public static async Task HandleIncomingConnections()
         {
             bool runServer = true;

             while (runServer)
                    HttpListenerContext ctx = await listener.GetContextAsync();
                              HttpListenerResponse resp = ctx.Response;
                              // In the next 4 lines we have the acutal code that is relevant to the Permit SDK
                              // string testUserId = getUserIdFromJWT();
                              EmbeddedLoginContentRequestOutput ticket = await permit.Elements.LoginAs(testUserId, TENANT_ID);
                              resp.Redirect(ticket.RedirectUrl);
                              resp.OutputStream.Close();
                          }
                      public static void Main(string[] args)
                      {
                          // Create a Http server and start listening for incoming connections
                          listener = new HttpListener();
                          listener.Prefixes.Add(url);
                          listener.Start();
                          Console.WriteLine("Listening for connections on {0}", url);

                          // Handle requests
                          Task listenTask = HandleIncomingConnections();
                          listenTask.GetAwaiter().GetResult();

                          // Close the listener
                          listener.Close();
                      }
                  }
              }
package com.example.myproject;

import io.permit.sdk.Permit;
import io.permit.sdk.PermitConfig;
import io.permit.sdk.api.PermitApiException;
import io.permit.sdk.api.models.UserLoginResponse;
import org.springframework.boot.SpringApplication;
import org.springframework.boot.autoconfigure.SpringBootApplication;
import org.springframework.http.HttpHeaders;
import org.springframework.http.HttpStatus;
import org.springframework.http.ResponseEntity;
import org.springframework.web.bind.annotation.GetMapping;
import org.springframework.web.bind.annotation.RestController;

import java.io.IOException;

@RestController
@SpringBootApplication
public class DemoApplication {
	Permit permit = new Permit(
			new PermitConfig.Builder("<SET_API_KEY_HERE>")
							.withPdpAddress("http://localhost:7766")
            					.withDebugMode(true)
            					.build()
            	);

            	@GetMapping("/login_cookie")
            	public ResponseEntity<Object> loginWithCookie() throws IOException, PermitApiException {
                // String userId = getUserIdFromJWT();
            		UserLoginResponse ticket = permit.elements.loginAs(userId, tenantId);
            		HttpHeaders headers = new HttpHeaders();
            		headers.add("Location", ticket.redirectUrl);
            		return new ResponseEntity<>(ticket.content, headers, HttpStatus.FOUND);
            	}

            	public static void main(String[] args) {
            		SpringApplication.run(DemoApplication.class, args);
            	}
            }
- Node.js
- Python
- .NET
- Java
const express = require("express");
 const app = express();
 app.post("/login_header", async (req, res) => {
     // const user_key = get_user_from_jwt();
     const ticket = await permit.elements.loginAs({userId: user_key, tenantId: TENANT});
     res.status(200).send(ticket.content);
 });
 app.listen(port, () => {
   console.log(`Example app listening at http://localhost:${port}`);
 });
from fastapi import FastAPI
 from starlette.responses import JSONResponse
 app = FastAPI()


 @app.post("/login_header")
 async def main():
     # get user from jwt
     # user_id = get_user_from_jwt(request)
     ticket = await permit.elements.login_as(USER, TENANT)
     return JSONResponse(content=ticket.content, status_code=200)
using PermitSDK;
 namespace PermitOnboardingApp
 {
     class HttpServer
     {
         public static HttpListener listener;
         public static string url = "http://localhost:4000/login_cookie";
         public static async Task HandleIncomingConnections()
         {
             bool runServer = true;
             while (runServer)
                 HttpListenerContext ctx = await listener.GetContextAsync();
                 HttpListenerResponse resp = ctx.Response;
                 // In the next 6 lines we have the acutal code that is relevant to the Permit SDK
                 // string testUserId = getUserIdFromJWT();
                 EmbeddedLoginContentRequestOutput ticket = await permit.Elements.LoginAs(testUserId, TENANT_ID);
                 byte[] data = Encoding.UTF8.GetBytes(ticket.Content);
                 resp.StatusCode = 200;
                 await resp.OutputStream.WriteAsync(data, 0, data.Length);
                 resp.OutputStream.Close();
             }
         public static void Main(string[] args)
          {
                      // Create a Http server and start listening for incoming connections
                      listener = new HttpListener();
                      listener.Prefixes.Add(url);
                      listener.Start();
                      Console.WriteLine("Listening for connections on {0}", url);
                      // Handle requests
                      Task listenTask = HandleIncomingConnections();
                      listenTask.GetAwaiter().GetResult();
                      // Close the listener
                      listener.Close();
                  }
              }
          }
package com.example.myproject;

import io.permit.sdk.Permit;
import io.permit.sdk.PermitConfig;
import io.permit.sdk.api.PermitApiException;
import io.permit.sdk.api.models.UserLoginResponse;
import org.springframework.boot.SpringApplication;
import org.springframework.boot.autoconfigure.SpringBootApplication;
import org.springframework.http.HttpHeaders;
import org.springframework.http.HttpStatus;
import org.springframework.http.ResponseEntity;
import org.springframework.web.bind.annotation.GetMapping;
import org.springframework.web.bind.annotation.RestController;

import java.io.IOException;

@RestController
@SpringBootApplication
public class DemoApplication {
	Permit permit = new Permit(
			new PermitConfig.Builder("<SET_API_KEY_HERE>")
					.withPdpAddress("http://localhost:7766")
					.withDebugMode(true)
					.build()
	);

	@GetMapping("/login_header")
	public ResponseEntity<Object> loginWithHeader() throws IOException, PermitApiException {
    // String userId = getUserIdFromJWT();
		UserLoginResponse ticket = permit.elements.loginAs(userId, tenantId);
		return new ResponseEntity<>(ticket.content, HttpStatus.OK);
	}

	public static void main(String[] args) {
		SpringApplication.run(DemoApplication.class, args);
	}
}
- Node.js
- Python
- .NET
- Java
const express = require("express");
 const app = express();
 app.post("/login_header", async (req, res) => {
     // const user_key = get_user_from_jwt();
     const ticket = await permit.elements.loginAs({userId: user_key, tenantId: TENANT});
     res.status(200).send(ticket.content);
 });
 app.listen(port, () => {
   console.log(`Example app listening at http://localhost:${port}`);
 });
from fastapi import FastAPI
 from starlette.responses import JSONResponse
 app = FastAPI()


 @app.post("/login_header")
 async def main():
     # get user from jwt
     # user_id = get_user_from_jwt(request)
     ticket = await permit.elements.login_as(USER, TENANT)
     return JSONResponse(content=ticket.content, status_code=200)
using PermitSDK;
 namespace PermitOnboardingApp
 {
     class HttpServer
     {
         public static HttpListener listener;
         public static string url = "http://localhost:4000/login_cookie";
         public static async Task HandleIncomingConnections()
         {
             bool runServer = true;
             while (runServer)
                 HttpListenerContext ctx = await listener.GetContextAsync();
                 HttpListenerResponse resp = ctx.Response;
                 // In the next 6 lines we have the acutal code that is relevant to the Permit SDK
                 // string testUserId = getUserIdFromJWT();
                 EmbeddedLoginContentRequestOutput ticket = await permit.Elements.LoginAs(testUserId, TENANT_ID);
                 byte[] data = Encoding.UTF8.GetBytes(ticket.Content);
                 resp.StatusCode = 200;
                 await resp.OutputStream.WriteAsync(data, 0, data.Length);
                 resp.OutputStream.Close();
             }
         public static void Main(string[] args)
         {
             // Create a Http server and start listening for incoming connections
             listener = new HttpListener();
             listener.Prefixes.Add(url);
             listener.Start();
             Console.WriteLine("Listening for connections on {0}", url);
             // Handle requests
             Task listenTask = HandleIncomingConnections();
             listenTask.GetAwaiter().GetResult();
             // Close the listener
             listener.Close();
         }
     }
 }
package com.example.myproject;

import io.permit.sdk.Permit;
import io.permit.sdk.PermitConfig;
import io.permit.sdk.api.PermitApiException;
import io.permit.sdk.api.models.UserLoginResponse;
import org.springframework.boot.SpringApplication;
import org.springframework.boot.autoconfigure.SpringBootApplication;
import org.springframework.http.HttpHeaders;
import org.springframework.http.HttpStatus;
import org.springframework.http.ResponseEntity;
import org.springframework.web.bind.annotation.GetMapping;
import org.springframework.web.bind.annotation.RestController;

import java.io.IOException;

@RestController
@SpringBootApplication
public class DemoApplication {
	Permit permit = new Permit(
			new PermitConfig.Builder("<SET_API_KEY_HERE>")
					.withPdpAddress("http://localhost:7766")
					.withDebugMode(true)
					.build()
	);

	@GetMapping("/login_header")
	public ResponseEntity<Object> loginWithHeader() throws IOException, PermitApiException {
    // String userId = getUserIdFromJWT();
		UserLoginResponse ticket = permit.elements.loginAs(userId, tenantId);
		return new ResponseEntity<>(ticket.content, HttpStatus.OK);
	}

	public static void main(String[] args) {
		SpringApplication.run(DemoApplication.class, args);
	}
}
If you use custom Authentication Header to authenticate to your backend, add this route to your backend.
For FrontendOnly Login, there is no need in backend. For a full guide, please check our Embedded Elements documentation.
Setup The Client-side Login
Next you need to setup the client-side login method to log in the user to the Permit Element - follow the instructions below.
🌏 Client-side login method
In the client side, you need to call the permit.elements.login() method from "Permit-JS" SDK to log in the user. This function is used to log in the user to the Permit Element
Install Permit-js
Once you have your application ready, you need to install Permit-JS SDK. This gives you access to our prebuilt embeddable Element components.
Run the following command to install the Permit-js SDK in your project:
npm install @permitio/permit-js
In the client side, you need to call the permit.elements.login() function to log in the user.
This function will use the Server-side endpoint you created in the previous step (if you are using the Server-side login method).
permit.elements.login({
    loginUrl: 'https://your_app_url.com/login_cookie',
    tenant: 'your_tenant_key',
    token: '<TOKEN>',
    loginMethod: LoginMethod.bearer
}).then((res: any) => {
    //optional handle success
}).catch((err: any) => {
    //handle error
});
There are few things that need to be configured here:
loginUrl- The URL that corresponds to your Server-side login route you created in the previous steps.loginMethod- The login method you are using (cookie, bearer, headers, frontendOnly)tenant(Optional) - Required for frontendOnly login method. the name of the tenant that the user is part of, you can set it at your backend as well.token(Optional) - Required for bearer token login method, you need to pass the token here.headers(Optional) - Required for custom headers login method, you need to pass the headers here.userJwt(Optional) - Required for frontendOnly login method, you need to pass the user JWT here.envId(Optional) - Required for frontendOnly login method, you need to pass the Permit.io Environment Key or ID here.
We recommend to place the login close to the user's authentication part, after the user's identity confirmed by the Authentication provider you are using, but just before the Permit.io Element is loaded.
Use The login Method
There are 4 supported login options choose the one that you are using in your backend.
- Cookie Login Method
- Bearer Token Login Method
- Other Header Login Method
- FrontendOnly
The loginMethod here should be set to: LoginMethod: LoginMethod.cookie.
permit.elements.login({
    loginUrl: 'https://your_app_url.com/permit_login,
    tenant: 'your_tenant_key'
}).then((res: any) => {//optional handle success
 }).catch((err: any) => {//handle error
});
The loginMethod here should be set to: LoginMethod: LoginMethod.bearer and the token
should be set to the current user token.
permit.elements.login({
    loginUrl: backendUrl,
    tenant: 'your_tenant_key',
    loginMethod: LoginMethod.bearer,
    token: JWT_secret
}).then((res: any) => {//optional handle success
 }).catch((err: any) => {//handle error
});
The loginMethod here should be set to: LoginMethod: LoginMethod.header
and you should pass the headers to the current user auth headers.
permit.elements.login({
    loginUrl: backendUrl,
    tenant: 'your_tenant_key',
    loginMethod: LoginMethod.header,
    headers: {'<secure header name>': 'secret'}
}).then((res: any) => {//optional handle success
 }).catch((err: any) => {//handle error
});
Running the permit.elements.login function with the LoginMethod.frontendOnly requires some more setup on Permit.io Dashboard - check our Embedded Elements documentation for a full guide.
permit.elements.login({
    loginMethod: LoginMethod.frontendOnly,
    userJwt: "<YOUR_USER_JWT>",
    tenant: "<YOUR_TENANT_KEY>",
    envId: "<YOUR_ENV_ID>",
})
    .then((res: any) => {
    console.log("success", res);
})
    .catch((err: any) => {
    // you can handle the error either here or in your BE
    console.log("err", err);
});
After you run login successfully you will get a cookie called permit_session which will allow you to
load your Permit Element securely and successfully.
Client-side logout method
This function should be called along with the logging-out logic that you have within your App, to make sure the user does not continue to have access to the Permit Element.
This logout method should be called as part of the logic of logging your user out with your authentication solution.
permit.elements.logout();
Support for private browsing mode
Permit Element is now compatible with private browsers, such as Chrome Incognito Mode and Safari. To do that you need to change a few things from the regular cookie-based permit elements
Backend configuration
To enable support for private browsing, you need to use ticket.element_bearer_token instead of the ticket.redirect_url like so:
    const express = require("express");
    const app = express();
    app.post("/login_private_browser", async (req, res) => {
        const ticket = await permit.elements.loginAs({userId: user_key, tenantId: TENANT});
        // this is the changed part
        res.status(200).json({url: ticket.element_bearer_token});
    });
    app.listen(port, () => {
        console.log(`Example app listening at http://localhost:${port}`);
    });
Frontend configuration
To ensure proper functionality, add the following code to your frontend:
    permit.elements.login({
        loginUrl: backendUrl,
            tenant: 'your_tenant_key',
            loginMethod: LoginMethod.supportsPrivateBrowser,
            // If your server uses a bearer token, put it here:
            // token: <JWT_secret>
            // If your server uses headers, put it here:
            // headers: <Headers>
            //This should be the exact URL copied from the iframe (we use it to ensure the element type)
            elementIframeUrl: 'https://embed.permit.io/<ELEMENT_NAME>?envId=<SOME_UNIQUE_ID>&darkMode=false&tenantKey=<TENANT_KEY>&elementsToken=true',

    }).then((res: any) => {//optional handle success
    }).catch((err: any) => {//handle error
    });
Modifications to the Iframe URL
In the iframe source URL, you need to append the following parameters:
&elementsToken=true
    <iframe
        src="https://embed.permit.io/<ELEMENT_NAME>?envId=<SOME_UNIQUE_ID>&darkMode=false&tenantKey=<TENANT_KEY>&elementsToken=true"
        width="100%"
        height="100%"
        frameborder="0"/>
This feature is available from version "permitio/permit-js@0.5.2"
Ensuring Login Before Loading the Iframe
It is important to make sure that the login process runs before the iframe is loaded. This ensures that the iframe is opened with an authenticated session, preventing issues with private browsing mode. Add with an authenticated session to Permit cloud.
Login Errors
There are a few possible errors you might find yourself come across while working with the embedding of Permit Elements.
| Error | Description |
|---|---|
USER_NOT_FOUND | This error can appear if you are trying to log in as a particular user, but that user does not exist within Permit. You can also experience this login error when you are trying to login a user into a tenant that he does not belong to. |
TENANT_NOT_FOUND | This error can appear when you are passing in a tenant, either in the frontend permit.elements.login function, or in your backend URL endpoint, where the tenant has not been created in Permit. |
INVALID_PERMISSION_LEVEL | This error will emerge when you are trying to access part of the Element which you have not been given access too. |