Fintech / Banking Demo Application
Mesa Verde Bank is a demo web application that showcases multiple fine-grained authorization flows for a self-service Fintech/banking system.
If you're planning to implement authorization for a Fintech use case, this intuitive demo should help you better understand fine-grained authorization policy modeling and enforcement basics.
Authorization Flows
Before we start with the configuration guide, let's understand the authorization flows we are showcasing in this application:
Multi-Tenancy Hierarchical Role-Based Access Control (RBAC)
This is our application's most basic self-service flow, which auto-assigns user permissions when they open an account in the bank application. By signing up for an account, the user is automatically assigned a role and permissions that allow them to perform all the operations on their account as an Account Owner.
In Mesa Verde, we use events from the authentication provider (Stytch) to call the Permit's role assignment and create tenant APIs to perform this flow.
Secure Collaboration
This self-service ability allows users to manage their account's beneficiaries and members.
The app utilizes Permit Elements ��— a set of Authorization UI components that allow users to manage other users and their roles in their accounts. This flow is a good example of using Permit's UI components to build secure collaboration features.

Dynamic UI Feature Toggling
One of the most common needs in the distributed architectures of banking applications is streamlining the permissions model across the whole stack - backend to frontend.
This application uses Permit's authorization enforcement with the isomorphic authorization CASL library to toggle UI features based on user permissions.
{
  abilities?.CREATE_WIRE_TRANSFER && (
    <Button type="primary" onClick={() => setActiveModal(ModalType.WIRE_TRANSFER)}>
      Send Wire Transfer
    </Button>
  );
}
{
  abilities?.ADD_MEMBERS && (
    <Button
      type="default"
      onClick={() => setActiveModal(ModalType.USER_MANAGEMENT)}
      disabled={!userJwt}
    >
      Manage Account Users
    </Button>
  );
}
The Mesa Verde application enforces permissions in the UI components using the @casl/react library.
Fine-Grained Wire Transfer Permissions
Wire transfers are a great example of complex flows in a banking system. Unlike other operations that can get the atomic binary decision of allowed/denied, performing a wire transfer requires multiple authorization steps. This app uses Permit's fine-grained authorization APIs to enforce a multi-step wire transfer flow. The following diagram shows the flow of the wire transfer operation:
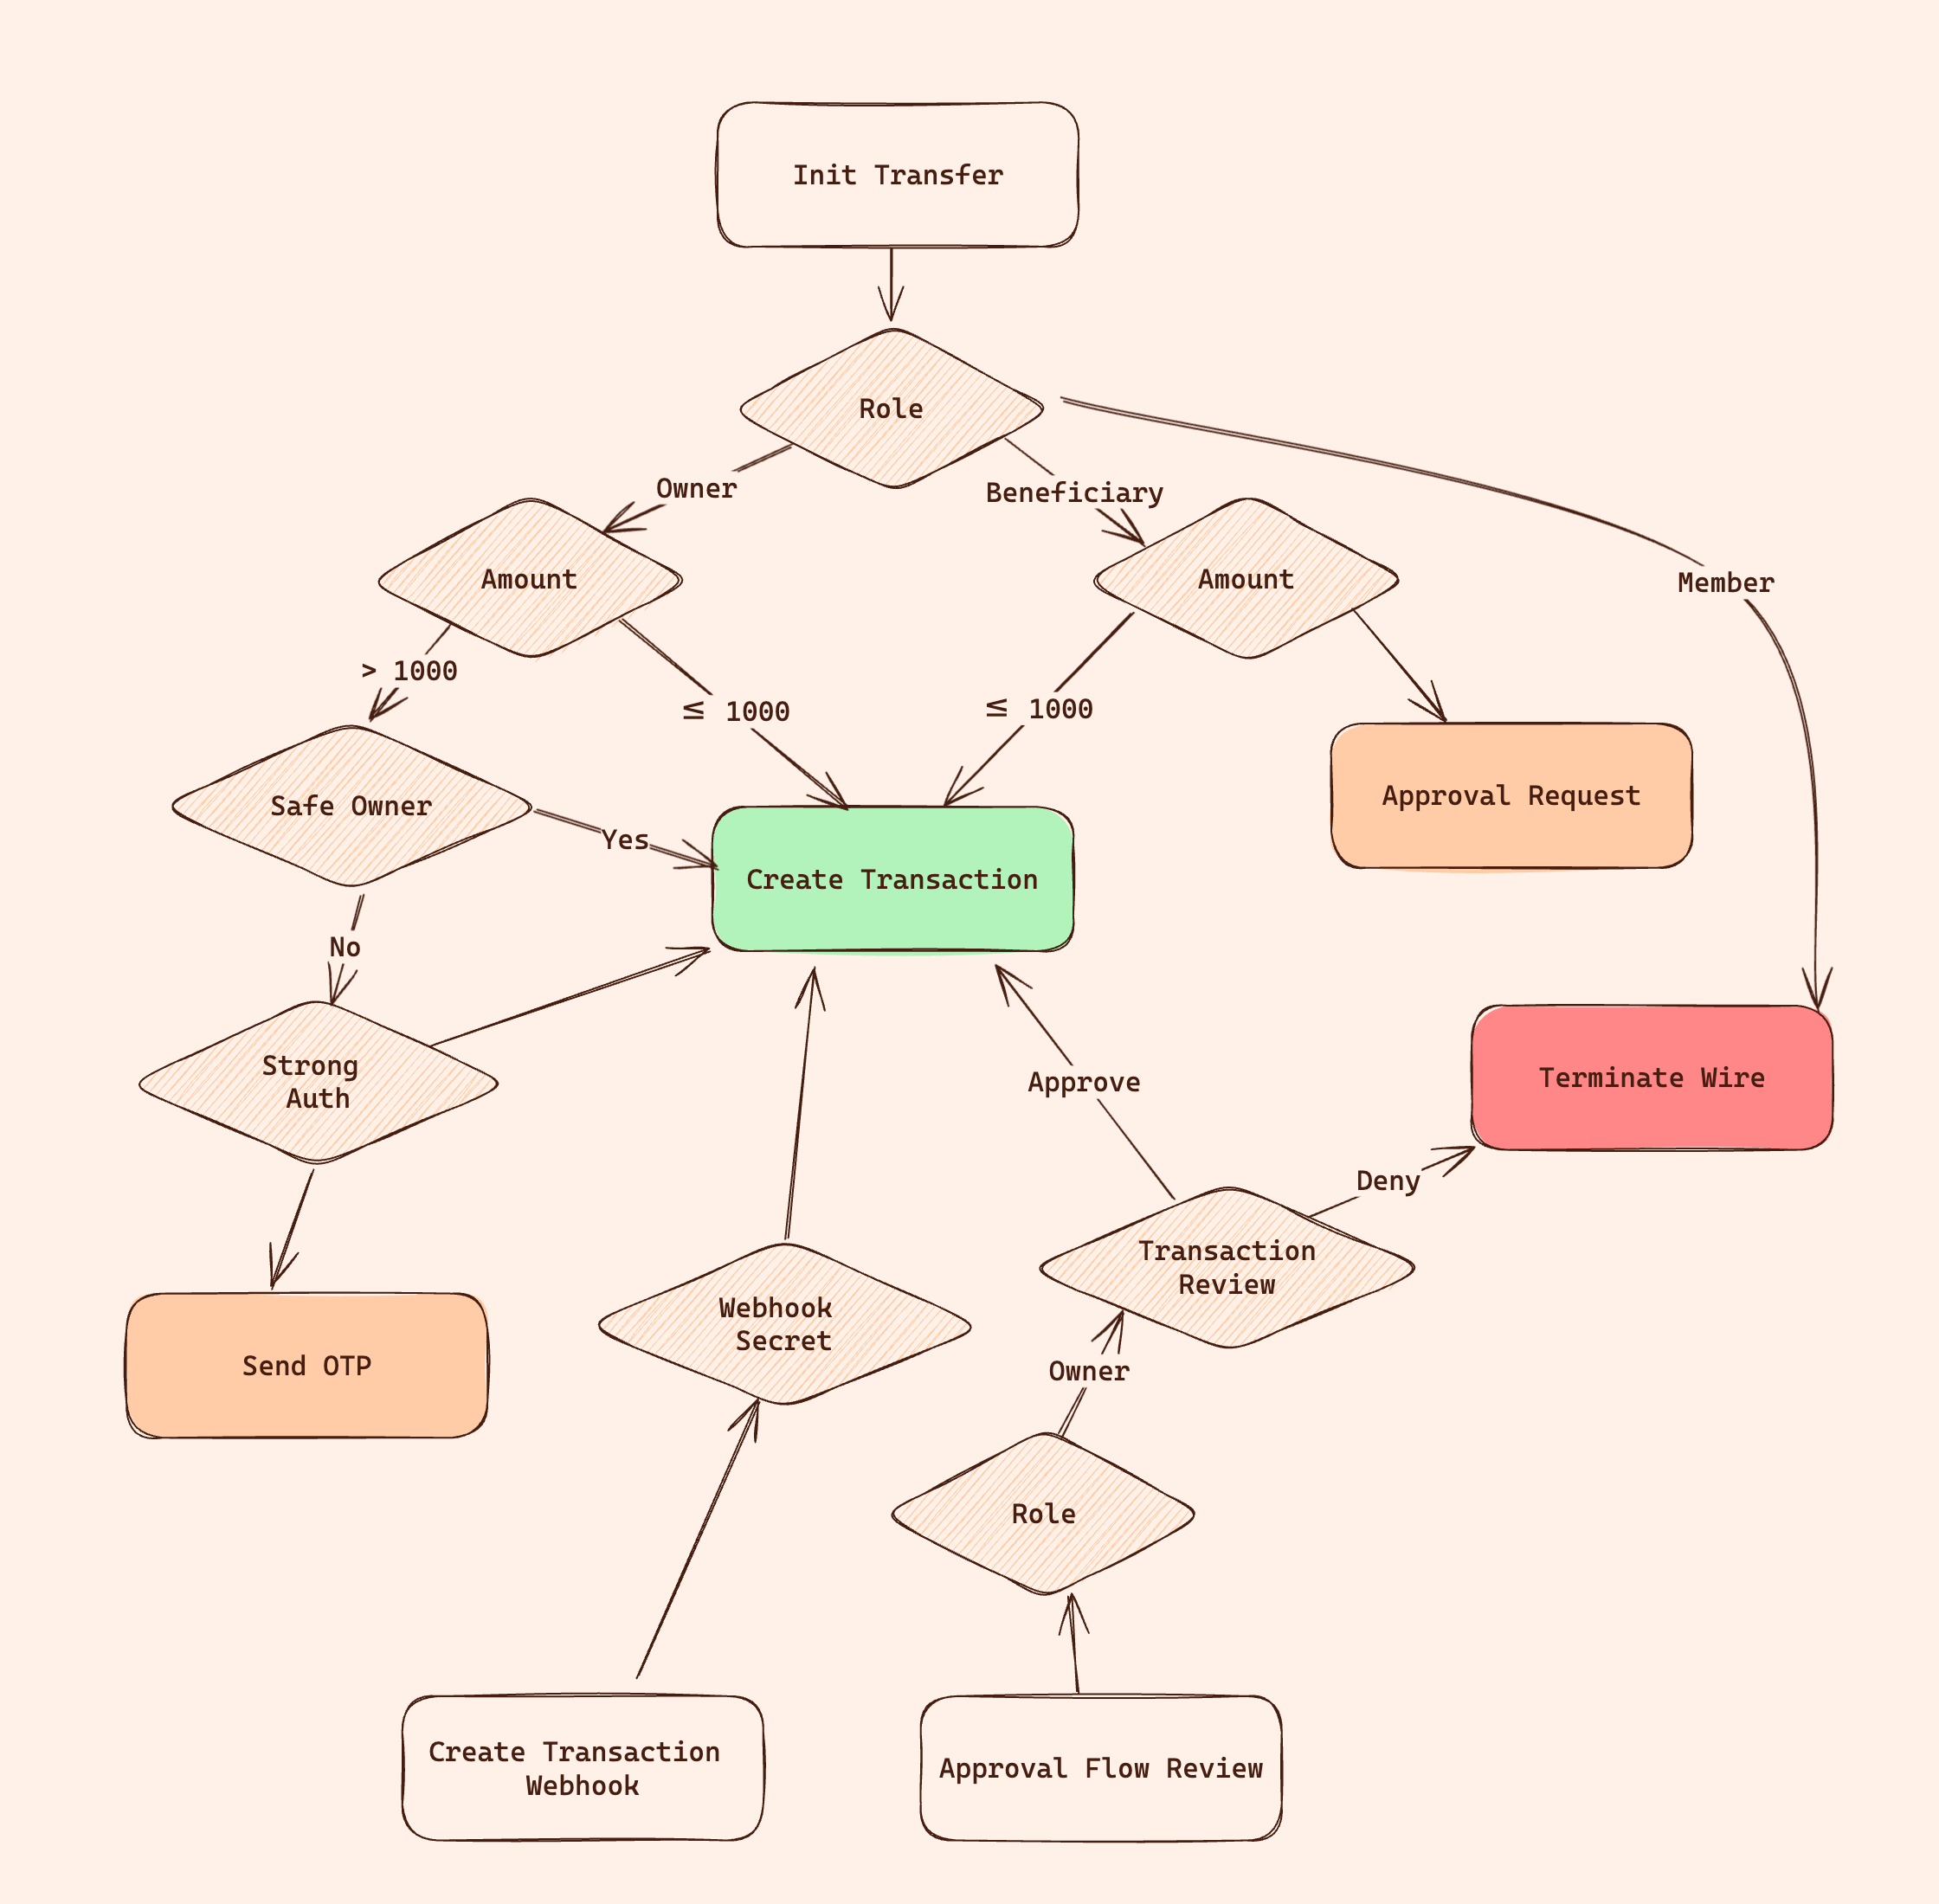
In the flow above, we are utilizing three different advanced flows of a Fine-Grained Authorization system:
- External Data Sources: The system uses external data sources (a dummy identity provider) to determine user operation anomalies by comparing their location attribute from external sources with a real-time IP-based location.
- A Feedback Loop of Authentication and Authorization: The application uses the authentication APIs to create a feedback loop between the authentication and authorization systems. With this feedback flow, the application sends and authorizes one-time passwords with the authentication provider along with the authorization check.
- Transaction Approval Flow: Account owners can approve wire transfers made by other users.
The transaction flow in Mesa Verde intentionally ignores the basic question, Does this user have the balance to perform this operation? and focuses on the complex flow of, Does this user have the permission to perform this operation?
After reading the documentation, you should see that a balance check is a basic operation that can be added to the flow in minutes.
Relationship-Based Access Control (ReBAC)
All the transactions users perform in the Mesa Verde application are stored in a Google-Zanzibar-like graph database, along with their relationships with other users and entities.
While the application only shows some of the basic capabilities of relationship-based access control, which allows the Sender and Reciever of a transaction to have separate permissions on those instances, using this approach can later create more complex flows like An associated advisor to a saving plan can also get an implicit grant to view the particular transactions of the plan.
Authorization UI Components
The Mesa Verde application also showcases the ability to implement complex access request flows in the UI using Permit's UI components.
The following flows are showcased in the application:
- Access Request Users can ask for leveraged access on the accounts they are members of (e.g., ask for permission to view the account transactions).
- Approval Request Users can request a wire transfer approval, which they are not allowed to perform.
- Approval Flow Users can approve or deny particular transactions on their account.

Implementing this flow from scratch can take a long time, but with Permit.io, you can do it in minutes, as we will show in the following sections.
To understand the flow we want to achieve in our application, let's start with the configuration guide. The next section will go through a step-by-step configuration of Permit, synchronizing the data with the authentication provider, and implementing fine-grained authorization enforcement in the Mesa Verde application.
Application Architecture
The Mesa Verde application is based on the Next.js framework, and uses the following technologies to implement the fine-grained authorization flows:
- Stytch - Authenticates the users in the application.
- JSONbin — Stores the users' locations in the application. In a real application, this data will probably come from the Identity Provider.
- Docker - Containerizes the application and runs a sidecar of the Permit's Policy Decision Point.
- ngrok - Runs the application locally and allows Permit to send webhooks to the application.
Application Code
To help you navigate through the application code, here is a brief overview of the main files and directories in the Mesa Verde application:
package.json- contains the application's dependencies and important scripts to run the application easily.main.tf- used to configure the policy schema of the application in Permit.setup.js- setting up the Permit elements.docker-compose.yml- running the application with all the relevant sidecars.lib/permit.ts- initialize the Permit SDK and some data sync functions.lib/stytch.ts- the file where we initialize the Stytch SDK and store some authentication functions.src/middleware.ts- where we authenticate all the users with Stytch and check users' location.src/app/account/api/*- the API routes of the application, most of the enforcement functions are here.src/app/*- the UI pages of the application. Most of the UI components are here. Here, you'll also find feature toggling components and the Permit Elements components.
In the following sections, we will walk you through the configuration guide of the Mesa Verde application. You can find all the code we are describing in the GitHub repository
Configuration Guide
One of the key points in the Permit architecture is the separation of duties between the system's three main components. The guide will follow the three components in the following order:
- Schema - the policy model we want to enforce in the application. The schema can be configured in Permit using its API, IaC, or UI. In our example, we will use Permit's Terraform provider to configure the schema. Examples of the schema components are resource types, roles, policy rules, etc. We are using this schema to define the fine-grained authorization policies that we want to enforce in our application.
- Data - the data of our application that will be used as part of the policy decision. We will use Permit's SDKs to synchronize the data with the authentication provider and the application. While you can also use Permit's UI to manage the data, the best practice is to use the SDKs to synchronize the data with the application as part of the application's existing state flow. Examples of the data components are the users, roles that are assigned to them, resource instances, etc.
- Enforcement—the code that enforces the application's policies or queries the relevant data for users according to their permissions.
on the enforcement side, we will use Permit's SDKs to enforce the policies in the application.
The main functions we will use are the
checkto enforce the application policies and thegetUserPermissionsto query the relevant data for the users according to their permissions.
Now that we understand the steps let's start with the configuration guide.
Schema
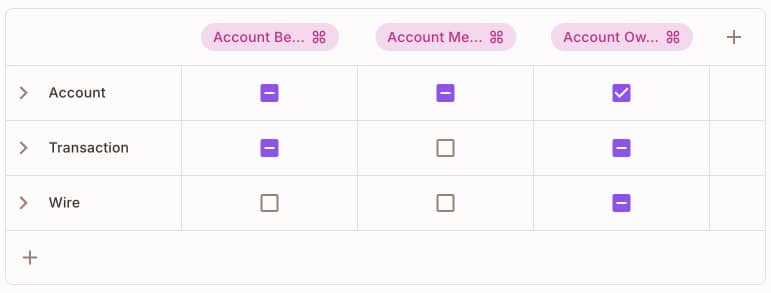
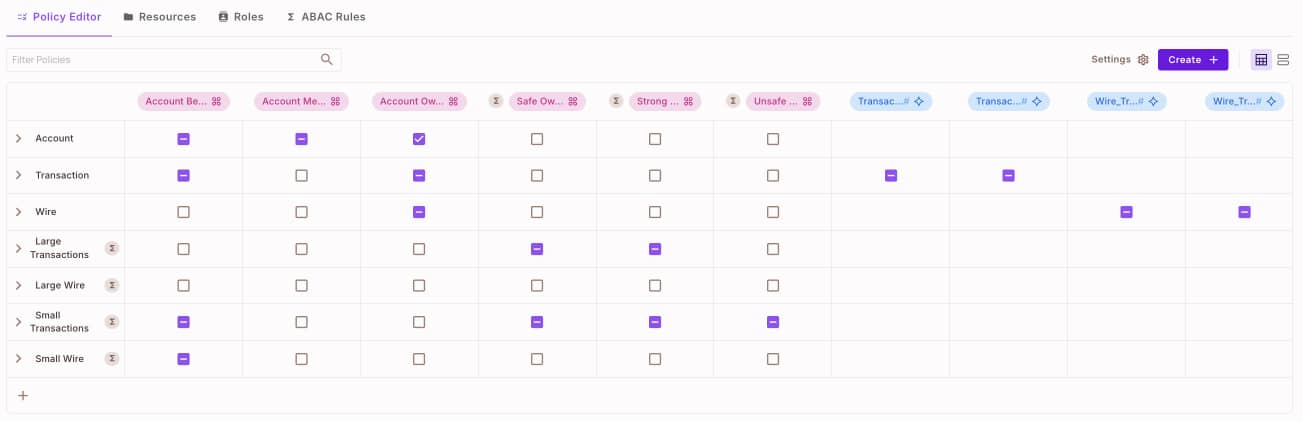
In Permit, policy rules can be represented in a table where the rows are segmentations of resources with their actions, and the columns are the segmentations of users by roles, conditions, etc.
Here is an example of the RBAC policy table of our application where we allow different roles of users to perform different actions on the resources:
In the following section, we will walk you through the configuration of the schema of the Mesa Verde application. Here is an overview components diagram of the schema we will configure:
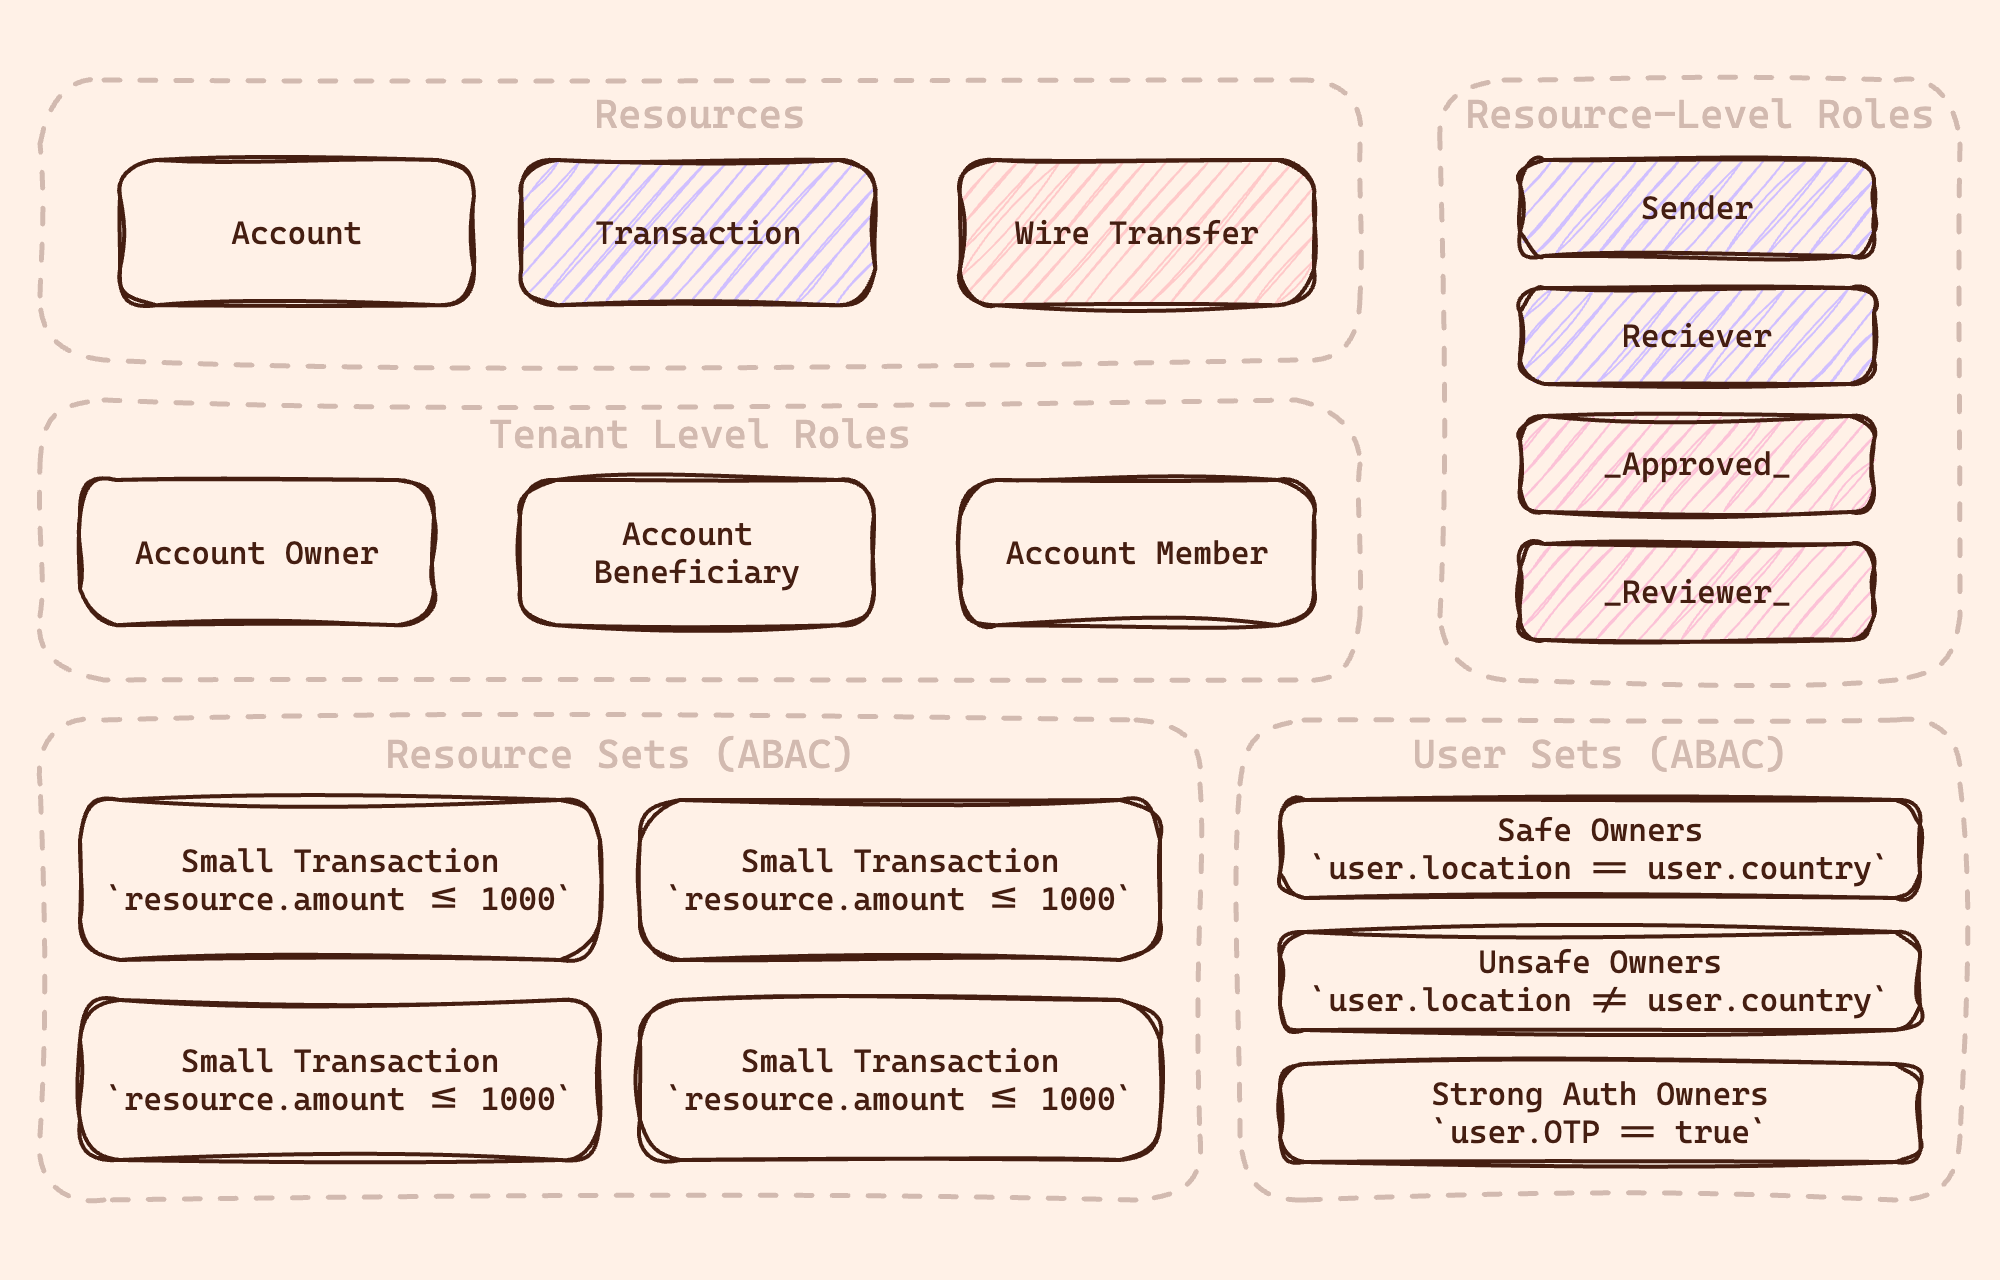
Resources
-
Account - the main resource on our account that will allow users to perform basic actions like reading the account details, updating the account details, etc.
In our application, the Account resource has the following actions:resource "permitio_resource" "Account" {key = "Account"name = "Account"actions = {"read" = {name = "Read"}"add-beneficiaries" = {name = "Add Beneficiaries"}"add-members" = {name = "Add Members"}}attributes = {}}As you can see in the code above, we are defining the
Accountresource with three actions:read,add-beneficiaries, andadd-members. These actions will be used in the policy rules to define the permissions of the account users. -
Wire Transfer - the resource allowing users to perform wire transfers on their account.
In our application, the Wire Transfer resource has the following actions:resource "permitio_resource" "Wire_Transfer" {name = "Wire"key = "Wire_Transfer"actions = {"approve" = { name = "Approve"}"review" = { name = "Review" }"deny" = { name = "Deny" }"operate" = { name = "Operate" }"create" = { name = "Operate" }}attributes = {"id" = {name = "ID"type = "string"}"description" = {name = "Description"type = "string"}"date" = {name = "Date"type = "string"}"currency" = {name = "Currency"type = "string"}"amount" = {name = "Amount"type = "number"}}}Looking at the code above, you'll see that here we also defined attributes for the resource. These attributes will later allow us to configure conditions on policy rules.
These conditions will allow us to distinguish between wire transfer operations based on the amount, currency, etc.In addition to the
createaction, we added various actions that will allow us to better control the wire transfer operation approval flow. -
Transaction - this resource will allow users to view the transactions on their account. This is different from the wire transfer because we want to also authorize transactions that are not wire transfers by definition
Configuring the Transaction resource is similar to the Wire Transfer resource but with different actions and attributes.The actions we will have in the Transaction object are
listandcreate. We will also have the same attributes as in the Wire Transfer object.
As we are done with the top-level resources, let's continue creating condition-based resources to support Attribute-Based Access Control (ABAC) authorization policies.
Resource Sets
As part of its fine-grained authorization offer, Permit also allows us to configure Resource Sets that will allow us to distinguish particular resources in real time based on their attributes.
In our application, we want to differentiate small and large wire transfer operations based on the amount attribute of an object.
Looking at the code, you'll see that we are creating four resource sets for the Wire Transfer and Transaction objects, respectively.
Here is an example of configuring the resource sets for a small wire transaction:
resource "permitio_resource_set" "Small_Transaction" {
  key      = "Small_Transaction"
  name     = "Small Transaction"
  resource = permitio_resource.Transaction.key
  conditions = jsonencode({
    "allOf" : [
      { "resource.amount" : { "less-than-equals" : 1000 } }
    ],
  })
  depends_on = [permitio_resource.Transaction]
}
With all our resources and resource sets configured, let's continue segmenting the users by roles to create Role-Based Access Control (RBAC) policies.
Roles
The basic capability of defining rules per group of users is creating top-level roles and assigning users to them.
In the schema, we will configure the following three roles, AccountOwner, AccountBeneficiary, and AccountMember:
resource "permitio_role" "AccountOwner" {
  key  = "AccountOwner"
  name = "Account Owner"
  permissions = [
    "Account:add-members",
    "Account:add-beneficiaries",
    "Account:read",
    "Transaction:list",
    "Wire_Transfer:create",
    "Wire_Transfer:approve",
  ]
  depends_on = [permitio_resource.Wire_Transfer, permitio_resource.Transaction, permitio_resource.Account]
}

resource "permitio_role" "AccountBeneficiary" {
  key  = "AccountBeneficiary"
  name = "Account Beneficiary"
  permissions = [
    "Account:add-members",
    "Account:read",
    "Transaction:list",
  ]
  depends_on = [permitio_resource.Account, permitio_resource.Transaction]
}

resource "permitio_role" "AccountMember" {
  key  = "AccountMember"
  name = "Account Member"
  permissions = [
    "Account:read",
  ]
  depends_on = [permitio_resource.Account]
}
As you can see in the configuration above, we are defining three roles: AccountOwner, AccountBeneficiary and AccountMember.
We also configure a set of permissions for each role that will allow the users assigned to these roles to perform different actions on the resources.
At this point, we are done with our RBAC policy. We have the resources, the top-level roles, and the policy rules resulting from them. Now, let's coninue with creating sets of users that will allow us to create ABAC policies.
User Sets
In Permit, User Sets are used to segment users by their attributes and create fine-grained policies based on these attributes.
The user sets are the same as the resource sets we defined above, but they consider conditions in addition to the users' attributes.
In the schema, we are just configuring the conditions, while the attribute values are synced to Permit in the data sync or later in the policy enforcement.
For the Mesa Verde application, we want to create three user sets:
- Safe Owners - users that are located in real-time in the same location as their address in the Identity Provider.
- Unsafe Owners - users that are located in real time in different locations than their address in the Identity Provider or users that still have not verified their location. Strong Auth Users are users that we can't locate in their location but who provided a strong authentication method (e.g., OTP).
Here is an example of how we configure the Safe Owners user set:
resource "permitio_user_set" "Safe_Owners" {
  key  = "Safe_Owners"
  name = "Safe Owners"
  conditions = jsonencode({
    "allOf" : [
      {
        "user.location" : {
          "equals" : {
            "ref" : "user.country"
          }
        }
      },
      {
        "user.roles" : {
          "array_contains" : "AccountOwner"
        }
      }
    ]
  })
}
As you can see, we created a condition that compares the user's location with the country attribute of the user. This condition will allow us to create policies that will allow the users in the Safe Owners user set to perform different actions on the resources.
Now that we have our user sets, it is time to set their policies and give the right permissions to the users in the user sets.
Condition Sets
As we did in the roles, where we added actions in the role configuration, we will create sets that combine user and resource sets to give the relevant action permissions to the users.
When configuring condition sets, we will need the following 3 elements:
- User Sets - the users that will be affected by the policy.
- Resource Sets - the resources that will be affected by the policy.
- Permissions - the action and the resource we want to give permission to.
Here is an example of the condition set where we are allowing the Safe Owners user set to perform the create action on a Large Transaction resource set:
resource "permitio_condition_set_rule" "allow_safeowners_large_transactions" {
  user_set     = permitio_user_set.Safe_Owners.key
  resource_set = permitio_resource_set.Large_Transaction.key
  permission   = "Transaction:create"
  depends_on   = [permitio_resource_set.Large_Transaction, permitio_user_set.Safe_Owners]
}
You can find all the sets and policies in the main.tf file in the root directory of the Mesa Verde application.
After we have completed the RBAC and ABAC policies, let's move on to the Relationship-Based Access Control (ReBAC) policies. We will start by configuring the resource roles.
Resource Roles
Unlike RBAC roles, where we assign a user a top-level role in the context of the whole tenant, in ReBAC, we would like to create roles that declare the user's relationship to a particular resource instance.
In the Mesa Verde application, we want to create resource roles on the Transaction and Wire Transfer resources. These roles will allow us to declare the user's relationship to the transaction and manage the user's permissions on the transaction.
These are the resource roles we would like to create:
- Transaction#Sender - the role that will allow the user to perform actions on the transaction as the sender of the transaction.
- Transaction#Receiver - the role that will allow the user to perform actions on the transaction as the receiver of the transaction.
- Wire Transfer#Approved is the role assigned to a user who requests approval for a wire transfer.
- Wire Transfer#Reviewer - the role that will allow the user to review and approve a particular wire transfer.
The # symbol on the resource role is a tuple convention from the Google Zanzibar paper that describes the relation of the role with a resource.
Here is an example of how we configure the Transaction#Sender resource role:
resource "permitio_role" "Sender" {
  key         = "Sender"
  name        = "Sender"
  resource    = permitio_resource.Transaction.key
  permissions = ["list"]
  depends_on  = [permitio_resource.Transaction]
}
As you can see, we also assign the list permission on the Transaction resource to the Sender role. This will allow the user to view the transaction as the sender of the transaction.
Summary
At this point, we have configured the schema of our application's policy. If you run the terraform apply command in the root directory of the Mesa Verde application, you will see the schema configured in Permit.
When configuring the schema in Permit, the Permit policy as code engine generates it in Policy Languages such as Rego or Cedar and pushes it to a Git repository.
If you want, you can own the policy by using Permit's GitOps capabilities and manage the policy as code in your repository.
To recap some of the rules we created in the schema:
- Only account owners can add members and beneficiaries to the account.
- Account owners and beneficiaries can view the transactions on the account.
- Safe owners can create large transactions.
- Senders can view the transactions they sent.
- Reviewer can approve wire transfers.
With the schema configured, let's move to the data configuration.
Data
In order to evaluate the policy we have configured, our Policy Decision Point — the software component provided by Permit.io to enforce the policies—needs to have the application's data in real-time.
In the following section, we will discuss the types of data that need to be synced with Permit and show examples of how our application is doing it.
-
Users — the application's users. We would like to inform Permit each time a new user is created. Here is an example code from our application when we are syncing new users created using Stytch into our application:
// Add User to Tenantawait permit.api.syncUser({key: email,email,});-
Tenants — the tenants of the application. In our application, we will create a tenant for each user. That will help us manage roles such as
Account Ownersof the users in the context of the whole tenant. Here is an example code from our application when we are creating a new tenant for every new user on our application:await permit.api.tenants.create({key: cleanedEmail,name: email,});As you can see, we just use the user email as the tenant key and name. This will allow us to manage the roles of the users in the context of their owned tenant.
Another usage of the tenant's data is where we want to check what tenants a user has assigned roles in. For example, the following function returns us a list of tenants so we can display the user's accounts in the UI:
const tenants = await permit.api.tenants.list({perPage: 100,});
-
-
Role Assignments—the roles assigned to the users. In Permit, there are two levels of assignment: for multi-tenancy RBAC and for ReBAC.
-
Tenant Role assignment — the roles assigned to the users in the context of the whole tenant. Here is an example of how we are assigning the
AccountOwnerrole to the user in the context of the tenant:await permit.api.assignRole({role: "AccountOwner",tenant: cleanedEmail,user: email,}); -
Resource Role assignment — the roles assigned to users in the context of a particular resource instance. Here is an example of how we are assigning the
Senderrole to the user in the context of the transaction:await permit.api.roleAssignments.assign({role: "Sender",tenant,resource_instance: `Transaction:${transaction.id}`,user,});As you can see here, we also pass the transaction's resource instance ID. This allows us to manage the user's permissions in the context of a single transaction in the system.
In more advanced cases, we will also be able to create relationships between instances of resources and simply grant users permissions based on these relationships.
-
-
User Attributes — the attributes of users. In our application, for example, we will sync the user's location with Permit. This will allow us to enforce ABAC policies based on the user's location.
Syncing attributes in Permit can be done in advance with the SDK. For example, here we are syncing the user location from an external JSON file in JSONbin:
const response = await fetch(`https://api.jsonbin.io/v3/b/${process.env.JSONBIN_KEY}/latest`);const data = await response.json();const envUsers = await permit.api.users.list();const users = envUsers.data.map((user) => user.key);await Promise.all(Object.entries(data.record).filter(([key]) => users.includes(key)).map(([key, country]) => permit.api.users.update(key, { attributes: { country } })));The code above iterates the JSON and syncs all users' locations, but in a real application, you would like to sync users' locations when they are created or updated.
SCIM ProvisioningYou can use Permit's SCIM client to listen to changes in user attributes and groups in your Identity Provider and sync them with Permit.
Read more about the SCIM client here
You can also use the Permit enforcement layer to sync attributes in real time; we will discuss this in the next section.
-
Resource Instances - the instances of the resources. In our application, for example, we will sync the transactions and wire transfers with Permit. This will allow us to create ReBAC policies based on the relationship of the user to the resource instance.
Here is an example code from our application when we are syncing a new transaction with Permit:
const resourceInstance = await permit.api.resourceInstances.create({resource: "Transaction",key: transaction.id,tenant,attributes: {...transaction,},});As you can see, we are syncing the transaction with Permit, and we are also syncing the attributes of the transaction. This will allow us to create ReBAC policies based on the attributes of the transaction.
-
The examples above show us a glimpse of the methods we are using to sync and retrieve the data to and from the Mesa Verde application with Permit. You can find all the data sync functions in the application code. Most of the code sits in the lib/permit.ts file.
After creating the policy schema and syncing the relevant data, let's proceed to the core of our authorization system—the enforcement of the rules we created on our application.
Enforcement
In our application, we have two enforcement functionalities we want to achieve:
- Check - the function that will return a
trueorfalsevalue per the decision we tried to evaluate. - getUserPermissions - the function that will return us the relevant instances for the user based on their permissions.
Every check function in Permit, consist of the following elements:
- User—the user for whom we want to evaluate the decision. The user argument could be only the user ID or token or the user object with its attributes.
- Action — the action for which we want to evaluate the decision. The action argument could be only the action name or the action object with its attributes.
- Resource - the resource that we want to evaluate the decision for. The resource argument could be only the resource ID or token and also the resource object with its attributes. In the resource, we would also like to pass the relevant tenant where we want to evaluate the decision.
Check
Here are some examples of how we are using the check function in our application:
- The
checkfunction where we check if a user can read an account in the context of the tenant:As you can see, we just pass the user ID, the action name, the resource type, and the tenant whom we want to evaluate the decision.await permit.check(user, "read", { type: "Account", tenant }); - The
Checkfunction that enforces the transaction rules in the application:As you can see, we are passing the user object with their attributes, the action name, the resource type, the resource attributes, and the tenant where we want to evaluate the decision.const transactionAllowed = await permit.check({key: user,attributes: { strongAuth: !!OTP, location },},"create",{type: "Transaction",attributes: { ...transaction },tenant,});
getUserPermissions
The following example is the function where we query all the allowed transactions from the transactions graph in the application:
const transactionInstances = await permit.getUserPermissions(key, [tenant], [], ["Transaction"]);
As you can see, the getUserPermissions function allows us to filter the relevant instances based on multiple factors. In the example above, we filter the transaction instances based on the user's tenant.
Summary
The three components we just walked through are the core of the Permit system. The schema, the data, and the enforcement are the components that will allow us to enforce the fine-grained authorization policies in the Mesa Verde application.
In our application, we also use the feature of Permit Elements, which are the UI components that allow us to build complex access request flows in the UI. The next section will walk you through the implementation of the Permit Elements in the Mesa Verde application.
Permit Elements
Apart from enforcing the permissions on our application, a basic functionality we would like to have on applications is the delegation of permissions management to our users in the UI.
For example, allowing our users to add and remove users from their accounts or approve wire transfers.
In the Mesa Verde application, we are utilizing the Permit Elements - a set of UI components that allow us to build complex access request flows in the UI.
The Permit Elements are configured in the setup.js file in the Mesa Verde application's root directory. In this file, we initialize the Permit Elements and pass the relevant settings to the components.
To fully experience configuring the Permit Elements, we recommend visiting the Permit Elements Configuration in Permit UI and enjoying the components' customization capabilities.
Below is the list of the elements we are using in the Mesa Verde application:
-
User Management - This component allows our application users to manage the beneficiaries and members in their accounts. This component is accessible via the
Manage Account Usersbutton in the UI.Looking at the configuration screen of the element, we can see that we can configure which roles will be eligible to view the elements and what roles they can assign to the users.
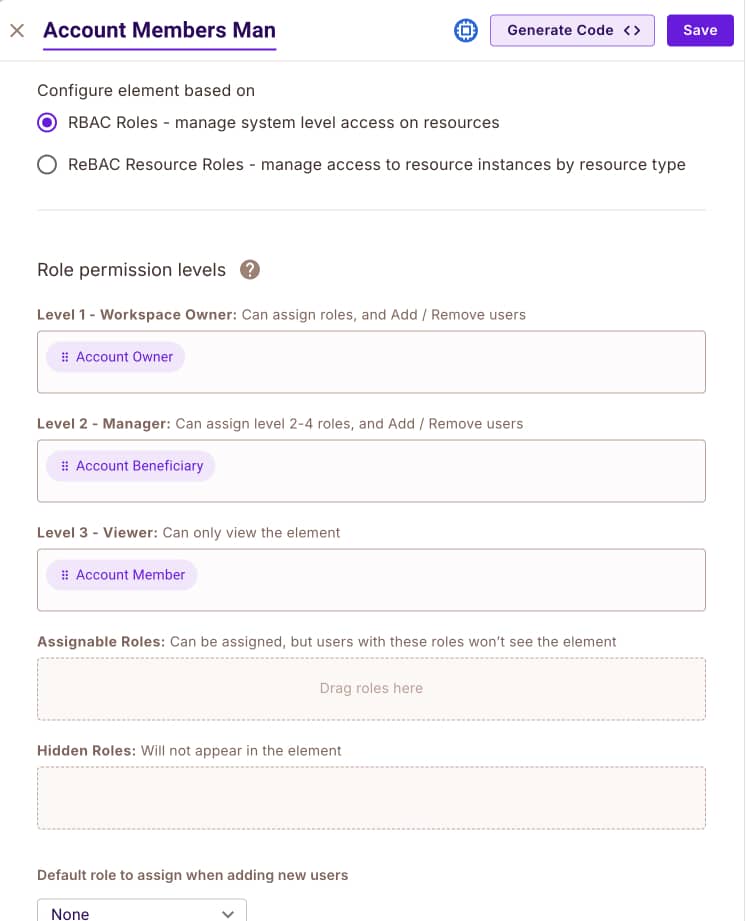
You can also see we are allowing different roles to assign different roles to users. This will allow us to create complex user management delegation flows in the UI.
In our application, we allow
Account Ownersto assign users theAccount BeneficiaryandAccount Memberroles, whileAccount Beneficiariescan only assign users theAccount Memberrole. -
Access Request — This component allows
Account Memberusers to ask for leveraged permission to view the account's transactions. It is accessible via theRequest Accessbutton in the UI only for users who don't have permission to view the transactions.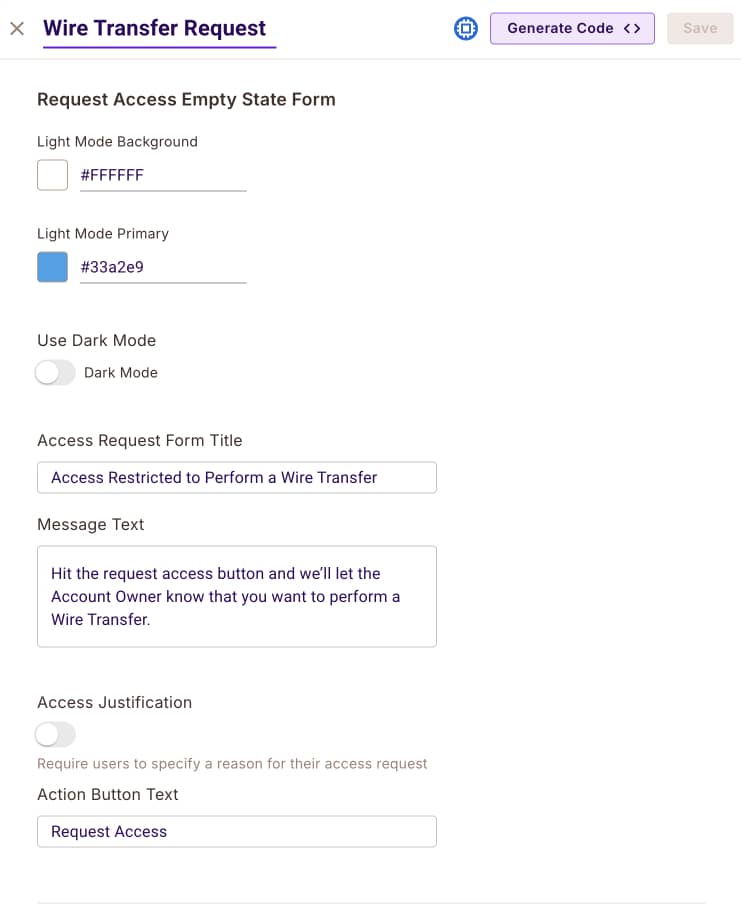
As you can see here, we are configuring the level of access that users can request. In our application, we are allowing
Account Memberusers to request theAccount Beneficiaryrole. -
Approval Flow—Request — This component allows a beneficiary to request approval for a specific instance of a transaction larger than the condition we created. The component will show up only if a user is not allowed to create a large transfer and is not an
Account Owner.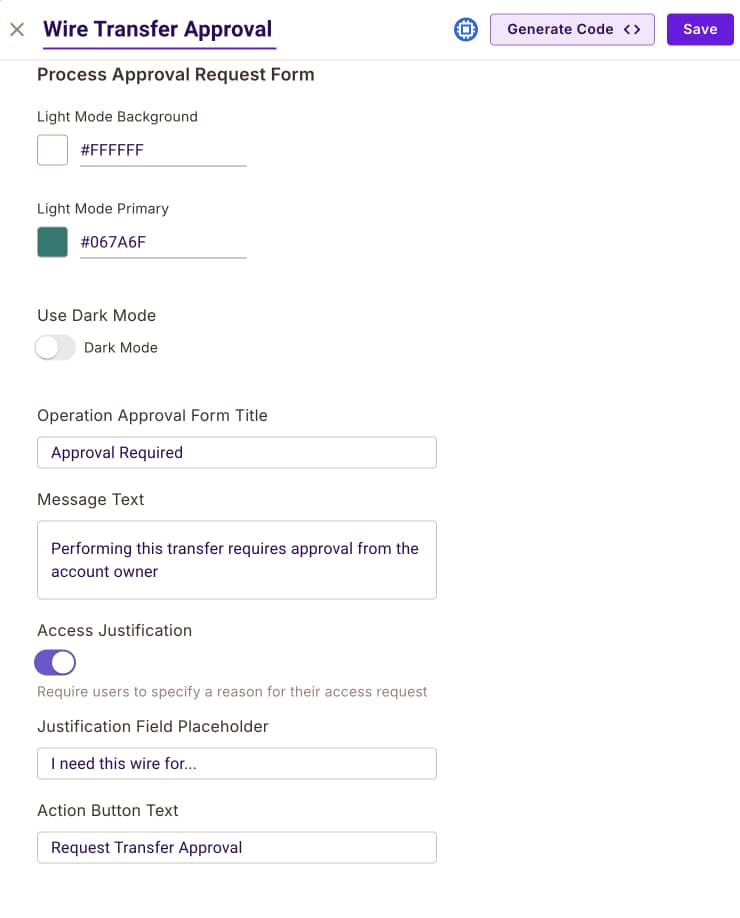
As you can see here, we are configuring the resource type so users can ask for approval for a particular instance. An important configuration point here is the webhook that will be called when the user approves the transaction.
-
Approval Flow—Review—This component allows the approver to review and approve the transaction. It is accessible only to
Account Ownersvia theReview Wire Transferbutton in the UI.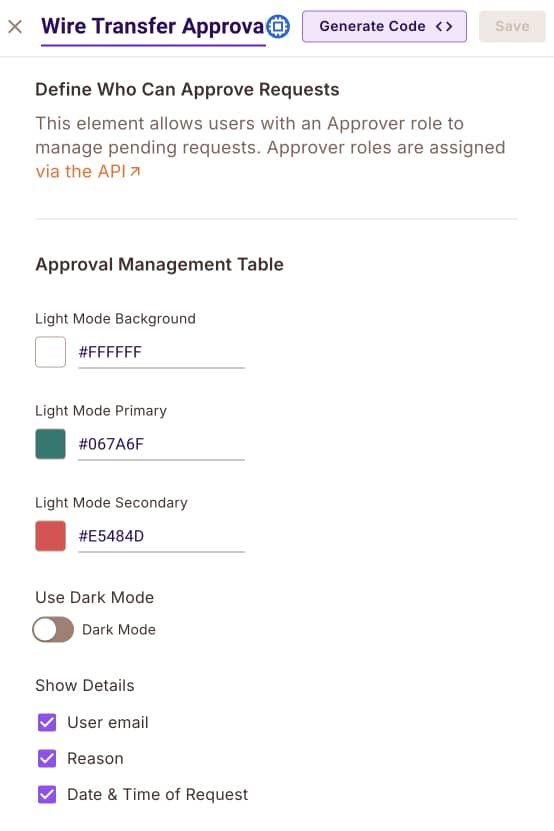
Here, we can configure more personalization factors, such as the message that will be sent to the approver.
Using Permit Elements allows us to implement smart permissions delegation flows in our application's UI. This results in an end-to-end fine-grained authorization system in the Mesa Verde application.
Conclusion
In this document, we've demonstrated multiple fine-grained authorization flows that are common in banking applications. As a next step, you're invited to configure similar flows in the Permit.io app and see how easy it is to implement them in your application.
We are looking forward to hearing from you on our Slack community and sharing the cool Fintech and Banking use cases you are implementing with Permit.io.