QuickStart - Add permissions to your Java app
In this tutorial, we will show you how to integrate Permit.io with your Application in just a few simple steps.
Setup your PDP (Policy Decision Point) Container
We provide you with a Policy-Decision-Point - aka an authorization microservice, as a container for you to use. Please follow the steps below to install and run the container on your local machine.
1. Pull our PDP container from Docker Hub
If you do not have Docker installed as of yet, click here to install Docker.
docker pull permitio/pdp:latest
2. Get the Permit.io API key
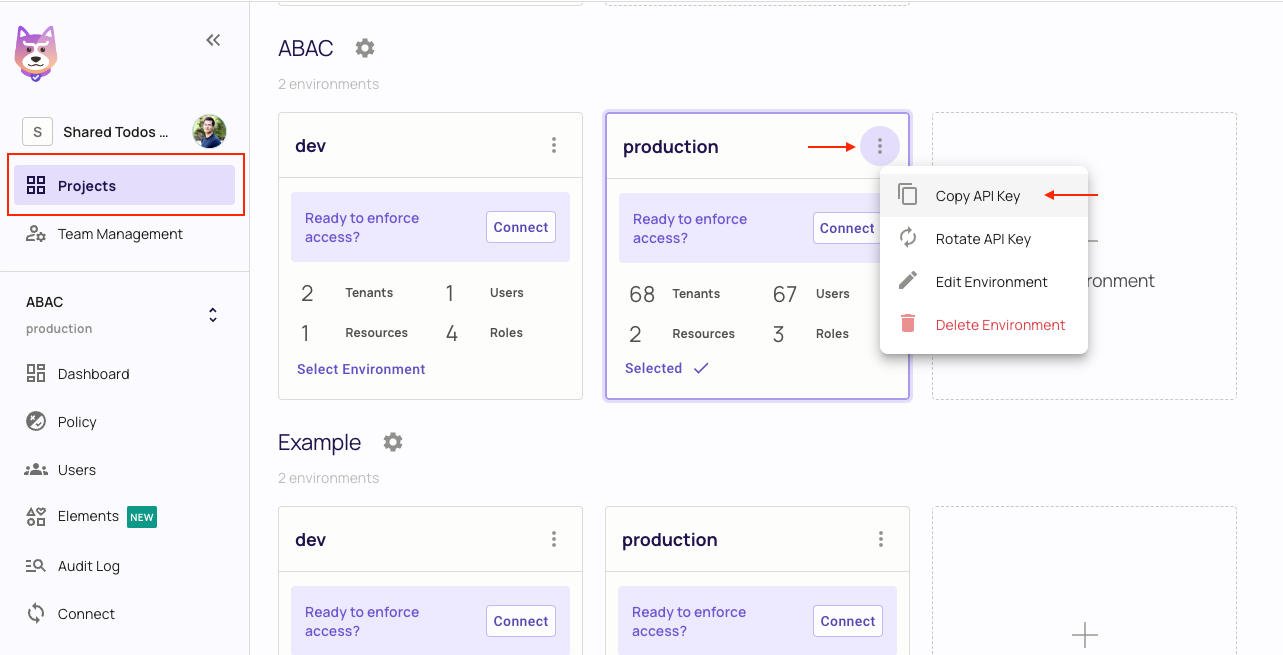
Navigate to the Project Management page with the Permit.io web interface. Find the active environment that is marked with a green dot on the icon. Copy the Secret Key.
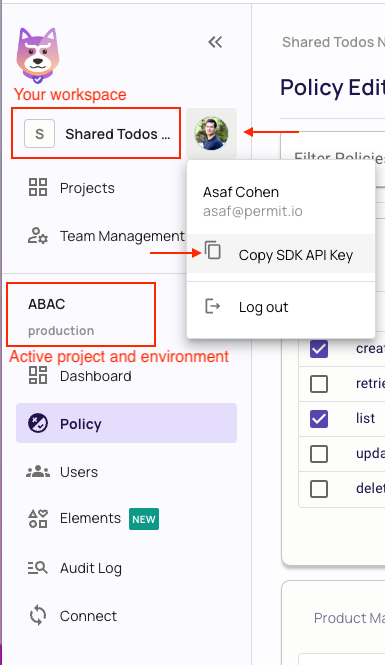
Alternatively, while anyhwere on the Permit.io web interface, click on your user icon in the top right of the screen, and "Copy SDK Secret Key" from there.
3. Run the container
Remember to replace <YOUR_API_KEY> with the Secret Key you have just obtained in the previous step.
docker run -p 7766:7000 --env PDP_API_KEY=<YOUR_API_KEY> permitio/pdp
Congratulations! You should now have a PDP container running. You can always check the status of the container
by typing docker ps in your terminal.
Let's now add the Permit SDK to your app or use the following demo example below.
Add the SDK to your Java code
Initialise the Javs SDK and check for permissions.
- Install the Permit.io SDK with:
- Maven
- Gradle
For Maven projects, use:
<dependency>
  <groupId>io.permit</groupId>
  <artifactId>permit-sdk-java</artifactId>
  <version>0.0.11</version>
</dependency>
For Gradle projects, configure permit-sdk-java as a dependency in your build.gradle.
dependencies {
  // ...

  implementation 'io.permit:permit-sdk-java:0.0.11'
}
- Create a new instance of the SDK.
You can find instructions on getting a secret API key in the previous section.
import io.permit.sdk.Permit;
import io.permit.sdk.PermitConfig;

// This line initializes the SDK and connects your Java app
// to the Permit.io PDP container you've set up in the previous step.
Permit permit = new Permit(
  new PermitConfig.Builder("[YOUR_API_KEY]")
    // in production, you might need to change this url to fit your deployment
    .withPdpAddress("http://localhost:7766")
    .build()
  );
Sync the user to the permissions system
When the user first logins, and after you check if he authenticated successfully (i.e: by checking the JWT access token) - you need to declare the user in the permission system so you can run
permit.check()on that user.
// init your user (only needed ONCE, after the user first logins successfully)
User user = new User.Builder("[A_USER_ID]")
  .withEmail("john@smith.com")
  .withFirstName("John")
  .withLastName("Smith")
  // you can assign role to the user at login
  .withRoles(new ArrayList<>(List.of(new AssignedRole[]{
      new AssignedRole("roleId", "tenantId"),
      // example assign the user (at login) to the default tenant with an admin role
      new AssignedRole("admin", "default"),
  })))
  .build();

// You need to call sync user in order to create the user in the
// permission system and be able to ask permit.check() on that user
permit.api.syncUser(user);
Check for permissions using the API
import io.permit.sdk.enforcement.Resource;
import io.permit.sdk.enforcement.User;

boolean permitted = permit.check(
  user,
  "create",
  Resource.fromString("document")
);

if (permitted) {
  System.out.println("User is PERMITTED to create a document");
} else {
  System.out.println("User is NOT PERMITTED to create a document");
}
Full app example
Assuming a Spring Boot app made up of a single file, with the SDK installed.
package com.example.myproject;

import io.permit.sdk.Permit;
import io.permit.sdk.PermitConfig;
import io.permit.sdk.api.PermitApiException;
import io.permit.sdk.enforcement.Resource;
import io.permit.sdk.enforcement.User;
import org.springframework.boot.SpringApplication;
import org.springframework.boot.autoconfigure.SpringBootApplication;
import org.springframework.http.HttpStatus;
import org.springframework.http.ResponseEntity;
import org.springframework.web.bind.annotation.GetMapping;
import org.springframework.web.bind.annotation.RestController;

import java.io.IOException;

@RestController
@SpringBootApplication
public class DemoApplication {
  // You can open http://localhost:4000 to invoke this http
  // endpoint, and see the outcome of the permission check.
  @GetMapping("/")
  ResponseEntity<String> home() throws IOException, PermitApiException {
    // init the permit SDK
    Permit permit = new Permit(
    new PermitConfig.Builder("[YOUR_API_KEY]")
      // in production, you might need to change this url to fit your deployment
      .withPdpAddress("http://localhost:7766")
      .build()
    );

    // init your user (only needed ONCE, after the user first logins successfully)
    User user = new User.Builder("[A_USER_ID]")
      .withEmail("john@smith.com")
      .withFirstName("John")
      .withLastName("Smith")
      .withRoles(new ArrayList<>(List.of(new AssignedRole[]{
          new AssignedRole("roleId", "tenantId"),
          // assign the user the admin role inside the default tenant
          new AssignedRole("admin", "default"),
      })))
      .build();

    // You need to call sync user in order to create the user in the
    // permission system and be able to ask permit.check() on that user
    permit.api.syncUser(user);

    boolean permitted = permit.check(
      user, // you may also call User.fromString("[A_USER_ID]"),
      "create",
      Resource.fromString("document")
    );

    if (permitted) {
      return ResponseEntity.status(HttpStatus.OK).body(
        "User is PERMITTED to create a document"
      );
    } else {
      return ResponseEntity.status(HttpStatus.FORBIDDEN).body(
        "User is NOT PERMITTED to create a document"
      );
    }
  }

  public static void main(String[] args) {
    SpringApplication.run(DemoApplication.class, args);
  }
}