Food ordering demo: human approval for an AI agent
Build a family food ordering assistant in which an AI agent requests access and one-time approvals through the Permit.io Access Request Model Context Protocol (MCP) server, and a parent approves or denies each request. This tutorial is for AI agent builders who want a working human-in-the-loop (HITL) agent, from the Permit policy to a running chat client.
In this tutorial, you:
- Model restaurants, roles, and approval flows with relationship-based access control (ReBAC) and Permit Elements.
- Add food ordering tools to the Access Request MCP server.
- Build a LangGraph agent that calls the tools, and pause the agent for human review with
interrupt(). - Serve the agent to several family members with a FastAPI backend and a command-line chat client.
To learn the concepts first, read the Access Request MCP overview. To add the server to an agent you already have, see Add the Access Request MCP server to your agent.
What you build
The demo is a family food ordering system:
- Children can view a list of restaurants and their dishes.
- When a child tries to open a restricted restaurant, the agent creates an access request.
- When a child tries to order a dish that costs more than $10, the agent creates an operation approval request.
- Parents review the requests and approve or deny them.
- After a parent approves, the child can open the restaurant or order the dish.
Components
| Component | Role in the demo |
|---|---|
| Gemini | The large language model (LLM). Gemini reads the user's message and decides which tool to call, such as order_dish. |
| Permit.io with ReBAC | Stores the restaurant roles and the policy, and answers permission checks. |
| Access Request MCP server | Exposes Permit access requests, operation approvals, and resource instances as MCP tools, plus the demo's food ordering tools. |
| LangGraph client | A single-user agent that pauses for human review before approval tools run. |
| FastAPI backend | Authenticates family members, filters the tools by role, and runs the chat over a WebSocket. |
| CLI client | A terminal app where a family member signs in and chats with the agent. |
The finished code is in the permitio/permit-mcp repository. The FastAPI backend, the CLI client, and their helper modules are in examples/food-ordering-system.
Prerequisites
- Python 3.10 or later, and uv 0.6.1 or later.
- A Permit.io account and your environment API key. See Get your API key.
- A policy decision point (PDP) URL: the Cloud PDP, or a PDP container on your machine. See Run the PDP.
- A Gemini API key from Google AI Studio.
Set up the project
Clone the Access Request MCP server repository, and install the server into a Python virtual environment.
1. Clone the Access Request MCP server repository
The permitio/permit-mcp repository holds the base server and the finished food ordering example. Clone the repository and change to the project directory:
git clone https://github.com/permitio/permit-mcp
cd permit-mcp
2. Create and activate a virtual environment
Create the environment with uv. If the uv command isn't found, install uv with the uv installation instructions.
uv venv
source .venv/bin/activate  # On Windows: .venv\Scripts\activate
3. Install the project dependencies
Install the project in editable mode:
uv pip install -e .
The install adds mcp, permit (the Permit Python SDK), httpx, python-dotenv, and aiosqlite. The LangGraph client and the FastAPI backend need more packages, which you add in their own sections.
Then pin the MCP Python SDK to version 1:
uv pip install "mcp<2"
pyproject.toml in permit-mcp requires mcp>=1.2.1 with no upper bound, so a fresh install resolves the 2.x series. In mcp 2.0.0 the FastMCP class became MCPServer and mcp.server.fastmcp was removed: importing it raises ModuleNotFoundError. The server in src/permit_mcp/server.py and the code on this page both import mcp.server.fastmcp, so on mcp 2.x every command in this tutorial fails at import, before it reaches Permit. Install mcp<2 first. To port the code to mcp 2.x instead, read the MCP Python SDK migration guide.
Model the permissions in Permit
Define the access control model in the Permit dashboard:
- A
restaurantsresource with ReBAC roles for parents and children. - Permit Elements that store access requests and operation approvals.
- Test users and a resource instance for the LangGraph client.
The MCP server tools and the FastAPI backend use these definitions to create requests and check permissions.
1. Create a ReBAC resource for restaurants
- In the Permit dashboard, go to Policy > Resources.
- Click Create a Resource.
- Fill in the details:
- Name:
restaurants - Actions:
create,read,update,delete - ReBAC roles:
parent,child-can-view
- Name:
- In the Policy Editor tab, grant the roles these permissions:
| Role | Permissions on restaurants |
|---|---|
parent | create, read, update, delete |
child-can-view | read |
A child can read a restaurant and its dishes only with the child-can-view role on that restaurant instance. Use that exact role name: the FastAPI backend assigns child-can-view, and the system instruction the backend sends to Gemini names child-can-view as the role to request.
2. Create the Permit Elements
Permit Elements are embeddable UI components for access request and approval flows. The Access Request MCP server calls the same flows through the Permit API. Open Elements in the dashboard sidebar.
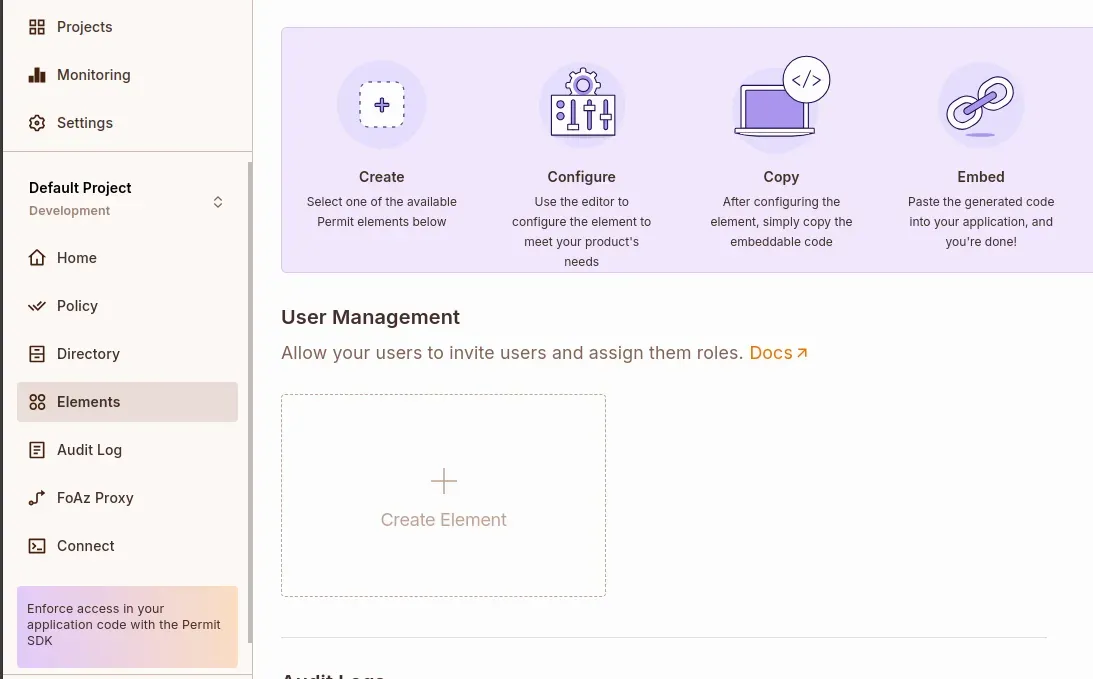
Create three elements.
Restaurant Requests, a User Management element, lets parents approve or deny the access requests that children send for restaurants:
- Name:
Restaurant Requests - Configure elements based on: ReBAC Resource Roles
- Resource Type:
restaurants - Role permission levels: Level 1 - Workspace Owner:
parent - Assignable Roles:
child-can-view
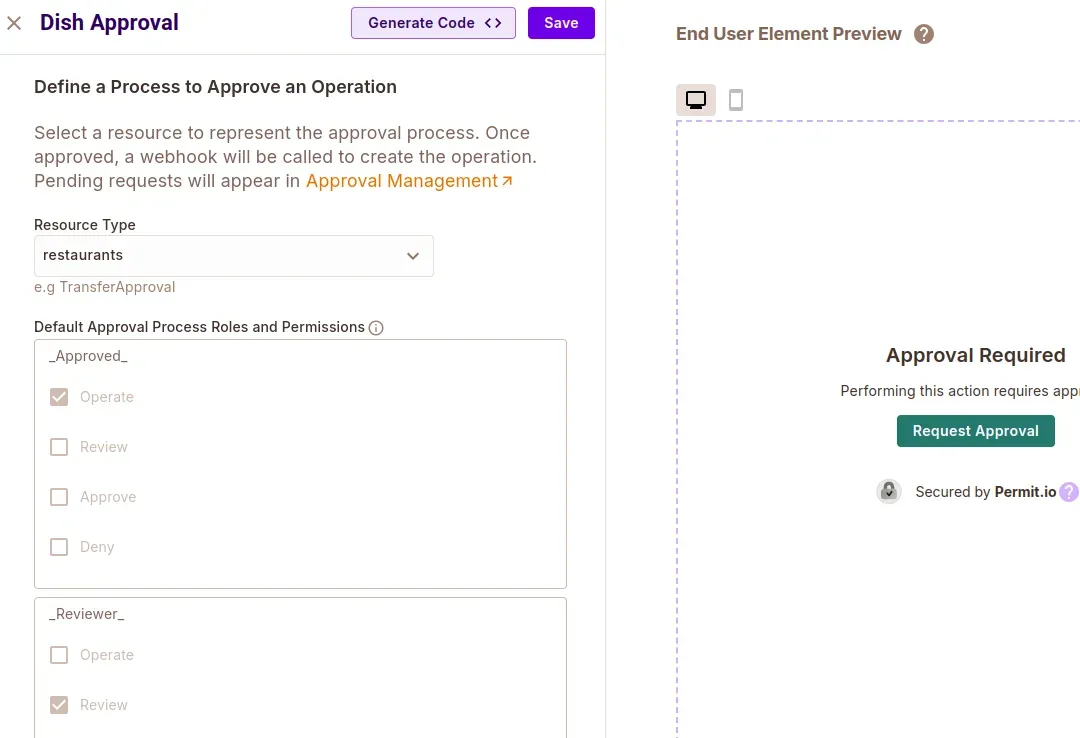
Dish approval, an Operation Approval element, adds the _Reviewer_ and _Approved_ roles to the restaurants resource. A user with _Reviewer_ can approve requests. A user with _Approved_ has the operate permission, which the order_dish tool checks before a child orders an expensive dish:
- Name:
Dish approval - Resource Type:
restaurants
Dish requests, an Approval Management element, lets reviewers, the parents in this demo, approve or deny one-time operation requests such as an order for an expensive dish:
- Name:
Dish requests
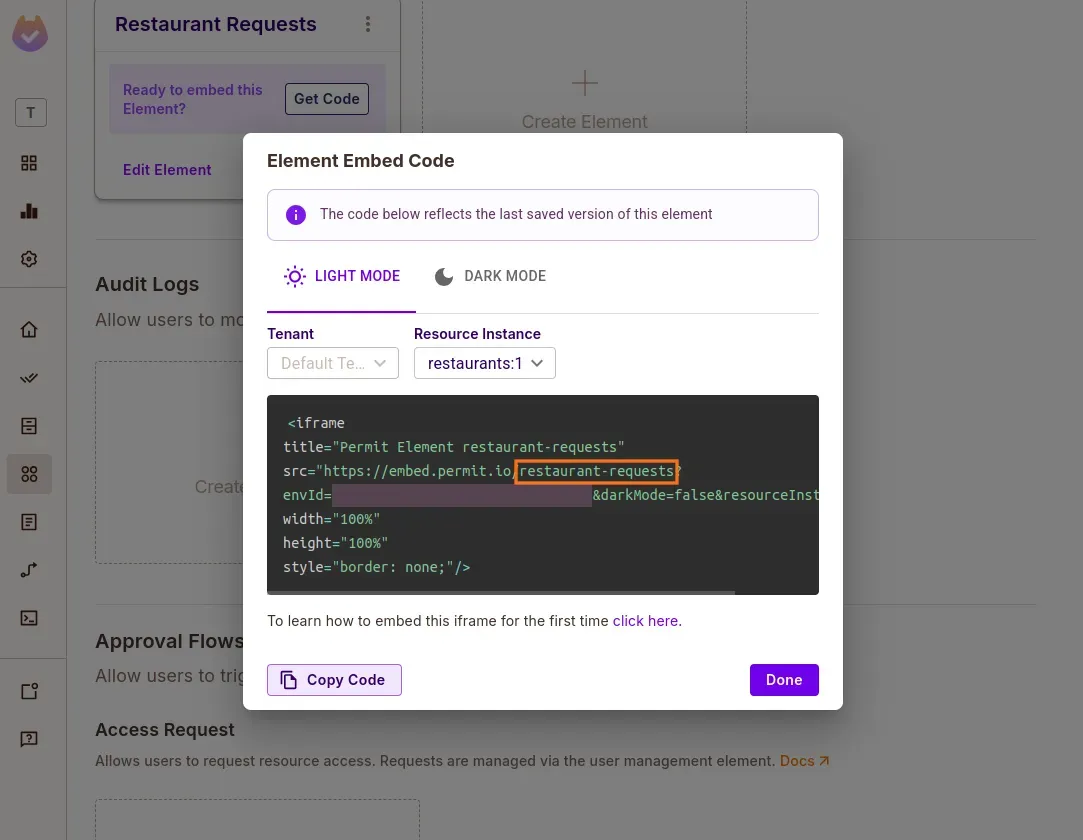
Click Get Code on the Restaurant Requests and Dish requests elements, and copy each config ID from the embed code, for example restaurant-requests and dish-requests. You add the IDs to your .env file in Configure the Access Request MCP server.
3. Collect your project configuration
Collect these values for your .env file:
PERMIT_API_KEY: see Get your API key.PROJECT_IDandENV_ID: see Get project and environment IDs.PERMIT_PDP_URL: see Run the PDP.
4. Add test users and a resource instance
The LangGraph client uses the users you add here. The FastAPI backend creates its own users and restaurant instances when it first starts, so this step serves the LangGraph client only.
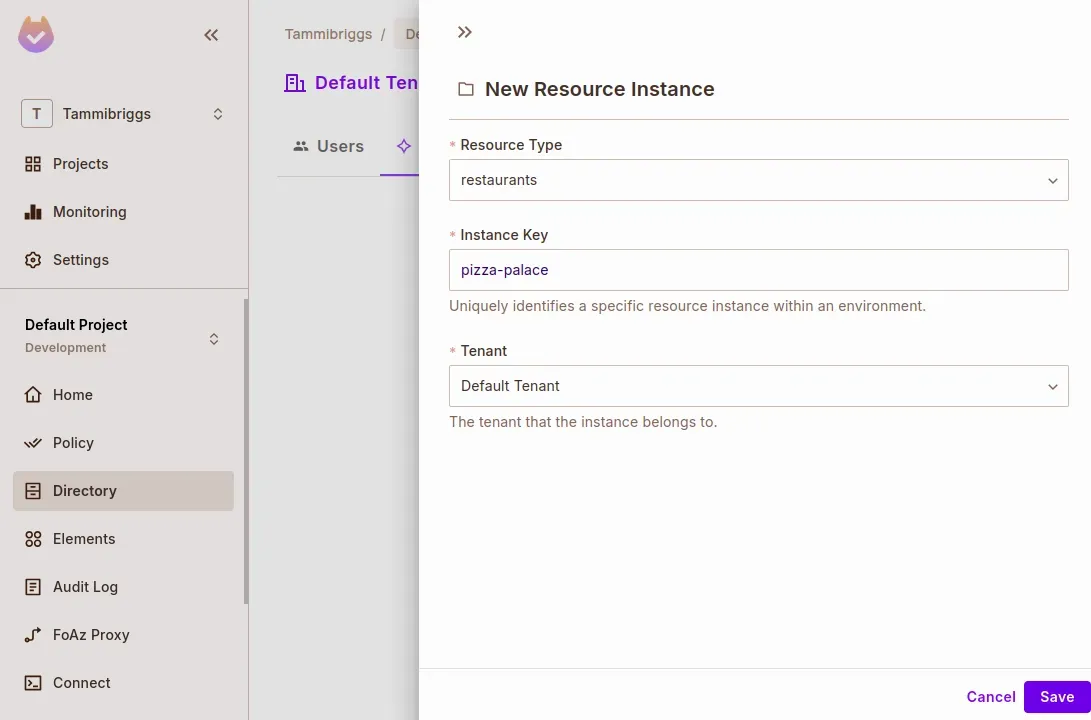
- Go to Directory > Instances.
- Click Add Instance:
- Resource Type:
restaurants - Instance Key:
pizza-palace - Tenant: Default Tenant, or your working tenant
- Resource Type:
- Switch to the Users tab.
- Click Add User:
- Key:
joe - Instance Access:
restaurants:pizza-palace#parent
- Key:
- Click Save.
- Create another user with the key
henry, and don't assign a role.
To confirm the setup, open Directory. The user joe has the parent role on restaurants:pizza-palace, and henry has no role.
Configure the Access Request MCP server
Create a .env file in the root of the cloned repository. The variables and where to find each value are in the environment variable reference. Use these values for the demo:
| Variable | Demo value |
|---|---|
RESOURCE_KEY | restaurants |
ACCESS_ELEMENTS_CONFIG_ID | The config ID of the Restaurant Requests element, for example restaurant-requests |
OPERATION_ELEMENTS_CONFIG_ID | The config ID of the Dish requests element, for example dish-requests |
TENANT | default, or your working tenant |
PERMIT_API_KEY, PROJECT_ID, ENV_ID, PERMIT_PDP_URL | The values you collected in Collect your project configuration |
To check the configuration, run the base server as described in Run the server from the command line. The server logs Starting Permit MCP server....
With the server running, an agent can call tools such as create_access_request, approve_access_request, and list_resource_instances. The tools call the Permit API and the Permit Elements APIs to create and review requests.
Add food ordering tools to the MCP server
The Access Request MCP server includes access request and approval tools. The food ordering agent also needs domain tools:
list_dishes: lists the dishes at a restaurant.order_dish: places an order after permission and price checks.
Both tools read a SQLite database and call permit.check() to enforce the ReBAC roles and the operation approvals.
1. Create the custom server file
In the repository root, create food_ordering_mcp.py:
touch food_ordering_mcp.py
food_ordering_mcp.py is the entry point of your custom MCP server. The file initializes the Permit SDK client, connects to the SQLite database named in the first command-line argument, registers the Access Request MCP server tools through the PermitServer class, and adds the food ordering tools.
Add the imports, the environment variables, and the MCP server setup:
from typing import List, Tuple
import aiosqlite
import sqlite3
import os
import sys
from dotenv import load_dotenv
from mcp.server.fastmcp import FastMCP
from src.permit_mcp.server import PermitServer
from mcp.server.fastmcp.exceptions import ToolError
from permit import Permit

# Load env variables
load_dotenv()

TENANT = os.getenv("TENANT")
DB_NAME = sys.argv[1] if len(sys.argv) > 1 else "test.db"

permit = Permit(
    pdp=os.getenv("PERMIT_PDP_URL"),
    token=os.getenv("PERMIT_API_KEY"),
)

conn = sqlite3.connect(DB_NAME)
cursor = conn.cursor()

# Initialize MCP
mcp = FastMCP("family_food_ordering_system")
permit_server = PermitServer(mcp)  # Register default tools
2. Add the list_dishes tool
list_dishes returns the dishes and prices at a restaurant if the user has the read permission on the restaurant instance. Otherwise the tool raises an access denied error, and the agent can offer to create an access request. Append the tool to food_ordering_mcp.py:
@mcp.tool()
async def list_dishes(user_id: str, restaurant_id: str) -> List[Tuple[str, float]]:
    """List the dishes and prices at a restaurant, if the user has access to it."""
    permitted = await permit.check(user_id, 'read', f"restaurants:{restaurant_id}")
    if not permitted:
        raise ToolError("Access denied. You are not permitted to view dishes.")

    async with aiosqlite.connect(DB_NAME) as db:
        query = "SELECT name, price FROM dishes WHERE restaurant_id = ?"
        cursor = await db.execute(query, (restaurant_id,))
        dishes = await cursor.fetchall()
        await cursor.close()
        return dishes
Keep the docstring. FastMCP publishes the docstring as the tool description, and the backend passes that description to Gemini. A tool without a docstring reaches the model with a generated placeholder description, and the model then picks the wrong tool more often.
3. Look up the dish and the user in order_dish
order_dish runs four checks before it places an order:
- The dish exists at the restaurant.
- The user has the
readpermission on the restaurant instance. - A child who orders a dish over $10 has the
operatepermission, which an approved operation approval grants. - After an approved order, the tool unassigns the
_Approved_role, so one approval covers one order.
Append the first half of the tool to food_ordering_mcp.py. This half reads the dish price and the user's role from SQLite, and raises an error when either row is missing:
@mcp.tool()
async def order_dish(user_id: str, restaurant_id: str, dish_name: str) -> str:
    """Place an order for a dish, identified by the restaurant key and the dish name."""
    MAX_ALLOWED_DISH_PRICE = 10  # dollars

    async with aiosqlite.connect(DB_NAME) as db:
        dish_cursor = await db.execute(
            "SELECT price FROM dishes WHERE name = ? AND restaurant_id = ?",
            (dish_name, restaurant_id),
        )
        dish = await dish_cursor.fetchone()
        await dish_cursor.close()

        if dish is None:
            raise ToolError(f"Dish '{dish_name}' not found.")

        user_cursor = await db.execute("SELECT role FROM users WHERE id = ?", (user_id,))
        user = await user_cursor.fetchone()
        await user_cursor.close()

    if user is None:
        raise ToolError(f"User '{user_id}' not found.")
4. Check the permissions in order_dish
The second half of order_dish continues the same function body, at one level of indentation. Two permit.check() calls enforce the policy: read on the restaurant instance, and operate for a child who orders a dish over the price limit. After an approved order, unassign_role removes the _Approved_ role, so the approval does not carry over to the next order:
    permitted_restaurant = await permit.check(user_id, "read", f"restaurants:{restaurant_id}")
    if not permitted_restaurant:
        raise ToolError("You are not allowed to order from this restaurant.")

    permitted_dish = await permit.check(user_id, "operate", f"restaurants:{restaurant_id}")
    if user[0] == "child" and dish[0] > MAX_ALLOWED_DISH_PRICE and not permitted_dish:
        raise ToolError(
            f"This dish costs ${dish[0]:.2f}. Approval required for expensive dishes."
        )

    if permitted_dish:
        await permit.api.users.unassign_role({
            "user": user_id,
            "role": "_Approved_",
            "resource_instance": f"restaurants:{restaurant_id}",
            "tenant": TENANT
        })

    return f"Order successfully placed for {dish_name}!"
End the file with an entry point that starts the server over standard input and output (stdio):
if __name__ == "__main__":
    mcp.run(transport="stdio")
5. Run the custom server
Start the server with a database file name:
uv run food_ordering_mcp.py food_ordering.db
The server exposes the Access Request MCP server tools and the list_dishes and order_dish tools over stdio. An stdio server waits for an MCP client and prints nothing, so a terminal that stays silent without exiting means the server started. A traceback instead means a missing environment variable or a failed import. The FastAPI backend creates the users, restaurants, and dishes tables in the database when the backend first starts.
Build a LangGraph agent client
Build a single-user agent in client.py, in the repository root. The LangGraph client:
- Uses Gemini to decide which tool to call.
- Loads the Access Request MCP server tools, such as
create_access_requestandapprove_operation_approval, as LangGraph tools. - Runs the conversation as a LangGraph graph.
- Pauses for human review with
interrupt(), after you add the human review node in Add human review with interrupt().
The LangGraph client starts the base server, src/permit_mcp/server.py, and works with the joe and henry users you created in the Permit Directory.
1. Install the LangGraph dependencies
In the project directory, add the packages:
uv add langchain-mcp-adapters langgraph langchain-google-genai
langchain-mcp-adapters: converts MCP tools into LangGraph-compatible tools.langgraph: runs the agent as a graph of nodes.langchain-google-genai: calls Gemini models.
2. Add a Google API key
Create an API key in Google AI Studio and add the key to your .env file:
GOOGLE_API_KEY=your-key-here
3. Create client.py and the Gemini client
Create client.py in the project root. Import the dependencies:
import os
from typing_extensions import TypedDict, Literal, Annotated
from dotenv import load_dotenv
from langchain_google_genai import ChatGoogleGenerativeAI
from langgraph.graph import StateGraph, START, END
from langgraph.types import Command, interrupt
from langgraph.checkpoint.memory import MemorySaver
from langgraph.prebuilt import ToolNode
from mcp import ClientSession, StdioServerParameters
from mcp.client.stdio import stdio_client
from langchain_mcp_adapters.tools import load_mcp_tools
import asyncio
from langgraph.graph.message import add_messages
Load the environment and create the Gemini LLM client. The global_llm_with_tools variable holds the LLM after the tools are bound to it, so the graph nodes can reach it:
load_dotenv()

global_llm_with_tools = None

llm = ChatGoogleGenerativeAI(
    model="gemini-2.5-flash",
    google_api_key=os.getenv('GOOGLE_API_KEY')
)
Google retires model versions. Check the Gemini models list and use a model name that the list still shows.
4. Add the MCP server parameters and the graph state
StdioServerParameters tells the client how to start the MCP server as a subprocess. State is the graph state: a list of messages that LangGraph appends to with add_messages:
server_params = StdioServerParameters(
    command="python",
    args=["src/permit_mcp/server.py"],
)

class State(TypedDict):
    messages: Annotated[list, add_messages]
5. Add the graph nodes and the graph builder
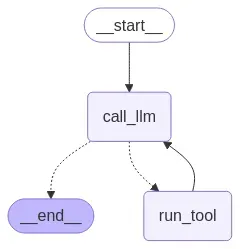
call_llm sends the conversation to Gemini. route_after_llm routes to the run_tool node when Gemini's last message has a tool call, and ends the graph otherwise. setup_graph compiles the graph with an in-memory checkpointer, which keeps the conversation between turns:
async def call_llm(state):
    response = await global_llm_with_tools.ainvoke(state["messages"])
    return {"messages": [response]}

def route_after_llm(state) -> Literal[END, "run_tool"]:
    return END if len(state["messages"][-1].tool_calls) == 0 else "run_tool"

async def setup_graph(tools):
    builder = StateGraph(State)
    run_tool = ToolNode(tools)
    builder.add_node(call_llm)
    builder.add_node('run_tool', run_tool)

    builder.add_edge(START, "call_llm")
    builder.add_conditional_edges("call_llm", route_after_llm)
    builder.add_edge("run_tool", "call_llm")

    memory = MemorySaver()
    return builder.compile(checkpointer=memory)
6. Add response streaming and the chat loop
stream_responses prints each LLM reply as the graph runs:
async def stream_responses(graph, config, invokeWith):
    async for event in graph.astream(invokeWith, config, stream_mode='updates'):
        for key, value in event.items():
            if key == 'call_llm':
                content = value["messages"][-1].content
                if content:
                    print('\n' + ", ".join(content)
                          if isinstance(content, list) else content)
chat_loop reads queries until you type quit, exit, or q, and prefixes each query with instructions that tell Gemini to look up resource instance keys first. Every query runs on the thread "1", so the checkpointer treats the session as one conversation:
async def chat_loop(graph):
    while True:
        try:
            user_input = input("\nQuery: ").strip()
            if user_input in ["quit", "exit", "q"]:
                print("Goodbye!")
                break

            sys_m = """
            Always provide the resource instance key during tool calls, as the ReBAC authorization model is being used. To obtain the resource instance key, use the list_resource_instances tool to view available resource instances.

            Always parse the provided data before displaying it.
            If the user has initially provided their ID, use that for subsequent tool calls without asking them again.
            """

            invokeWith = {"messages": [
                {"role": "user", "content": sys_m + '\n\n' + user_input}]}
            config = {"configurable": {"thread_id": "1"}}

            await stream_responses(graph, config, invokeWith)

        except Exception as e:
            print(f"Error: {e}")
7. Add the entry point
main starts the MCP server, converts its tools to LangGraph tools, binds the tools to the LLM, builds the graph, saves a diagram of the graph, and starts the chat loop:
async def main():
    async with stdio_client(server_params) as (read, write):
        async with ClientSession(read, write) as session:
            await session.initialize()
            tools = await load_mcp_tools(session)
            llm_with_tools = llm.bind_tools(tools)
            graph = await setup_graph(tools)

            global global_llm_with_tools
            global_llm_with_tools = llm_with_tools

            with open("workflow_graph.png", "wb") as f:
                f.write(graph.get_graph().draw_mermaid_png())

            await chat_loop(graph)

if __name__ == "__main__":
    asyncio.run(main())
8. Run the LangGraph client and send a request
Start the client:
uv run client.py
The client writes a diagram of the graph to workflow_graph.png, then prints the Query: prompt. The diagram shows the call_llm node, which either ends the run or calls run_tool and returns to call_llm.
Send a request as henry, then list the requests as joe:
Query: My user id is henry, request access to pizza palace with the reason: I am now 18, and the role child-can-view
Query: My user id is joe, list all access requests
After the first query, the agent calls create_access_request and reports that the request was sent. After the second query, the agent lists the pending request from henry, with the reason you gave. The same request appears in the Permit dashboard under Elements > Restaurant Requests.
Add human review with interrupt()
The LangGraph client runs every tool that Gemini calls, including tools that grant access. Add a human review node that pauses the graph with LangGraph's interrupt() before a high-risk tool runs:
approve_access_requestapprove_operation_approval
The person at the terminal approves or denies the tool call before the agent continues.
Define the human review node
In client.py, before setup_graph, add the human_review_node function:
async def human_review_node(state) -> Command[Literal["call_llm", "run_tool"]]:
    """Handle human review process."""
    last_message = state["messages"][-1]
    tool_call = last_message.tool_calls[-1]

    high_risk_tools = ['approve_access_request', 'approve_operation_approval']
    if tool_call["name"] not in high_risk_tools:
        return Command(goto="run_tool")

    human_review = interrupt({
        "question": "Do you approve this tool call? (yes/no)",
        "tool_call": tool_call,
    })

    review_action = human_review["action"]

    if review_action == "yes":
        return Command(goto="run_tool")

    return Command(goto="call_llm", update={"messages": [{
        "role": "tool",
        "content": f"The user declined your request to execute the {tool_call.get('name', 'Unknown')} tool, with arguments {tool_call.get('args', 'N/A')}",
        "name": tool_call["name"],
        "tool_call_id": tool_call["id"],
    }]})
human_review_node sends tool calls that aren't high risk straight to run_tool. For a high-risk tool call, interrupt() pauses the graph with a question and the tool call. When the graph resumes with "yes", the node routes to run_tool. For any other answer, the node returns a tool message that tells the LLM the user declined the call.
Route tool calls to the human review node
Change route_after_llm in client.py so that tool calls go to human_review_node instead of run_tool:
def route_after_llm(state) -> Literal[END, "human_review_node"]:
    """Route logic after LLM processing."""
    return END if len(state["messages"][-1].tool_calls) == 0 else "human_review_node"
Add the human review node to the graph
In setup_graph, add human_review_node as a node. The node needs no static edges, because it returns a Command that names the next node:
async def setup_graph(tools):
    builder = StateGraph(State)
    run_tool = ToolNode(tools)
    builder.add_node(call_llm)
    builder.add_node('run_tool', run_tool)
    builder.add_node(human_review_node)  # Add the interrupt node here

    builder.add_edge(START, "call_llm")
    builder.add_conditional_edges("call_llm", route_after_llm)
    builder.add_edge("run_tool", "call_llm")

    memory = MemorySaver()
    return builder.compile(checkpointer=memory)
Resume the graph with the reviewer's answer
When interrupt() pauses the graph, graph.astream() stops producing updates, and the graph waits for a resume command. Change stream_responses so that the client:
- Detects the interrupt in the streamed updates. With
stream_mode='updates', LangGraph reports the interrupt under the__interrupt__key, with the question and tool call thathuman_review_nodepassed tointerrupt(). - Prints the question and the tool call, and reads
yesornofrom the terminal. - Streams the graph again with
Command(resume={"action": user_input})as the input and the sameconfig, so the graph resumes on the same thread.
async def stream_responses(graph, config, invokeWith):
    async for event in graph.astream(invokeWith, config, stream_mode='updates'):
        for key, value in event.items():
            if key == 'call_llm':
                content = value["messages"][-1].content
                if content:
                    print('\n' + ", ".join(content)
                          if isinstance(content, list) else content)
            elif key == '__interrupt__':
                review = value[0].value
                print(f"\n{review['question']}")
                print(f"Tool call: {review['tool_call']['name']} {review['tool_call']['args']}")
                user_input = input("Approve? (yes/no): ").strip().lower()
                await stream_responses(graph, config, Command(resume={"action": user_input}))
                return
For the interrupt API, see the LangGraph human-in-the-loop documentation.
Verify the human review step
Run uv run client.py again. The regenerated workflow_graph.png includes human_review_node between call_llm and run_tool:
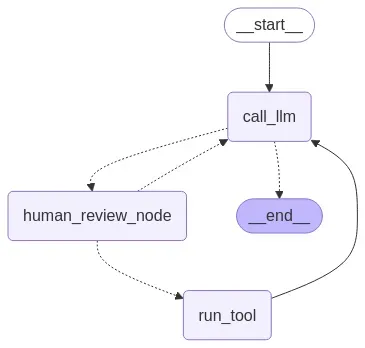
Ask the agent, as joe, to approve henry's access request. Before approve_access_request runs, the client prints the review question, the tool name, and the tool arguments, then waits at the Approve? (yes/no): prompt. Answer yes, and Permit assigns the child-can-view role to henry on that restaurant instance. Answer no, and the agent reports that you declined the tool call, and the role assignments in the Permit Directory do not change.
Serve the agent with FastAPI and a CLI
The LangGraph client serves one person at a terminal. To serve several family members, run the agent behind a backend that authenticates each user. The FastAPI backend:
- Signs users in with a username and password, and issues a JSON Web Token (JWT).
- Starts
food_ordering_mcp.pyfor each WebSocket chat connection. - Filters the tools by role. Children get
list_resource_instances,create_access_request,create_operation_approval,list_dishes, andorder_dish. Parents get every tool, including the approve and deny tools. - Sends each message and the filtered tools to Gemini, runs the tool calls Gemini returns, and streams the replies to the client.
In this design, a child can't approve a request, because the backend never gives a child the approval tools. A parent approves the request from a separate chat session.
Prepare the backend files
Build the backend and the CLI client in the repository root, next to food_ordering_mcp.py. Before you write the code:
- The CLI client is also named
client.py. If you built the LangGraph client in the same directory, rename the LangGraph client file first, for example tolanggraph_client.py. - Copy
utils.pyandpermit_client.pyfromexamples/food-ordering-systemto the repository root.utils.pydefines the helpers the backend imports:init_db,get_user,verify_password,create_access_token,get_current_websocket_user,filter_tools_by_role,convert_mcp_tools_to_gemini, andretry_tool_call. - Add the backend and client packages that the example's pyproject.toml lists:
uv add "fastapi[standard]" google-genai "python-jose[cryptography]" bcrypt websockets. - Add
GEMINI_API_KEY(your Gemini API key) andDB_NAME(for example,food_ordering.db) to your.envfile.
utils.py signs tokens with the hardcoded SECRET_KEY value your-secret-key. Anyone who knows the value can create a token for any user and chat as that user, including a parent who approves requests. Load a random secret from an environment variable before you run the backend outside your machine.
Build the FastAPI backend
1. Create server.py and read the settings
Create server.py in the repository root:
touch server.py
Import the dependencies and read the settings. genai_client and server_params are created once at module level and reused by every connection: genai_client calls Gemini, and server_params describes how to start food_ordering_mcp.py with your database file:
from fastapi import FastAPI, WebSocket, WebSocketDisconnect, HTTPException, Depends, status
from fastapi.security import OAuth2PasswordRequestForm
from mcp import ClientSession, StdioServerParameters
from mcp.client.stdio import stdio_client
from datetime import timedelta
from contextlib import AsyncExitStack, asynccontextmanager
import os, json, asyncio

from google import genai
from google.genai import types

from utils import (
    get_user,
    verify_password,
    create_access_token,
    get_current_websocket_user,
    filter_tools_by_role,
    convert_mcp_tools_to_gemini,
    retry_tool_call,
    init_db,
)

ACCESS_TOKEN_EXPIRE_MINUTES = 30
DB_NAME = os.getenv("DB_NAME")
GEMINI_API_KEY = os.getenv("GEMINI_API_KEY")

genai_client = genai.Client(api_key=GEMINI_API_KEY)

server_params = StdioServerParameters(
    command="python",
    args=["food_ordering_mcp.py", DB_NAME],
    env=None,
)
2. Create the app with a startup handler
The lifespan handler runs init_db() at startup. init_db() creates the SQLite tables, adds the demo users, restaurants, and dishes, creates the restaurant instances in Permit, syncs the users, and assigns their roles:
@asynccontextmanager
async def lifespan(app: FastAPI):
    await init_db()
    yield

app = FastAPI(lifespan=lifespan)
3. Add the WebSocket connection manager
ConnectionManager tracks the open WebSocket connection of each user, so the backend can push a message to one user by ID:
class ConnectionManager:
    def __init__(self):
        self.active_connections = {}

    async def connect(self, websocket: WebSocket, client_id: str):
        await websocket.accept()
        self.active_connections[client_id] = websocket

    def disconnect(self, client_id: str):
        self.active_connections.pop(client_id, None)

    async def send_message(self, message: str, client_id: str):
        if client_id in self.active_connections:
            await self.active_connections[client_id].send_text(message)

manager = ConnectionManager()
4. Add the sign-in endpoint
The /token endpoint checks the username and password against the database and returns a JWT access token that expires after 30 minutes:
@app.post("/token")
async def login_for_access_token(form_data: OAuth2PasswordRequestForm = Depends()):
    user = get_user(form_data.username)
    if not user or not verify_password(form_data.password, user["hashed_password"]):
        raise HTTPException(
            status_code=status.HTTP_401_UNAUTHORIZED,
            detail="Incorrect username or password",
            headers={"WWW-Authenticate": "Bearer"},
        )

    access_token_expires = timedelta(minutes=ACCESS_TOKEN_EXPIRE_MINUTES)
    access_token = create_access_token(
        data={"sub": user["username"]}, expires_delta=access_token_expires
    )
    return {"access_token": access_token, "token_type": "bearer"}
5. Authenticate the WebSocket connection
The /ws/chat endpoint connects the CLI client, Gemini, and the MCP server. Start the endpoint by resolving the user from the bearer token in the connection headers. A connection with no valid token, or with a user who has no role, is closed with the policy violation code 1008:
@app.websocket("/ws/chat")
async def websocket_chat(websocket: WebSocket):
    current_user = await get_current_websocket_user(websocket)
    if not current_user:
        await websocket.close(code=status.WS_1008_POLICY_VIOLATION, reason="Not authenticated")
        return

    if not current_user.get("role"):
        await websocket.close(code=status.WS_1008_POLICY_VIOLATION, reason="Insufficient permissions")
        return

    client_id = current_user.get("id")
    await manager.connect(websocket, client_id)
6. Start the MCP server and filter the tools by role
The next block continues websocket_chat. Each connection gets its own MCP server subprocess, held open by an AsyncExitStack. filter_tools_by_role drops the tools the signed-in role must not call, and convert_mcp_tools_to_gemini turns the remaining MCP tool schemas into Gemini function declarations:
    try:
        exit_stack = AsyncExitStack()
        stdio_transport = await exit_stack.enter_async_context(stdio_client(server_params))
        stdio, write = stdio_transport
        session = await exit_stack.enter_async_context(ClientSession(stdio, write))

        await session.initialize()

        tools_result = await session.list_tools()
        filtered_tools = filter_tools_by_role(tools_result.tools, current_user["role"])
        mcp_tools = [{"function_declarations": convert_mcp_tools_to_gemini(filtered_tools)}]
7. Add the tool call helper
run_tool calls one MCP tool through retry_tool_call, which retries the call twice before it gives up. retry_tool_call returns the exception instead of raising it, so run_tool checks the return value and shapes either an error or a result for Gemini:
        async def run_tool(fc):
            result = await retry_tool_call(session, fc.name, fc.args)
            if isinstance(result, Exception):
                return {"name": fc.name, "response": {"result": {"error": str(result)}}}
            content = [{"text": c.text} for c in result.content]
            return {"name": fc.name, "response": {"result": {"content": content, "is_error": result.isError}}}
8. Send each message to Gemini
The outer loop waits for a message from the CLI client and rebuilds the conversation from the history the client sent. The inner loop calls Gemini with the filtered tools and a system instruction that carries the signed-in user's ID and role, so the model never has to ask for them:
        while True:
            data = json.loads(await websocket.receive_text())
            message = data.get("message")
            history = data.get("history", [])
            contents = history + [{"role": "user", "parts": [{"text": message}]}]

            while True:
                response = genai_client.models.generate_content(
                    model="gemini-2.5-flash",
                    contents=contents,
                    config=types.GenerateContentConfig(
                        tools=mcp_tools,
                        system_instruction=f"""
                        - current_user_role: {current_user['role']}
                        - user_id: "{current_user['id']}"
                        - Assign role: "child-can-view"
                        - Use list_resource_instances first to get keys
                        - Always request reason from user for access/approval
                        """
                    )
                )
The endpoint pins the gemini-2.5-flash model. Google retires models, so check the Gemini models list and use a model name that the list still shows.
9. Stream the reply and run the tool calls
Still inside the inner loop, send any text Gemini returned to the CLI client, then leave the inner loop when Gemini returned no function calls:
                if hasattr(response, "text") and response.text:
                    contents.append({"role": "model", "parts": [{"text": response.text}]})
                    await manager.send_message(json.dumps({
                        "type": "text", "content": response.text
                    }), client_id)

                function_calls = getattr(response, "function_calls", None)
                if not function_calls:
                    break
When Gemini did return function calls, record them in the conversation, run them together with asyncio.gather, and append their responses. The inner loop then calls Gemini again with the tool results:
                await manager.send_message(json.dumps({
                    "type": "status", "content": "Processing function calls..."
                }), client_id)

                contents.append({
                    "role": "model",
                    "parts": [{"function_call": {
                        "id": fc.id, "name": fc.name, "args": fc.args
                    }} for fc in function_calls]
                })

                results = await asyncio.gather(*[run_tool(fc) for fc in function_calls])

                contents.append({
                    "role": "user",
                    "parts": [{"function_response": r} for r in results]
                })
10. Send the updated history and close the session
After the inner loop ends, send the full conversation back to the CLI client. The client stores the conversation, sends it with the next message, and unblocks its input prompt. The finally block closes the MCP session when the connection ends:
            await manager.send_message(json.dumps({
                "type": "history_update", "content": contents
            }), client_id)

    except WebSocketDisconnect:
        manager.disconnect(client_id)
    except Exception as err:
        await manager.send_message(json.dumps({
            "type": "error", "content": str(err)
        }), client_id)
    finally:
        manager.disconnect(client_id)
        await exit_stack.aclose()
Build the CLI chat client
The CLI client signs the user in to the FastAPI backend, then opens the WebSocket chat to send messages and print the replies.
1. Create client.py and set the backend URLs
Create client.py in the repository root. Import the libraries and set the backend URLs. Change both URLs if your backend runs on another host or port:
import asyncio
import json
import httpx
import websockets
import sys
from typing import Dict, List, Optional

API_URL = "http://localhost:8000"  # Change if needed
WS_URL = "ws://localhost:8000"     # WebSocket URL
2. Add the sign-in function
login posts the username and password to the /token endpoint and returns the access token, or None if sign-in fails:
async def login(username: str, password: str) -> str | None:
    async with httpx.AsyncClient() as client:
        response = await client.post(
            f"{API_URL}/token",
            data={
                "username": username,
                "password": password,
            },
            headers={"Content-Type": "application/x-www-form-urlencoded"},
        )

    if response.status_code == 200:
        token = response.json().get("access_token")
        print("Login successful!\n")
        return token
    else:
        print(f"Login failed: {response.json().get('detail')}")
        return None
3. Start the chat session
chat holds the message history and two flags. is_processing is true while the backend handles a message. is_displayed_processing is true after the client prints the waiting message, so the client prints it once per message:
async def chat(token: str):
    history: List[Dict] = []
    is_processing = False
    is_displayed_processing = False

    print("\n--- Chat session started ---")
    print("Type 'exit' to quit.\n")
4. Open the WebSocket connection
The next block continues chat. Connect to the chat endpoint with the token in the Authorization header. Every block after this one belongs inside the body of this async with statement:
    try:
        headers = {"Authorization": f"Bearer {token}"}

        async with websockets.connect(
            f"{WS_URL}/ws/chat",
            additional_headers=headers
        ) as websocket:
5. Receive messages in the background
receive_messages is nested inside chat. The function reads each message from the backend, prints the message by type, and updates the history and the flags. nonlocal lets receive_messages change the variables of chat:
            async def receive_messages():
                nonlocal is_processing, history, is_displayed_processing

                while True:
                    try:
                        message = await websocket.recv()
                        data = json.loads(message)

                        message_type = data.get("type")
                        content = data.get("content")

                        if message_type == "text":
                            print(f"Assistant: {content}")
                        elif message_type == "status":
                            print(f"[Status] {content}")
                        elif message_type == "error":
                            print(f"Error: {content}")
                            is_processing = False
                            is_displayed_processing = False
                        elif message_type == "history_update":
                            history = content
                            is_processing = False
                            is_displayed_processing = False
                    except Exception as e:
                        print(f"\nError receiving message: {str(e)}")
                        is_processing = False
                        is_displayed_processing = False
                        break
Start receive_messages as a background task, so the client receives messages while the main loop reads input:
receiver_task = asyncio.create_task(receive_messages())
6. Read input in the main loop
The main loop waits while the backend processes a message, and prints the waiting message once. When the backend is ready, the loop reads input with input() in a thread executor, so the input call doesn't block the event loop:
            while True:
                if is_processing:
                    if not is_displayed_processing:
                        print("Processing previous message. Please wait...")
                        is_displayed_processing = True

                    await asyncio.sleep(1)
                    continue

                user_input = await asyncio.get_event_loop().run_in_executor(
                    None, lambda: input("You: ")
                )

                if user_input.lower() == "exit":
                    print("Ending chat session.")
                    break
7. Send the message and the history
Still inside the main loop, set is_processing before sending, so the next input() call waits until the backend returns a history_update message. The payload carries the new message and the history the backend sent last:
                is_processing = True

                payload = {
                    "message": user_input,
                    "history": history
                }

                try:
                    await websocket.send(json.dumps(payload))
                except Exception as e:
                    print(f"Error sending message: {str(e)}")
                    is_processing = False
                    is_displayed_processing = False
                    break
8. Clean up after the chat loop
When the main loop exits, because of an error or because the user typed exit, cancel the receiver task. The except clauses belong to the try statement that opened the connection:
            receiver_task.cancel()

    except websockets.exceptions.WebSocketException as e:
        print(f"WebSocket connection error: {str(e)}")
    except Exception as e:
        print(f"Unexpected error: {str(e)}")
9. Add the entry point
main asks for a username and password, calls login, and starts chat when sign-in succeeds. The if __name__ == "__main__": block runs main and exits cleanly on Ctrl+C:
async def main():
    print("Welcome to the Food Ordering CLI tool!")

    username = input("Username: ").strip()
    password = input("Password: ").strip()

    token = await login(username, password)

    if token:
        await chat(token)


if __name__ == "__main__":
    try:
        asyncio.run(main())
    except KeyboardInterrupt:
        print("\nProgram terminated by user.")
    except Exception as e:
        print(f"Unexpected error: {str(e)}")
        sys.exit(1)
Run the app and review requests
1. Start the FastAPI backend
fastapi dev server.py
On the first run, init_db() fills the database and creates the Permit objects, and prints three lines:
Initializing database
Setting up Permit...
Database initialization complete.
On later runs the database already holds the restaurants, so init_db() skips the seeding and prints only the first and the last line. The development server then reports that startup is complete and serves the app on port 8000, which is the port the CLI client's API_URL points to.
2. Start the CLI client
In a second terminal, start the client:
uv run client.py
The client prints the welcome line and asks for credentials:
Welcome to the Food Ordering CLI tool!
Username:
3. Sign in as a demo user
init_db() creates four users. Sign in as one of them:
| Username | Password | Role |
|---|---|---|
joe | joe_password | parent |
jane | jane_password | parent |
henry | henry_password | child |
rose | rose_password | child |
After a successful sign-in, the client prints:
Login successful!

--- Chat session started ---
Type 'exit' to quit.

You:
A wrong password prints Login failed: Incorrect username or password, and the client exits.
4. Request access to a restricted restaurant
init_db() marks Pizza Palace and Burger Bonanza as allowed for children, and assigns children the child-can-view role on those two restaurants only. Fancy French and Sushi World stay restricted.
Sign in as henry, a child, and ask for the dishes at Fancy French. The client prints [Status] Processing function calls... while the tool runs. The list_dishes tool raises Access denied. You are not permitted to view dishes., and the agent relays the denial. Ask the agent to request access, and give a reason when the agent asks for one. The agent calls create_access_request, and the request appears in the Permit dashboard under Elements > Restaurant Requests.
5. Approve the access request as a parent
In a third terminal, run uv run client.py again and sign in as joe, a parent. Ask for the pending access requests, and approve henry's request. The parent role gives joe the approval tools, which filter_tools_by_role withholds from a child.
Back in henry's session, ask for the Fancy French dishes again. The agent lists Escargot at $15.99, Foie Gras at $19.99, and Truffle Pasta at $18.49.
6. Request approval for an expensive dish
As henry, order the Pepperoni Pizza at Pizza Palace, which costs $10.99. The order_dish tool raises This dish costs $10.99. Approval required for expensive dishes., because a child needs the operate permission for a dish over $10. The agent then creates an operation approval request with create_operation_approval.
7. Approve the dish and confirm the one-time approval
As joe, list the operation approvals and approve henry's request. Permit assigns the _Approved_ role to henry on that restaurant instance.
As henry, order the Pepperoni Pizza again. The tool returns Order successfully placed for Pepperoni Pizza!. The same call unassigns the _Approved_ role, so a third order of the Pepperoni Pizza raises the approval required error again. That confirms the approval covered one order.
Next steps
- Add the Access Request MCP server to your agent: configure the server and add its tools to your own agent.
- Access Request MCP overview: the request and approval flows, and when to use them.
- Operation Approval element: embed the approval request UI in your application.
- Delegating AI permissions to human users with Access Request MCP: the blog post that introduced the LangGraph client.
- Questions: join the Permit.io Slack community.