Running a demo
Connect a demo application to Permit.io and enforce access with the SDK. By the end, you have a running application that allows or denies each request based on the user's role.
This guide assumes you have created at least one policy in Permit. If you haven't, complete the Quickstart first.
1. Get your Permit Environment API Key
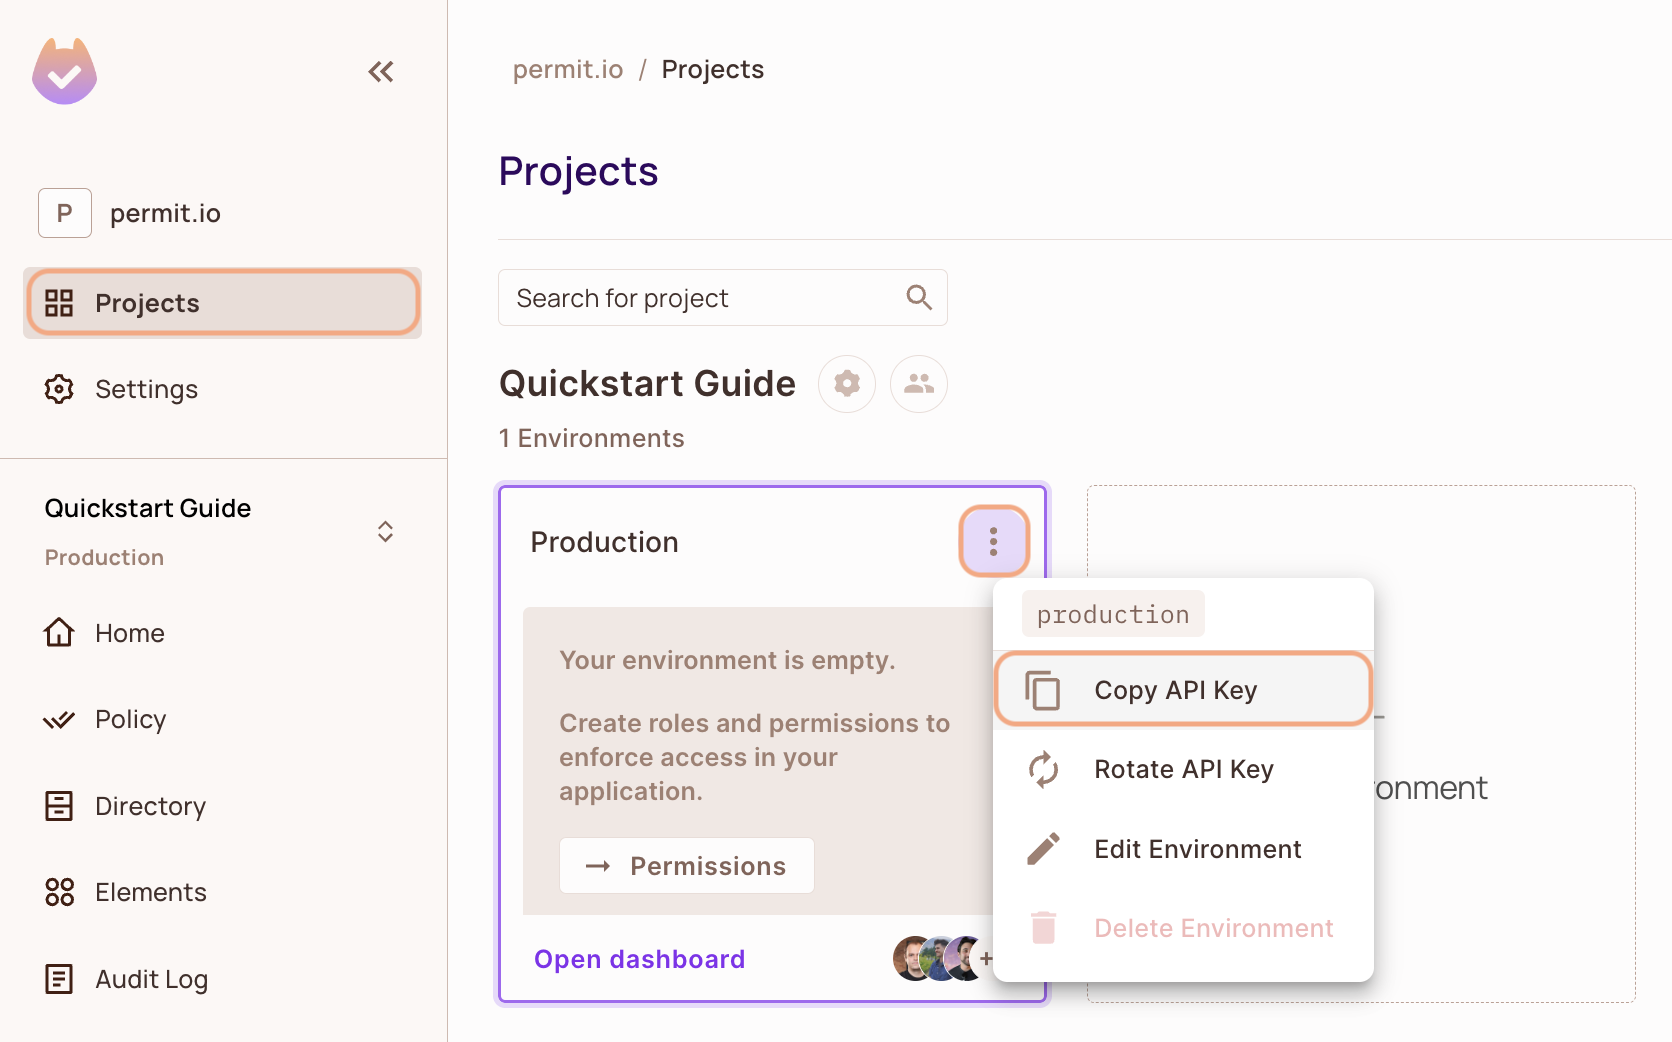
- In the Permit Dashboard, navigate to the Projects screen.
- Find the Project and Environment you want to connect to.
- Click the
 icon on the top right of the environment card.
 - Click Copy API Key.
You can also copy the API key of the active environment from User Menu > Copy Environment Key.
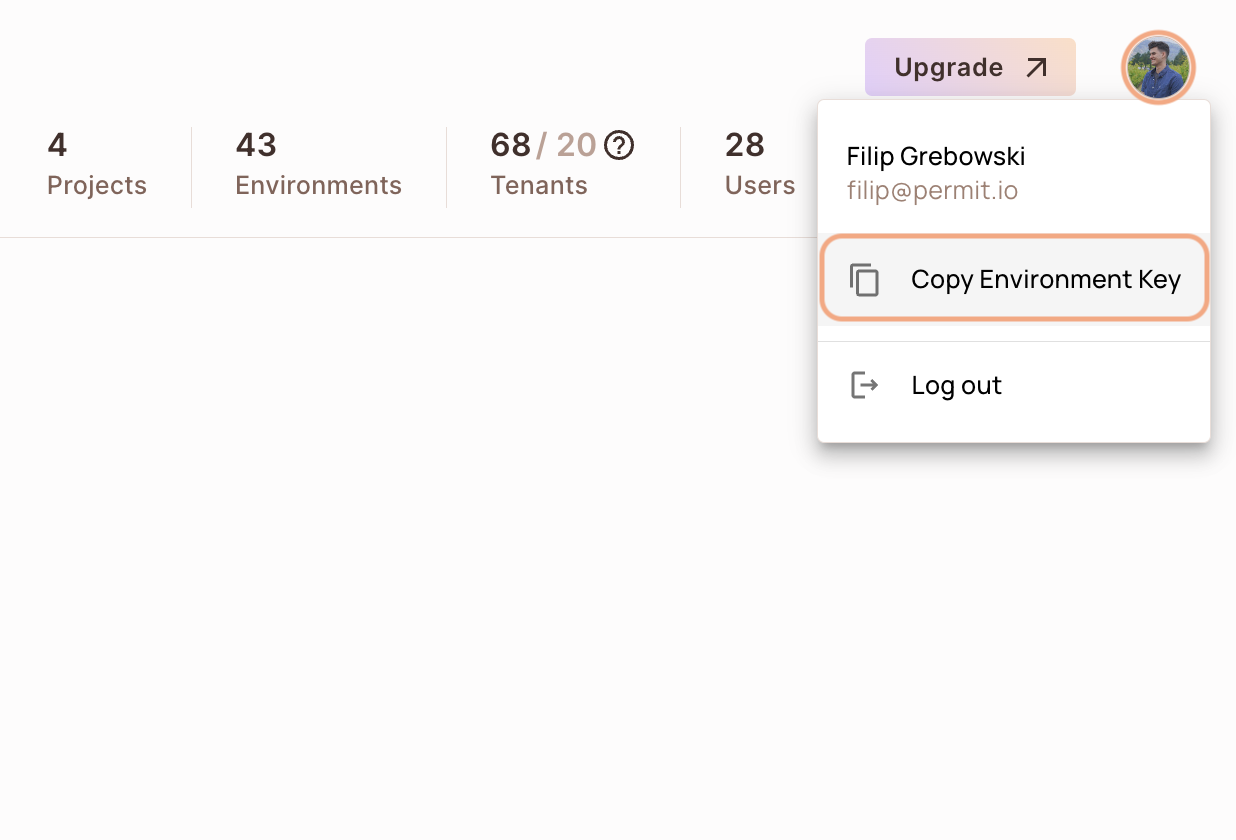
The API key you copy from the user menu belongs to the active environment in the sidebar. If you switch the active environment and click Copy Environment Key again, you copy a different API key: the key of the newly active environment.
2. Setup your PDP (Policy Decision Point) Container
Your application sends permission checks to a policy decision point (PDP), the microservice that evaluates your policy. Run the PDP as a Docker container, or use the managed Cloud PDP that Permit.io runs for you.
- Cloud PDP
- Container PDP
To use the Cloud PDP, pass the Cloud PDP URL when you initialize the Permit SDK.
Cloud PDP is a managed, production-ready service that Permit.io runs for you. It supports RBAC and ReBAC authorization models, but does not support ABAC.
For more details on capabilities, limits, and when to use Cloud PDP vs. a container PDP, see Cloud PDP Capabilities.
// This line initializes the SDK and connects your app
// to the Permit.io Cloud PDP.

const permit = new Permit({
  pdp: "https://cloudpdp.api.permit.io",
  // your API Key
  token: "[YOUR_API_KEY]",
});
Follow these steps to install and run the PDP container on your machine.
1. Pull our PDP container from Docker Hub
If you don't have Docker yet, install Docker first.
docker pull permitio/pdp-v2:latest
2. Run the container
Replace <YOUR_API_KEY> with the API key you copied in the previous step.
docker run -it -p 7766:7000 --env PDP_DEBUG=True --env PDP_API_KEY=<YOUR_API_KEY> permitio/pdp-v2:latest
Your PDP container is running. To check its status, run docker ps in your terminal.
Next, add the Permit SDK to your app or use the demo example below.
Select your language
 NodeJS
 Python (sync)
- Python (asyncio)
 Java
Java Golang
 Ruby
Ruby .Net
.Net
Add the SDK to your JS code
Initialise the Node.js SDK and check for permissions.
- Install the Permit.io SDK
npm install permitio
- Import the SDK into your code
- Import
- Require
import { Permit } from "permitio";
const { Permit } = require("permitio");
- Create a new instance of the SDK.
You can find instructions on getting a secret API key in the previous section.
// This line initializes the SDK and connects your Node.js app
// to the Permit.io PDP container you've set up in the previous step.
const permit = new Permit({
  // your API Key
  token: "[YOUR_API_KEY]",
  // in production, you might need to change this url to fit your deployment
  pdp: "http://localhost:7766",
  // if you want the SDK to emit logs, uncomment this:
  // log: {
  //   level: "debug",
  // },
  // The SDK returns false if you get a timeout / network error
  // if you want it to throw an error instead, and let you handle this, uncomment this:
  // throwOnError: true,
});
Check for permissions using the SDK
You can run a permission check with permit.check(), passing in 3 arguments:
user: a unique string id that identifies the user doing the action. This is typically the user key.action: the action performed.resource: the resource (object) the action is performed on.
In the following example we are checking that a user with the unique id john@smith.com can create a document resource.
const permitted = await permit.check("john@permit.io", "create", "document");
if (permitted) {
  console.log("John is PERMITTED to create a document");
} else {
  console.log("John is NOT PERMITTED to create a document");
}
Usually instead of an email you'd use the unique identifier provided by your chosen authentication solution. You can also pass the entire decoded JWT, to include attributes about the user.
In cases where you are dealing with more than one tenant in your application, permit.check() can pass the tenant as part of the resource.
The tenant passed in needs to be either the tenant id or the tenant key.
You can use the list_tenants API to get the ids and keys set for your tenants.
tenant: a unique tenant id or tenant key that you have defined within Permit.
For example, if we want to check if john@permit.io can read documents that belong to the awesome_inc tenant:
const permitted = await permit.check(
  // the key of the user
  "john@permit.io",
  // the action
  "read",
  {
    type: "document",
    tenant: "awesome_inc",
  }
);
Check permissions against ABAC policies
Above we have checked for permissions against an RBAC policy - but what if we have an ABAC policy we want to run a permission check for? An ABAC policy is made up of User Sets and Resource Sets, which you can read more about here.
With ABAC we define conditions based on pre-configured attributes.
If we are running a permit.check() for an ABAC policy, we can attach just-in-time attributes to the user and the resource.
There attributes are merged (and override) user and resource attributes that were persisted to the permit API.
const permitted = await permit.check(
  // the user object
  {
    // the user key
    key: "check@permit.io",
    // just-in-time attributes on the user
    attributes: {
      location: "England",
      department: "Engineering",
    },
  },
  // the action the user is trying to do
  "action",
  // Resource
  {
    // the type of the resource (the resource key)
    type: "resource",
    // just-in-time attributes on the resource
    attributes: {
      hasApproval: "true",
    },
    // the tenant the resource belong to
    tenant: "tenant",
  }
);
Permission checks are being run against the PDP container that's running locally on your machine - offering minimal latency and without leaving your network.
This means that your user data never goes outside your system, keeping security high.
Full app example
Assuming a Node.js app made up of a single file, with the permitio and express modules installed.
const { Permit } = require("permitio");

const express = require("express");
const app = express();
const port = 4000;

// This line initializes the SDK and connects your Node.js app
// to the Permit.io PDP container you've set up in the previous step.
const permit = new Permit({
  // in production, you might need to change this url to fit your deployment
  pdp: "http://localhost:7766",
  // your secret API Key
  token: "[YOUR_API_KEY]",
});

// You can open http://localhost:4000 to invoke this http
// endpoint, and see the outcome of the permission check.
app.get("/", async (req, res) => {
  // Example user object
  // You would usually get the user from your authentication layer (e.g. Auth0, Cognito, etc) via a JWT token or a database.
  const user = {
    key: "[A_USER_ID]",
    firstName: "John",
    lastName: "Smith",
    email: "john@permit.io",
  };

  // check for permissions to a resource and action (in this example, create a document)
  const permitted = await permit.check(user.key, "create", "document");
  if (permitted) {
    res.status(200).send(`${user.firstName} ${user.lastName} is PERMITTED to create document!`);
  } else {
    res.status(403).send(`${user.firstName} ${user.lastName} is NOT PERMITTED to create document!`);
  }
});

app.listen(port, () => {
  console.log(`Example app listening at http://localhost:${port}`);
});
Add the SDK to your Python code
Initialise the Python SDK and check for permissions.
- Install the Permit.io SDK:
pip install permit
- Import the SDK into your code.
Notice that you need to import the classPermitfrompermit.syncto get the sync-python SDK.
from permit.sync import Permit
- Create a new instance of the SDK.
You can find instructions on getting a secret API key in the previous section.
# This line initializes the SDK and connects your python app
# to the Permit.io PDP container you've set up.
permit = Permit(
    # in production, you might need to change this url to fit your deployment
    pdp="http://localhost:7766",
    # your secret API KEY
    token="<your-api-key>",
)
Check for permissions using the SDK
You can run a permission check with permit.check(), passing in 3 arguments:
user_id: a unique string id that identifies the user doing the action.action: the action performed.resource: the resource (object) the action is performed on.
In the following example we are checking that a user with the unique id john@smith.com can create a document resource.
permitted = await permit.check("john@smith.com", "create", "document")

if permitted:
    print("John is permitted to create a document")
else:
    print("John is NOT PERMITTED to create document!")
Usually instead of an email you'd use the unique identifier provided by your chosen authentication solution. You can also pass the entire decoded JWT, to include attributes about the user.
In cases where you are dealing with more than one tenant in your application, permit.check() can pass the tenant as part of the resource.
The tenant passed in needs to be either the tenant id or the tenant key.
You can use the list_tenants API to get the ids and keys set for your tenants.
tenant: a unique tenant id or tenant key that you have defined within Permit.
permitted = await permit.check("userId", "action", { type: "resource", tenant: "tenant" })
Check permissions against ABAC policies
Above we have checked for permissions against an RBAC policy - but what if we have an ABAC policy we want to run a permission check for? An ABAC policy is made up of User Sets and Resource Sets, which you can read more about here.
With ABAC we define conditions based on pre-configured attributes.
If we are running a permit.check() for an ABAC policy, we replace the userId and the resource with objects, containing attributes.
permitted = await permit.check(
	# User Set
	{
		"userId": "check@permit.io",
		"attributes": {
			"location": "England",
			"department": "Engineering",
		},
	},
	# Action
	"action",
	# Resource Set
	{
		"type": "resource",
		"attributes": {
			"hasApproval": "true",
		},
		"tenant": "tenant",
	}
)
Permission checks are being run against the PDP container that's running locally on your machine - offering minimal latency and without leaving your network.
This means that your user data never goes outside your system, keeping security high.
Full app example
Assuming a Python app made up of a single file, with the permit and FastAPI modules installed.
Create a new directory for your new python project.
mkdir hello-permissions && cd hello-permissions
Optionally, create a new virtual environment for your project - you might need to install pyenv and virtualenv.
pyenv virtualenv permissions && pyenv activate permissions
Now install the Permit.io SDK. We will also install flask package.
pip install permit==1.0.0rc1 flask
Create a file called test.py.
touch test.py
Copy the following code inside test.py and replace with your API KEY and user-object.
You can find instructions on getting a secret API Key in the previous section.
import json

from permit.sync import Permit

from flask import Flask, Response

app = Flask(__name__)

# This line initializes the SDK and connects your python app
# to the Permit.io PDP container you've set up in the previous step.
permit = Permit(
    # in production, you might need to change this url to fit your deployment
    pdp="http://localhost:7766",
    # your API KEY
    token="[YOUR_API_KEY]",
)

def sync_objects():
    # first let's create a user:
    user = {
        "key": "john@smith.com",
        "firstName": "John",
        "lastName": "Smith",
        "email": "john@smith.com",
        "roles": [{"role":"admin", "tenant": "default"}]
    }
    permit.write(permit.api.sync_user(user))

    tenant2 = {
        "key": "tenant2",
        "name": "Second Tenant"
    }

    # create tenant 2 and assign role viewer to user john
    permit.write(
        permit.api.create_tenant(tenant2),
        permit.api.assign_role("john@smith.com", "viewer", "tenant2")
    )

sync_objects()

@app.route("/")
def check_permissions():
    # After we created this user in the previous step, we also synced the user's identifier
    # to permit.io servers with permit.write(permit.api.syncUser(user)). The user identifier
    # can be anything (email, db id, etc.) but must be unique for each user. Now that the
    # user is synced, we can use its identifier to check permissions with `permit.check()`.
    permitted = permit.check("john@smith.com", "retrieve", "task") # default tenant is used
    if not permitted:
        return Response(json.dumps({
            "result": f"John Smith is NOT PERMITTED to retrieve task!"
        }), status=403, mimetype='application/json')

    return Response(json.dumps({
            "result": f"John Smith is PERMITTED to retrieve task!"
        }), status=200, mimetype='application/json')

@app.route("/tenant2")
def check_permissions_tenant2():
    # After we created this user in the previous step, we also synced the user's identifier
    # to permit.io servers with permit.write(permit.api.syncUser(user)). The user identifier
    # can be anything (email, db id, etc.) but must be unique for each user. Now that the
    # user is synced, we can use its identifier to check permissions with `permit.check()`.
    permitted = permit.check("john@smith.com", "create", {"type": "task", "tenant": "tenant2"}) # tenant2 is used
    if not permitted:
        return Response(json.dumps({
            "result": f"John Smith is NOT PERMITTED to create task (tenant 2)!"
        }), status=403, mimetype='application/json')

    return Response(json.dumps({
            "result": f"John Smith is PERMITTED to create task (tenant 2)!"
        }), status=200, mimetype='application/json')
Now that your application is ready, let's run it!
FLASK_APP=test flask run --host=0.0.0.0
Finally, go to your applications localhost live deployment to see the outcome of the permission check.
Add the SDK to your Python code
Initialise the Python SDK and check for permissions.
- Install the Permit.io SDK
pip install permit
- Import the SDK into your code
from permit import Permit
- Create a new instance of the SDK. You can find instructions on getting a secret API key in the previous section.
# This line initializes the SDK and connects your python app
# to the Permit.io PDP container you've set up.
permit = Permit(
    # your secret API KEY
    token="<your-api-key>",

    # in production, you might need to change this url to fit your deployment
    # this is the address where you can find the PDP container.
    pdp="http://localhost:7766",

    # optional, the timeout in seconds for the request to the PDP container (supported from version 2.5.0)
    pdp_timeout=5,
    # optional, the timeout in seconds for the request to Permit cloud API (supported from version 2.5.0)
    api_timeout=5,
)
Check for permissions using the SDK
You can run a permission check with permit.check(), passing in 3 arguments:
user: a unique string id that identifies the user doing the action. This is typically the user key.action: the action performed.resource: the resource (object) the action is performed on.
In the following example we are checking that a user with the unique id john@smith.com can create a document resource.
permitted = await permit.check("john@smith.com", "create", "document")

if permitted:
    print("John is permitted to create a document")
else:
    print("John is NOT PERMITTED to create document!")
Usually instead of an email you'd use the unique identifier provided by your chosen authentication solution. You can also pass the entire decoded JWT, to include attributes about the user.
In cases where you are dealing with more than one tenant in your application, permit.check() can pass the tenant as part of the resource.
The tenant passed in needs to be either the tenant id or the tenant key.
You can use the list_tenants API to get the ids and keys set for your tenants.
tenant: a unique tenant id or tenant key that you have defined within Permit.
For example, if we want to check if john@permit.io can read documents that belong to the awesome_inc tenant:
permitted = await permit.check(
    # the key of the user
    "john@permit.io",
    # the action
    "read",
    # the resource (all resources of type document under the awesome_inc tenant)
    { "type": "document", "tenant": "awesome_inc" }
)
Check permissions against ABAC policies
Above we have checked for permissions against an RBAC policy - but what if we have an ABAC policy we want to run a permission check for? An ABAC policy is made up of User Sets and Resource Sets, which you can read more about here.
With ABAC we define conditions based on pre-configured attributes.
If we are running a permit.check() for an ABAC policy, we can attach just-in-time attributes to the user and the resource.
There attributes are merged (and override) user and resource attributes that were persisted to the permit API.
permitted = await permit.check(
	# the user object
	{
        # the user key
		"key": "check@permit.io",
        # just-in-time attributes on the user
		"attributes": {
			"location": "England",
			"department": "Engineering",
		},
	},
	# the action the user is trying to do
	"action",
	# Resource
	{
        # the type of the resource (the resource key)
		"type": "resource",
        # just-in-time attributes on the resource
		"attributes": {
			"hasApproval": "true",
		},
        # the tenant the resource belong to
		"tenant": "tenant",
	}
)
Permission checks are being run against the PDP container that's running locally on your machine - offering minimal latency and without leaving your network.
This means that your user data never goes outside your system, keeping security high.
Full app example
Assuming a Python app made up of a single file, with the permit and FastAPI modules installed.
Create a new directory for your new python project.
mkdir hello-permissions && cd hello-permissions
Optionally, create a new virtual environment for your project - you might need to install pyenv and virtualenv.
pyenv virtualenv permissions && pyenv activate permissions
Now install the Permit.io SDK. We will also install the FastAPI and Uvicorn packages in order to run an HTTP server in our example.
pip install permit fastapi "uvicorn[standard]"
Create a file called test.py.
touch test.py
Copy the following code inside test.py and replace with your API KEY and user-object.
You can find instructions on getting a secret API Key in the previous section.
import asyncio

from permit import Permit
from fastapi import FastAPI, status, HTTPException
from fastapi.responses import JSONResponse

app = FastAPI()

# This line initializes the SDK and connects your python app
# to the Permit.io PDP container you've set up in the previous step.
permit = Permit(
    # in production, you might need to change this url to fit your deployment
    pdp="http://localhost:7766",
    # your API KEY
    token="[YOUR_API_KEY]",
)

# This user was defined by you in the previous step and
# is already assigned with a role in the permission system.
user = {
    "key": "john@smith.com",
    "first_name": "John",
    "last_name": "Smith",
    "email": "john@smith.com",
} # in a real app, you would typically decode the user id from a JWT token

@app.get("/")
async def check_permissions():
    permitted = await permit.check("john@smith.com", "read", "document")
    if not permitted:
        raise HTTPException(status_code=status.HTTP_403_FORBIDDEN, detail={
            "result": f"{user.get('firstName')} {user.get('lastName')} is NOT PERMITTED to create document!"
        })

    return JSONResponse(status_code=status.HTTP_200_OK, content={
        "result": f"{user.get('firstName')} {user.get('lastName')} is PERMITTED to create document!"
    })
Now that your application is ready, let's run it! Go to your applications localhost live deployment to see the outcome of the permission check.
uvicorn test:app --reload --port=<YOUR_LOCALHOST_PORT_NUMBER>
Full app example
Example application using FastAPI,SQLAlchemy,PostgreSQL and the Permit.io SDK. https://github.com/permitio/permit-python-example
Features
- RBAC policy
- ABAC policy
- ReBAC policy
- Terraform setup
Add the SDK to your Java code
Initialise the Java SDK and check for permissions.
- Install the Permit.io SDK with:
- Maven
- Gradle
- Create a new instance of the SDK.
You can find instructions on getting a secret API key in the previous section.
import io.permit.sdk.Permit;
import io.permit.sdk.PermitConfig;

// This line initializes the SDK and connects your Java app
// to the Permit.io PDP container you've set up in the previous step.
Permit permit = new Permit(
    new PermitConfig.Builder("[YOUR_API_KEY]")
        // in production, you might need to change this url to fit your deployment
        .withPdpAddress("http://localhost:7766")
        // optionally, if you wish to get more debug messages to your log, set this to true
        .withDebugMode(false)
        .build()
    );
-
Sync the user to the permissions system
When the user first logins, and after you check if he authenticated successfully (i.e: by checking the JWT access token) - you need to declare the user in the permission system so you can run
permit.check()on that user.
import io.permit.sdk.api.models.CreateOrUpdateResult;
import io.permit.sdk.openapi.models.UserRead;
import io.permit.sdk.enforcement.User;

// optional - save the user attributes in permit so that they are
// automatically available as ABAC attributes in permit.check()
HashMap<String, Object> userAttributes = new HashMap<>();
userAttributes.put("age", Integer.valueOf(20));
userAttributes.put("subscription", "pro");

// Syncing the user to the permission system
CreateOrUpdateResult<UserRead> response = permit.api.users.sync(
  (new User.Builder("[A_UNIQUE_USER_ID]"))
    .withEmail("john@smith.com") // optional
    .withFirstName("John") // optional
    .withLastName("Smith") // optional
    .withAttributes(userAttributes) // optional, used for ABAC permission checks
    .build()
);

// assign the `admin` role to the user in the `default` tenant
permit.api.users.assignRole(user.key, "admin", "default");

// the response object contains the user, and whether or not the user was create or updated
UserRead user = response.getResult();
boolean wasCreated = response.wasCreated();
Check for permissions using the SDK
import io.permit.sdk.enforcement.Resource;
import io.permit.sdk.enforcement.User;

// to run a permission check, use permit.check()
boolean permitted = permit.check(
  // the user you check permission on
  User.fromString("[A_USER_ID]"),
  // the action (key) the user want to perform
  "create",
  // the resource the user is trying to access
  new Resource.Builder("document").withTenant("default").build()
);

if (permitted) {
  System.out.println("User is PERMITTED to create a document");
} else {
  System.out.println("User is NOT PERMITTED to create a document");
}
Usually for the user ID you'd use the unique identifier provided by your chosen authentication solution. You can also pass the entire decoded JWT, to include attributes about the user.
In cases where you are dealing with more than one tenant in your application, permit.check() can pass the tenant as part of the resource.
The tenant passed in needs to be either the tenant id or the tenant key.
You can use the list_tenants API to get the ids and keys set for your tenants.
tenant: a unique tenant id or tenant key that you have defined within Permit.
Check permissions against ABAC policies
Above we have checked for permissions against an RBAC policy - but what if we have an ABAC policy we want to run a permission check for? An ABAC policy is made up of User Sets and Resource Sets, which you can read more about here.
With ABAC we define conditions based on pre-configured attributes.
If we are running a permit.check() for an ABAC policy, we replace the userId and the resource with objects, containing attributes.
// Creating a UserSet
HashMap<String, Object> userAttributes = new HashMap<>();
userAttributes.put("isAllowed", "True");

User userWithAttributes = (new User.Builder("John"))
	.withEmail("John@smith.com")
	.withFirstName("John")
	.withLastName("Smith")
	.withAttributes(userAttributes)
	.build();

// Creating a ResourceSet
Resource resourceWithAttributes = new Resource.Builder("resource").withTenant(tenant.key).withAttributes(resourceAttributes).build()

// Checking the permissions
permit.check(userWithAttributes, "action", resourceWithAttributes);
Permission checks are being run against the PDP container that's running locally on your machine - offering minimal latency and without leaving your network.
This means that your user data never goes outside your system, keeping security high.
Full app example
Assuming a Spring Boot app made up of a single file, with the SDK installed.
package com.example.myproject;

import io.permit.sdk.Permit;
import io.permit.sdk.PermitConfig;
import io.permit.sdk.api.PermitApiError;
import io.permit.sdk.api.PermitContextError;
import io.permit.sdk.enforcement.Resource;
import io.permit.sdk.enforcement.User;
import io.permit.sdk.openapi.models.UserCreate;
import io.permit.sdk.openapi.models.UserRead;
import org.springframework.boot.SpringApplication;
import org.springframework.boot.autoconfigure.SpringBootApplication;
import org.springframework.http.HttpStatus;
import org.springframework.http.ResponseEntity;
import org.springframework.web.bind.annotation.GetMapping;
import org.springframework.web.bind.annotation.RestController;

import java.io.IOException;

@RestController
@SpringBootApplication
public class DemoApplication {

	final Permit permit;
	final UserRead user;

	public DemoApplication() {
		// init the permit SDK
		this.permit = new Permit(
			new PermitConfig.Builder("[YOUR_API_KEY]")
				.withPdpAddress("http://localhost:7766")
				.withApiUrl("https://api.stg.permit.io")
				.withDebugMode(true)
				.build()
		);

		try {
			// typically you would sync a user to the permission system
			// and assign an initial role when the user signs up to the system
			this.user = permit.api.users.sync(
				// the user "key" is any id that identifies the user uniquely
				// but is typically taken straight from the user JWT `sub` claim
				new UserCreate("[A_USER_ID]")
					.withEmail("user@example.com")
					.withFirstName("Joe")
					.withLastName("Doe")
			).getResult();

			// assign the `admin` role to the user in the `default` tenant
			permit.api.users.assignRole(user.key, "admin", "default");
		} catch (IOException | PermitApiError | PermitContextError e) {
			throw new RuntimeException(e);
		}
	}

	@GetMapping("/")
	ResponseEntity<String> home() throws IOException, PermitApiError, PermitContextError {
		// is `user` allowed to do `action` on `resource`?
		User user = User.fromString("[A_USER_ID]"); // pass the user key to init a user from string
		String action = "create";
		Resource resource = new Resource.Builder("document")
			.withTenant("default")
			.build();

		// to run a permission check, use permit.check()
		boolean permitted = permit.check(user, action, resource);

		if (permitted) {
			return ResponseEntity.status(HttpStatus.OK).body(
				"Joe Doe is PERMITTED to create document!"
			);
		} else {
			return ResponseEntity.status(HttpStatus.FORBIDDEN).body(
				"Joe Doe is NOT PERMITTED to create document!"
			);
		}
	}

	public static void main(String[] args) {
		SpringApplication.run(DemoApplication.class, args);
	}
}
Full app example
Example application using Spring framework and the Permit.io SDK. https://github.com/permitio/permit-java-example
Features
- RBAC policy
- ABAC policy
- ReBAC policy
- Terraform setup
Add the SDK to your Golang code
Initialise the Golang SDK and check for permissions.
- Install the Permit.io SDK for Golang
go get github.com/permitio/permit-golang
- Import the SDK into your code
import "github.com/permitio/permit-golang/pkg/permit"
- Create a new instance of the SDK.
You can find instructions on getting a secret API key in the previous section.
package main

import "github.com/permitio/permit-golang/pkg/permit"
import "github.com/permitio/permit-golang/pkg/config"

func main() {
	PermitConfig := config.NewConfigBuilder("<YOUR_API_TOKEN>").Build()
	Permit := permit.New(PermitConfig)
}
Check for permissions using the SDK
You can run a permission check with permit.check(). You need to pass 3 arguments to the function:
User: a unique user that identifies the user doing the action - this can be created usingmodels.NewUserCreate("user_key")action: the action performed, as string.resource: the resource the action is performed on - this can be created usingmodels.NewResourceCreate("resource_key")
In the following example we are checking that a user with the unique id john@permit.io can create a document resource.
package main

import "github.com/permitio/permit-golang/pkg/permit"
import "github.com/permitio/permit-golang/pkg/config"
import "github.com/permitio/permit-golang/pkg/enforcement"

func main() {
	PermitConfig := config.NewConfigBuilder("<YOUR_API_TOKEN>").Build()
	Permit := permit.New(PermitConfig)

	user := enforcement.UserBuilder("john@doe.com").Build()
	resource := enforcement.ResourceBuilder("document").Build()
	permitted, err := Permit.Check(user, "create", resource)
	if err != nil {
		return
	}
	if permitted {
		// Let the user read the resource
	} else {
		// Deny access
	}
}
Usually instead of an email you'd use the unique identifier provided by your chosen authentication solution. You can also pass the entire decoded JWT, to include attributes about the user.
In cases where you are dealing with more than one tenant in your application, Permit.Check() can pass the tenant as part of the resource.
The tenant passed in needs to be either the tenant id or the tenant key.
You can use the list_tenants API to get the ids and keys set for your tenants.
tenant: a unique tenant id or tenant key that you have defined within Permit.
	resource := enforcement.ResourceBuilder("document").WithTenant("tenant").Build()
    const permitted = await permit.check(user, "create", resource);
Check permissions against ABAC policies
Above we have checked for permissions against an RBAC policy - but what if we have an ABAC policy we want to run a permission check for? An ABAC policy is made up of User Sets and Resource Sets, which you can read more about here.
With ABAC we define conditions based on pre-configured attributes.
If we are running a permit.check() for an ABAC policy, we replace the userId and the resource with objects, containing attributes.
userCheck := enforcement.UserBuilder("userKey").Build()
attributes := map[string]string{
	"hasApproval": "true",
}
resourceCheck := enforcement.ResourceBuilder("resourceKey").WithTenant("default").WithAttributes(attributes).Build()
allowed, _ := permitClient.Check(userCheck, "create", resourceCheck)
Permission checks are being run against the PDP container that's running locally on your machine - offering minimal latency and without leaving your network.
This means that your user data never goes outside your system, keeping security high.
Full app example
Assuming a Node.js app made up of a single file, with the permitio and express modules installed.
package main

import (
	"fmt"
	"go.uber.org/zap"
	"net/http"

	"github.com/permitio/permit-golang/pkg/config"
	"github.com/permitio/permit-golang/pkg/enforcement"
	"github.com/permitio/permit-golang/pkg/permit"
)

const (
	port = 4000
)

func main() {
	// This line initializes the SDK and connects your Go app
	// to the Permit.io PDP container (you've set in the previous step), with the API key provided.
	permitClient := permit.NewPermit(
		// Building new config for Permit client
		config.NewConfigBuilder(
			// your api key
			"<YOUR_API_KEY>").
			// Set the PDP URL
			WithLogger(zap.NewExample()).
			WithPdpUrl("http://localhost:7766").
			Build(),
	)

	// You can open http://localhost:4000 to invoke this http
	// endpoint, and see the outcome of the permission check.
	http.HandleFunc("/", func(w http.ResponseWriter, r *http.Request) {
		// This user was defined by you in the previous step and
		// is already assigned with a role in the permission system.
		user := enforcement.UserBuilder("user_id").
			WithFirstName("john").
			WithLastName("doe").
			WithEmail("jown@doe.com").
			Build()

		// This resource was defined by you in the previous step
		// and is already has actions assigned in the permission system.
		resource := enforcement.ResourceBuilder("document").Build()

		// After we created this user in the previous step, we also synced the user's identifier
		// to permit.io servers with permitClient.syncUser(user)).
		// The user identifier can be anything (email, db id, etc) but must be unique for each user.
		// Now that the user is synced, we can use its identifier to check permissions with `permit.check()`.
		permitted, err := permitClient.Check(user, "read", resource)
		if err != nil {
			fmt.Println(err)
			return
		}
		if permitted {
			w.WriteHeader(http.StatusOK)
			_, err = w.Write([]byte(user.FirstName + " " + user.LastName + " is PERMITTED to read document!"))
		} else {
			w.WriteHeader(http.StatusForbidden)
			_, err = w.Write([]byte(fmt.Sprintf(user.FirstName + " " + user.LastName + " is NOT PERMITTED to read document!")))
		}
	})
	fmt.Printf("Listening on http://localhost:%d", port)
	http.ListenAndServe(fmt.Sprintf(":%d", port), nil)
}
Full app example (includes ABAC RBAC and terraform )
Add the SDK to your Ruby code
Initialise the Ruby SDK and check for permissions.
- Install the Permit.io SDK for Ruby
gem install permit-sdk
- Import the SDK into your code
require 'permit-sdk'
- Create a new instance of the SDK.
You can find instructions on getting a secret API key in the previous section.
require 'permit-sdk'
permit = Permit.new("TOKEN", "localhost:7766") # the PDP url is optional
Check for permissions using the SDK
You can run a permission check with permit.check(). You need to pass 3 arguments to the function:
user: a unique user that identifies the user doing the action - this can be created using hash or a string.action: the action performed, as string.resource: the resource the action is performed on - this can be created using a hash or a string.
In the following examples we are checking that a user with the unique key john@permit.io can create a document resource.
Here is an example using strings:
require 'permit-sdk'
permit = Permit.new("TOKEN", "localhost:7766") # the PDP url is optional

permitted = permit.check("john@permit.io", "create" , "document")
if permitted
  puts "john@permit.io is permitted to create a document"
else
  puts "john@permit.io is not permitted to create a document"
end
And here is an example using Hash objects:
require 'permit-sdk'
permit = Permit.new("TOKEN", "localhost:7766") # the PDP url is optional

user_hash = {"key": "john@permit.io", "first_name": "john", "last_name": "doe", "email": "john@permit.io"}
resource_hash = {"type": "document", "tenant": "default"}
permitted = permit.check(user_hash, "create" , resource_hash)
if permitted
  puts "john@permit.io is permitted to create a document"
else
  puts "john@permit.io is not permitted to create a document"
end
Usually instead of an email you'd use the unique identifier provided by your chosen authentication solution. You can also pass the entire decoded JWT, to include attributes about the user.
In cases where you are dealing with more than one tenant in your application, Permit.check() can pass the tenant as part of the resource like we showed before in the Hash objects example.
The tenant passed in needs to be either the tenant id or the tenant key.
You can use the list_tenants API to get the ids and keys set for your tenants.
tenant: a unique tenant id or tenant key that you have defined within Permit.
if permit.check("user", "action", { "key": "resource", "tenant": "tenant" })
  # Allow to close document
end
Check permissions against ABAC policies
Above we have checked for permissions against an RBAC policy - but what if we have an ABAC policy we want to run a permission check for? An ABAC policy is made up of User Sets and Resource Sets, which you can read more about here.
With ABAC we define conditions based on pre-configured attributes.
If we are running a permit.check() for an ABAC policy, we replace the userId and the resource with objects, containing attributes.
if permit.check(user, 'close', { "key": "resource", "attributes": {"hasApproval": "true"} })
  # Allow to close document
end
Permission checks are being run against the PDP container that's running locally on your machine - offering minimal latency and without leaving your network.
This means that your user data never goes outside your system, keeping security high.
Full app example
Assuming a Ruby app made up of a single file, with the permit-sdk and webrick gem packages installed with the following command :
gem install permit-sdk webrick
Here is a full example of a Ruby app that uses the Permit.io SDK to check for permissions:
require 'webrick'
require 'permit-sdk'

permit = Permit.new("<YOUR_API_KEY>")

server = WEBrick::HTTPServer.new(Port: 4000)

server.mount_proc '/' do |_, res|
  res['Content-Type'] = 'application/json'

  permitted = permit.check("user@mail.com", "read", "document")
  if permitted
    res.status = 200
    res.body = { result: "user@mail.com is PERMITTED to read document!" }.to_json
    next
  end
  res.status = 403
  res.body = { result: "user@mail.com is NOT PERMITTED to read document" }.to_json
end

trap 'INT' do server.shutdown end

server.start
Add the SDK to your .NET code
We are now ready to init the .NET SDK and check for permissions.
- Create a new directory with an empty .NET project inside (we use HttpListener to demonstrate a REST API).
mkdir hello-permissions-dotnet && cd hello-permissions-dotnet && dotnet new console
-
Install the Permit.io SDK
dotnet add package Permit -
Import the SDK into your code
using PermitSDK;using PermitSDK.Models; -
Create a new instance of the SDK.
You can find instructions on getting a secret API key in the previous section.// This line initializes the SDK and connects your .NET app// to the Permit.io PDP container you've set up in the previous step.Permit permit = new Permit("[YOUR_API_KEY]","http://localhost:7766");-
You can also set more config options when initializing the SDK.
// you can also set more config optionsPermit permitClient = new Permit(// the API key to usetoken: "[YOUR_API_KEY]",// the URL of the Permit.io PDP containerpdp: "http://localhost:7766",// the tenant to use if the tenant is not provideddefaultTenant: "default",// whether to use the default tenant if the tenant is not provideduseDefaultTenantIfEmpty: true,// should run in debug modedebugMode: true,// set the log levellevel: "info",// set the log labellabel: "Permitio-sdk",// should log as JSONlogAsJson: false,// the URL of the API (relevant for EU customers)apiURL: "https://api.eu-central-1.permit.io",// should raise errors (instead of the default behavior of returning false for network errors in permit checks)raiseErrors: false,// Optional: manual set the environment_id and project_id for the SDK client (to avoid `scope` api call)envId: "[YOUR_ENVIRONMENT_ID]",projectId: "[YOUR_PROJECT_ID]");
-
Check for permissions using the SDK
bool permitted = await permit.Check(user.key, "create", "document");
if (permitted)
{
Console.Write("User is PERMITTED to create a document");
}
else
{
Console.Write("User is NOT PERMITTED to create a document");
}
Usually for the user ID you'd use the unique identifier provided by your chosen authentication solution. You can also pass the entire decoded JWT, to include attributes about the user.
In cases where you are dealing with more than one tenant in your application, permit.check() can pass the tenant as part of the resource.
The tenant passed in needs to be either the tenant id or the tenant key.
You can use the list_tenants API to get the ids and keys set for your tenants.
tenant: a unique tenant id or tenant key that you have defined within Permit.
Check permissions against ABAC policies
Above we have checked for permissions against an RBAC policy - but what if we have an ABAC policy we want to run a permission check for? An ABAC policy is made up of User Sets and Resource Sets, which you can read more about here.
With ABAC we define conditions based on pre-configured attributes.
If we are running a permit.check() for an ABAC policy, we replace the userId and the resource with objects, containing attributes.
UserKey user = new UserKey("userId", "John", "Smith", "john@smith.com");
var resourceInput = new ResourceInput(
"resource",
tenant: "tenant",
attributes: new Dictionary<string, string>
{
{"hasApproval", "True"}
}
);
bool permitted = await permit.Check(user, "action", resourceInput);
Permission checks are being run against the PDP container that's running locally on your machine - offering minimal latency and without leaving your network.
This means that your user data never goes outside your system, keeping security high.
Full app example
Assuming a .NET app made up of a single file, with the Permit modules installed.
using System;
using System.Text;
using System.Net;
using System.Threading.Tasks;
using PermitSDK;
using PermitSDK.Models;
namespace PermitOnboardingApp
{
class HttpServer
{
public static HttpListener listener;
public static string url = "http://localhost:4000/";
public static string pageData ="<p>User {0} is {1} to {2} {3}</p>";
public static async Task HandleIncomingConnections()
{
bool runServer = true;
while (runServer)
{
HttpListenerContext ctx = await listener.GetContextAsync();
HttpListenerResponse resp = ctx.Response;
// in a real app, you would typically decode the user id from a JWT token
UserKey user = new UserKey("userId", "John", "Smith", "john@permit.io");
// init Permit SDK
string clientToken = "[YOUR_API_KEY]";
Permit permit = new Permit(
clientToken,
"http://localhost:7766",
"default",
true
);
// After we created this user in the previous step, we also synced the user's identifier
// to permit.io servers with permit.write(permit.api.syncUser(user)). The user identifier
// can be anything (email, db id, etc) but must be unique for each user. Now that the
// user is synced, we can use its identifier to check permissions with `permit.check()`.
bool permitted = await permit.Check(user.key, "create", "task");
if (permitted)
{
await SendResponseAsync(resp, 200, String.Format(pageData, user.firstName + user.lastName, "Permitted", "create", "task"));
}
else
{
await SendResponseAsync(resp, 403, String.Format(pageData, user.firstName + user.lastName, "NOT Permitted", "create", "task"));
}
}
}
public static async Task SendResponseAsync(HttpListenerResponse resp, int returnCode, string responseContent)
{
byte[] data = Encoding.UTF8.GetBytes(responseContent);
resp.StatusCode = returnCode;
await resp.OutputStream.WriteAsync(data, 0, data.Length);
resp.Close();
}
public static void Main(string[] args)
{
// Create a Http server and start listening for incoming connections
listener = new HttpListener();
listener.Prefixes.Add(url);
listener.Start();
Console.WriteLine("Listening for connections on {0}", url);
Task listenTask = HandleIncomingConnections();
listenTask.GetAwaiter().GetResult();
listener.Close();
}
}
}
Now that your application is ready, let's run it:
dotnet run
Finally, go to http://localhost:4000 to see the outcome of the permission check.
Navigate to the Audit log page to see your permissions request results.
Don't see logs? Use the troubleshooting page to find reasons why.